The Old School Dungeon – Review, Siting the Underworld in a Wilderness, and Keeping Things Fresh
Review
There is no substitute for setting something aside and then coming back to it later on, if you can. It is usually easier to find problems after a break. What we are really looking for at this point are omissions and errors rather than a re-write. All we need do is give our maps a second look and somewhat carefully read the map keys. This doesn’t necessarily mean every loose end has to be neatly tied. A review may raise questions which you may simply wish to leave unresolved until a later time.
I’ll make a list of the things that stick out to me after reading:
- On Level 1 we have a special wandering monster table for the Shrieker. It attracts Kobolds but we need an alternative monster. The Kobolds in the dungeon which would be attracted by the sound of the Shrieker may leave or be slain.
- On Level 1 in map key 8 I proposed that Thrax, the leader of the Acolytes of Pestilence, is following the instructions of a higher up in the cult. What is the cult’s plot? What are they planning to do with the plague-ridden Zombie? What is their relationship to Devious Ingrate now that the patriarch is dead? What is the Evil Entity that the cult worships and derives its clerical power from?
- Thrax has instructions from Contagion the Patriarch of the Acolytes of Pestilence to obtain the coffin and take it to the Keep on the Borderlands without anyone interfering. They will try to smuggle the coffin containing the Zombie into the Keep, no easy feat. The plot is to spread the plague there. The Acolytes consider the former Patriarch Devious Ingrate a failure and an abomination. They have no loyalty to it. Devious Ingrate worshipped a tentacled bat-like entity rather than Chaos.
- On Level 1 in map key 17 I proposed that the niche for the sword does something when the sword is replaced. What could that be?
- We’ll say the sword Skullthrasher from Level 2 Map Key 4 activates this niche and it will then turn other swords into magic swords. You can limit the number of times this works.
- On Level 2 in map key 15 we need to update the text which refers to pillar 1 to pillar c of Level 3 map key 7.
- On Level 3, in map key 10, we refer to a magical stone, marked with the Cyrillic character Й, which we are using as a magical symbol. It was hidden, but we’ll propose it ends up in the wall of the inn as our mysterious stone. What does it do?
- We’ll modify the story a little, and have the stone thrown into the river by the inn, which is how it was eventually found and added to the building.
- We need to site the Crossroads Inn, and our Underworld, in a larger wilderness so we do not have to rely on theatre of the mind.
- We’ll site the inn within Bree Yark’s Project on the Borderlands.
- Anything else we might find along the way we’ll make note of and address as we go even if our decision will be to set it aside for later.
A Wilderness Setting
In true mad fashion I’ll begin with a tangent. At this point we have our recommended three level dungeon, prepared in advance. What we do not have is a wilderness setting containing the village or other refuge to which the Player Characters retreat to in order to heal, purchase food, sell and purchase items, and collect their XP. We only have our theatre-of-the-mind.
It is a very common practice to drop an underworld into an existing setting. So, we will add this Underworld of ours to the eponymous Keep on the Borderlands B2 Wilderness Setting; specifically the Bree Yark expansion of B2, The Project On The Borderlands.
Some years ago Erin Smale and I began this project from the idea that we had both enjoyed B2 so much it deserved expanding. Erin had already written a few articles and I created the following map in Hexographer which locates the Keep in an expanded wilderness. The scale of Gygax’s map was very small so the Keep occupies a single hex in our map. Each “Atlas” hex is 25 miles; per Erin Smale’s system of mapping.
B2 comes with its own thematic content and underworld but we will site our underworld in our expansion. We will connect the entries in our Underworld to entries in the Project On The Borderlands Wilderness.

Where are the Player Characters From?
B2 helps us answer many questions. In The Keep on the Borderlands the topic Background on page 6 informs that the Player Characters are from “The Realm” and we can assume (from the nature of the game) that they have journeyed to the Borderlands in search of adventure and riches. B2’s Keep is an outpost of The Realm in a hostile wilderness. The Castellan does not rule the Borderlands! To quote Gary Gygax on page 12 of KOTB, beyond the keep is a “forsaken wilderness beyond the ken of Law.” We should really amend this to “beyond the walls of the keep is a forsaken wilderness”.
The Castellan does not control the territory around B2’s Keep in the same way as if it were the castle of a character, per the rules on page X52. The land around the Keep has not been “cleared”. The land around a castle is meant to be patrolled up to 18 miles distant to keep it clear. However, back in the day it was a very common practice to conveniently insert dungeons directly under or near to cities, towns, castles, etc. This juxtaposition was widely used regardless of its plausibility. The proximity of the underworld is a necessary convenience. Furthermore, it is assumed from the outset that every character in B2 knows about the existence of the Caves of Chaos including the Player Characters!
If the Player Characters need more back story than what is provided in B2 the Players may invent it for themselves, or you may help create it with them. The idea behind a backstory is to help a Player understand their imaginary fantasy Character in order to help them role-play it. That’s why it is better if the players invent it for themselves; they invest in the the story. Keep it vague. For example, the Characters should not be rich noblemen, but nobody’s of humble orphans, the illegitimate, street urchins, outlaws, wanderers, exiles, and even barbarians. In other words they should really be adventurers with little to lose; seeking their fortunes in a wider world. They have formed a band of friends, loyal to each other, to share in their adventures. Cooperative effort is a key concept essential to surviving the dangers of both underworld and wilderness adventures.
The Player Characters will have learned of our underworld below a ruin containing as yet un-plundered riches located to the east and so made the journey to undiscovered country in search of it. They may begin their adventure as we proposed, at the entrance to the underworld, or at the inn and then make the short journey into the wilderness to seek it out. They will have a map, drawn on cloth or parchment showing the immediate area and the location of the inn and underworld. Their few first trips out and back should be uneventful and without wilderness encounters otherwise they may not live to enter the underworld and return to the safety of the inn. Nonetheless they should still get in the habit of setting a watch.
Locating the Inn and Underworld
I refer you to the Map East of the Realm as the Crow Flies, Grid 4C, hex 19010. We will change the location of our imaginary Inn from a crossroad to the easternmost side of the river where the road crosses. The Inn is located in what is a dismal marsh, a lonely location which, inexplicably, fills me with joy. We will locate “The Hole”, as the innkeeper has named our Underworld/Dungeon, a little further east down the Bordermen’s Road in hex 21010.
At this point you will really need “Expert rules” for Wilderness, Cook/Marsh, Mentzer, etc. You need to understand how exploration, movement, and encounters in the wilderness work.
I’ll paraphrase the rules a little. Each hex of our map is 25 miles, so (including our current hex) our Underworld is three hexes away, 75 miles, a journey of a little under 3 days for characters carrying up to 60 lbs (75 miles / 27 mi per day on a Good Road = 2.7 days and we’ll round up).
Note: We’ll propose that the road east from the Keep is a “good road” until it suddenly ends in the marsh at hex 30010 far to the east. In the following Project on the Borderlands map the road resumes and becomes the lost road which is subsequently swallowed up by the desert.
In order to find the basic distance a character can travel in Clear Wilderness per day we must divide their movement rate by 5, so an encumbered character who can move 60’ per turn can travel 12 miles per day. A force-march grants an additional 50%, so 18 miles. Refer to Cook/Marsh Expert page X20.
| Player Character Carry | Move | Clear Wilderness Move | Clear Wilderness Force March |
| 40lb | 120/40’ | 24 mi | 36 mi |
| 60lb | 90/30’ | 18 mi | 27 mi |
| 80lb | 60/20’ | 12 mi | 18 mi |
| 160lb | 30/10’ | 6 mi | 9 mi |
Using Mules, to shift the burden of encumbrance, allows maximum movement, 24 miles.
| Mule Carry | Move | Clear Wilderness Move | Clear Wilderness Force March |
| 200 lb | 120/40’ | 24 mi | 36 mi |
| 400 lb | 60/20’ | 12 mi | 18 mi |
Note: It is no coincidence that the hex typically used for mapping is at a scale of 24 miles as the base move for a lightly encumbered character in Clear Wilderness hex is 24 miles. However, mapping using a 25 mile scale hex is friendly to map enlargement and reduction. I refer you to welshpiper.com/hex-based-campaign-design-part-1
With the base movement for Clear Wilderness established it is then modified by the type of wilderness terrain entered, refer to Cook Marsh Expert Part 3 Adventures in the Wilderness, page X41. I have done the math for you and the following tables remove the necessity of performing ad hoc calculations. Force Marches are +1/2 the stated movement rates below.
| Player Character Carry | Move | Hills | Jungle | Mountain | Good Road | Swamp | Trail |
| 40 lb | 120/40’ | 16 mi | 12 mi | 12 mi | 36 mi | 12 mi | 24 mi |
| 60 lb | 90/30’ | 12 mi | 9 mi | 9 mi | 27 mi | 9 mi | 18 mi |
| 80 lb | 60/20’ | 8 mi | 6 mi | 6 mi | 19 mi | 6 mi | 12 mi |
| 160 lb | 30/10’ | 4 mi | 2 mi | 2 mi | 9 mi | 2 mi | 6 mi |
| Player Character Carry | Move | Broken | City | Clear (Normal Movement) | Desert | Forest | Grasslands |
| 40 lb | 120/40’ | 16 mi | 24 mi | 24 mi | 16 mi | 16 mi | 24 mi |
| 60 lb | 90/30’ | 12 mi | 18 mi | 18 mi | 12 mi | 12 mi | 18 mi |
| 80 lb | 60/20’ | 8 mi | 12 mi | 12 mi | 8 mi | 8 mi | 12 mi |
| 160 lb | 30/10’ | 4 mi | 6 mi | 6 mi | 4 mi | 4 mi | 6 mi |
| Mule Carry | Move | Broken | City | Clear (Normal Movement) | Desert | Forest | Grasslands |
| 200 lb | 120/40’ | 16 mi | 24 mi | 24 mi | 16 mi | 16 mi | 24 mi |
| 400 lb | 60/20’ | 8 mi | 12 mi | 12 mi | 8 mi | 8 mi | 12 mi |
| Mule Carry | Move | Hills | Jungle | Mountain | Good Road | Swamp | Trail |
| 200 lb | 120/40’ | 16 mi | 12 mi | 12 mi | 36 mi | 12 mi | 24 mi |
| 400 lb | 60/20’ | 8 mi | 6 mi | 6 mi | 19 mi | 6 mi | 12 mi |
Note: a day after a forced march must always be spent resting and not adventuring in the Underworld.
Mapping the Wilderness
We do not need to be intimidated by wilderness exploration as it is the same idea as underworld exploration. We will propose that the Player Characters may obtain, or have obtained, a “players map” of the region East of the Realm as the Crow Flies. This should not reveal everything, merely a few hexes surrounding the road from the border of The Realm to our underworld, and nothing more!
The Player Characters can normally map only the wilderness hex through which they pass, but this may vary with terrain. For example from hills and mountains the they may be able to see further, use discretion. Players may be able to map 1 hex of terrain in every direction when they pass through a hex. As the characters move through hexes of wilderness they discover general terrain features such as forest, lakes, rivers, hills, and signs of civilization, castles, farms, roads, etc., but they do not learn details about the hex or its inhabitants unless they stop and spend time there. Refer to the Cook/Marsh Expert Rules.
Note: With regard to the observation of light in or beyond hexes at night, fires, torch, lamp, and magical light at night might be visible in the same hex and quite possibly in adjacent ones as seen from hilltops or in open terrain if you decide to allow it. Consider the scale of your hex, or sub-hexes. This wouldn’t necessarily reveal the terrain type!
Wilderness Encounters
The Player Characters must decide their marching order for wilderness travel just as they would in an underworld and they should organize guards for the night. Wilderness encounters are by terrain type rather than by level. This means that almost any monster can appear! The potential for an overwhelming monster encounter is very real and the Ref is instructed in Cook/Marsh Expert in the topic Wilderness Encounters on page X57, that the number of monsters appearing may be set by the Ref. This is still pretty scary! I can’t emphasize enough the importance of not ending the game prematurely to general player dis-satisfaction.
The Expert Rules provided us with simple black and white map symbols which are easy to draw but the text didn’t really discuss their use for mapping other than an exhortation to use common sense: Barren/Broken Land, Capital, Castle, Caves, City, Desert, Forest, Grassland/Steppe, Hills, Ice Flow, Jungle, Mountain, Ocean/Lake, River, Ruins, Swamp, Village, and Volcano. It also provided some symbols which are essentially contextual; that is they are used with base terrain: border, coral reef, paved road/road, plateau, river, tar pits, and trail/trade route.
Most maps, if not mapping tools, will include Marsh as a terrain type. What are we to do? Unhelpfully the text of the Expert Rules does not tell us what the encounters should be for the Marsh terrain type despite “marsh” being referred to in the text. We are limited to encounters for Aerial, Barren Lands, City, Clear, Desert, Grasslands, Hills, Inhabited, Jungle, Mountains, Ocean, River, Swamp, and Woods.
To cleave to the extant basic rules we will create a sub-table for the Marsh terrain type which then will list appropriate sub-sub-tables from the available categories: Animals, Dragons, Flyers, Humanoids, Insects, Men, Swimmers, Undead, and Unusual. We are not quite in the clear because some of these re-list the known terrain types and do not include Marsh.
What is the difference between a marsh and a swamp? A swamp is a wetland dominated by trees; featuring slow stagnant water. A marsh is a wetland dominated by plants; grasses and reeds are the most common plants. The commonality here is wetland, again the rules are unhelpful. The differences however are trees vs. grasses. The choice seems obvious, to equate Marsh to Grassland both for the chance of an encounter and where further classification is required on a sub-sub-table.
Note – The rules do not provide contextual encounters for the roads and trails that pass through terrain so we’ll add Men and Humanoids twice to our prospective table as they will obviously frequent the road through our Marsh wilderness, this equates to 25%, 2/8 x 100 = 25.
| DIE ROLL | MARSH |
| 1 | Animal (sub-table Clear, Grassland) |
| 2 | Humanoid (sub-table Clear, Grassland) |
| 3 | Humanoid (sub-table Clear, Grassland) |
| 4 | Men (sub-table Clear, Grassland) |
| 5 | Men (sub-table Clear, Grassland) |
| 6 | Insects |
| 7 | Undead |
| 8 | Flyers (sub-table All Others, has 2 columns) |
To check for an encounter we’ll treat Marsh the same as if it were “Clear, Grassland” and that means once per day we make a check for a “wandering monster” encounter. We roll 1d6 and if the result is a 6 an encounter is indicated. We then roll 1d8 to determine the encounter sub-table. We then roll on the sub-table to determine the type of monster encountered but the results can be pretty scary! The rules have told us to amend our results. Therefore, in keeping with an introductory adventure the monster chosen should probably not have more hit dice than the kind of monsters that we might expect to find on levels 1-3; moreover they should also appear in appropriate numbers.
Unlike the Underworld Wandering Monster Tables the Expert rules do not list the wilderness monster encounters by their hit dice, or provide any other information, so you will have to look them up.
For example: Each day we roll 1d6 for Clear, Grassland; a 6, indicates an encounter. We roll 1d8 on the Marsh table, the result is 2, Humanoid. We then consult the Humanoid sub-table on page X57 in the “Clear, Grassland” column of that table and roll 1d12, the result is 1, Bugbear. We then must consult the rules to determine the Hit Dice and Number Appearing of this monster. Refer to Moldvay page B32, and we find it is 3+1 Hit Dice with 2-8 (2d4) appearing. Now, we can temper this a bit depending on the Level of our players and how well they are doing in terms of playing the game. I would likely reduce the number appearing to one or two Bugbears at most as I would in a dungeon.
Let’s say we got a Flyer with significant Hit Dice, we might propose that such a creature be seen in flight in the distant sky but it takes little or no interest in the Player Characters; particularly if they do not draw attention to themselves. They should hide from it!
We can also treat introductory or special areas of the map as if they were dungeon levels. For example were we to group a number of hexes into a zone, and designate it a “Level 1 Zone”, we are providing ourselves guidance to ourselves to reduce the number of monsters encountered of greater than 1 Hit Die to one monster. In this way we can limit the hit dice of monsters just as we would for an underworld level. We could even go so far as to create custom maps and encounter tables for particular zones of wilderness just as we would for the levels of an underworld.
Note: by the way, one of the reasons I do like to quote Moldvay and Cook Expert is that these use B and X before the page numbers, there’s no question whether I am referring to the Basic or Expert rule books. References in BECMI are a bit more work.
The Temptation of Maps
No sooner does the Ref provide a complete map than players can develop an itch to explore it to the edge of the paper. Therefore, a practically blank player map is essential because:
- It does not contain all information,
- It requires exploration,
- Is there such a thing as accurate wilderness mapping? That is entirely your choice as the Ref. The design of the game is such that Player Characters exploring wilderness terrain will get lost; this is by intention, refer to Cook/Marsh Expert page X57. If you use the getting-lost-rules have lots of blank hex paper ready because unless in clear or grassland terrain there is a 2-in-6 or 3-in-6 chance of becoming lost depending on the terrain.
What I would recommend is that you drill down from the 25 mile “Atlas” hex of the Project on the Borderlands map by employing the excellent example of Erin Smale’s article Hex-based Campaign Design to 5 mile sub-hexes and see how the players do exploring at that scale with the getting-lost-rules. This makes it movement in the wilderness more precise as you will know in what part of a 25 mile square the Player Characters actually are. You can devise encounters based on the following excellent article!
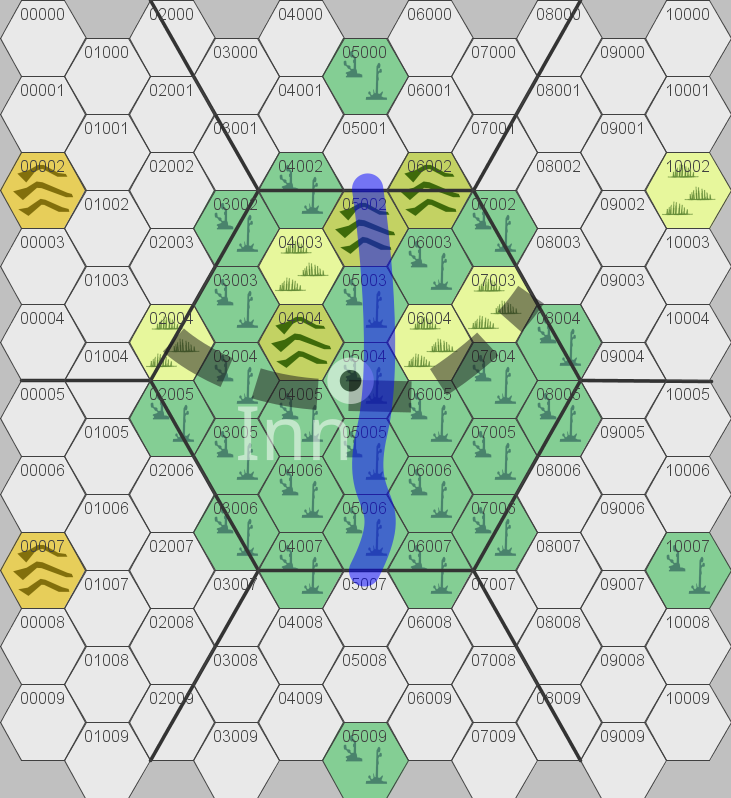
Example: Hex 19010 is a marsh terrain hex.
The large hexes are 25 miles. Each sub hex of the above map is 5 miles.
Terrain varies within the marsh hex.
Note – I did not prepare the wilderness encounters, per the article, for any of the sub-hexes in the maps which follow. I’ll leave that to you.
Updating Project on the Borderlands Wilderness Map Keys
One of the advantages of using an existing wilderness or adventure, starting out, is that we can find seeds in it to nurture and grow in our imagination. Books, film, art, and our experiences all inform our imagination as well. How does our imagination work? Usually we need a little time for contemplation to let our minds explore new associations and juxtapositions. We compare two things, one against the other. What if we found a pair of old boots on the road? This is our juxtaposition. Are they magical? Do they make the wearer invisible? Why were they left there? Were they forgotten or deliberately left there? Are they cursed? Who owned them? Is there anything currently protecting them? We search for meaning, for a little story. It doesn’t have to be immediately world shattering; for example the eventual meaning of Bilbo finding Gollum’s ring is not apparent to the reader of The Hobbit. Such is the relationship of our players to the boots on the road. If they are entertained and/or intrigued by the enigma all the better. Like our Underworld map keys the associations between the little texts begin to build elements of story. Not huge story arcs but little interconnected stories.
You only ever need to use what you find someone else has written if it works for you and your players. In one sense B2, KOTB, works because it allows the Ref to put their stamp on it. When a module is too specific it may be that it is too individuated to find favour. Our game is very much about subjective response.
Each hex of wilderness can be written about just as you would for a room in an underworld. We can use our imagination and helpfully draw from the previously written text. For example, in an earlier Bree Yark article I wrote about the Bordermen’s Road in Project on the Borderlands – Hex Encounters Along the Bordermen’s Road. We will amend the entry for Hex 19010 to include the location of an inn.
Let’s begin with two hexes that interest us, 19010 and 21010.
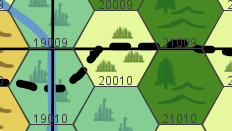
Hex 19010
Hex 19010
Each sub hex of the above map is 5 miles.
Note – I did not prepare the wilderness encounters, per the article, for any of the sub-hexes in the map.
A cold river winds its way through the marsh, the current is fast here. The road is raised several feet above the marsh. The reeds grow several feet higher still above the heads of travellers on the road. The road ends and although pilings for an old wooden bridge still stand in the river the bridge itself has long since rotted or been swept away in a spring flood. The water is quite cool since it is melt-water from the mountain glaciers, and waist deep. Someone has strung a rope along the pilings from one side of the river to the next as an aid to crossing. The rope, on closer examination, is relatively new and made of hemp. Those who do not grip the rope must make a STR attribute check-roll to avoid losing their footing and being swept downstream by the current. In seasonal spring flood, or after a hurricane, the river is impassible and there could be a wait of several days before the waters ebb and its force eases. The tops of the pilings on the eastern side have been carved into the heads of bears, totems. The animal totems are clearly meant to designate a border. They were erected by the Bordermen as a sign any territory east of here to the desert is theirs. This is common knowledge at the inn. Bands of Bordermen are known to roam the wilderness though as far west as the keep.
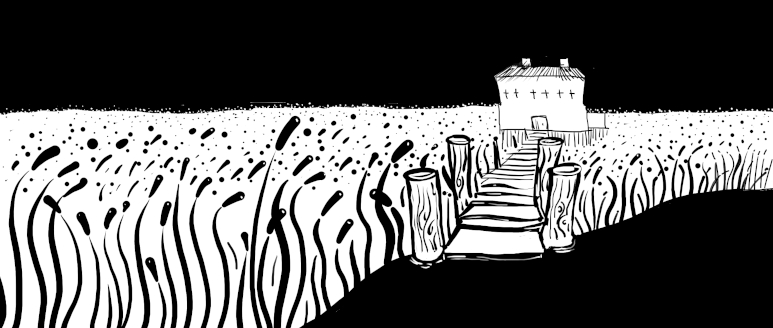
On the western bank, in the marsh, which is by no means dry, a two storey stone building stands on a forest of thick sturdy pilings driven into the marsh. Our inspiration for this is the buildings of Venice. The building stands 10’ above the marsh below it. This is the Coldford Inn. A rickety looking wooden walkway, which looks as though it could fall apart at any moment, spans 50’ of marsh to the road. This is by intention, as it can be quickly thrown down in the event of attack to isolate the inn from the road.
When players leave the road they find themselves waist or chest deep in the marsh. The ground off the road is infirm, soft, and characters who attempt to walk in the marsh quickly sink. It is difficult to extract oneself from this morass once a character has left the path, and all sense of direction will be easily lost as all anyone can see in any direction while down in the marsh are reeds. Refer to Hex 06007.
The Coldford Inn and the Underworld
We have previously posited that exiting the underworld to Map Key 1 may not be sufficiently satisfying for some players, in terms of their player experience, to suspend the game, heal wounds, spend treasure on equipment, and tally the reward of Experience Points (XP) for treasure and monsters slain. Although this is all that is really necessary, as a step towards developing a connection to a greater wilderness beyond the underworld we have proposed a fictional haven, an imaginary safe place, for players to repair to between adventures in the underworld.
The inn’s location makes it a good location for trade from East to West. Not too far away is a disused trail, now mainly used by wild animals such as deer, which leads from the Bordermen’s Road southwest up to the forested hilltop where our underworld, the Hole, is located. The player characters, may always make a short undisturbed journey to and from the inn to the underworld. The proprietor of this establishment is a stalwart character who is a source of information and rumour (true or false) about the underworld and other things. This described imaginary location will be a safe space where the players characters can both recuperate from injury and spend their treasure to obtain the supplies and other goods they need to continue their underworld adventures. Any Non-Player Character present can grant the Ref an opportunity to impart information to the player characters be it true or false. Itinerant traders will come and go and it is from them that the player characters obtain new equipment.
The Coldford Inn
The “Coldford Inn” is fortified, constructed of stone and mortar, with a sturdy door. The roof is slate, to resist fire. Its windows are small and all on the second floor, and they are equipped with arrow loops. It has a small fenced enclosure for animals and a barn attached. The players can obtain food and lodging, rest, and purchase equipment and supplies from the itinerant traders who stop here.
Gurgle Bumsrush – Proprietor
The proprietor of this establishment, Gurgle Bumsrush, is a stalwart character who is a source of information and rumour about the underworld and other things.
Gurgle Bumsrush refers to the underworld as “the Hole” or “the hole under the ruin.” All he knows is that it was a ruin long before the fortified inn was ever built from its fallen stones. He does not know who built the inn or the ruin as he won the deed to the inn at a game of chance.
Rumour – Many have entered the Hole but few have come back again to tell the tale. Those that did come back were wealthy. (True)
Rumour – There is a stone in the inn taken from the river which has a strange glyph engraved on it, Й (True) No one knows what the glyph means.
[This is the magic stone that the priestess used to attack the evil creature Devious Ingrate serves. It was thrown into the river to prevent Devious Ingrate from capturing it. Later, it was taken and used in the building of the walls of the inn. We’ll propose that the stone magically creates an enlarged Circle of Protection which completely surrounds the inn and its foundations. Gurgle is fond of the stone, regards it as lucky, but doesn’t understand it. He has a habit of touching it for luck, which invokes its protection. While active creatures of alignments other than that of Gurgle (Law) cannot cross the circle to enter the inn; this does not prevent spell or missile attacks. Creatures of other alignments than Gurgle’s which are already within the circle (inside the inn), must treat Gurgle as if he were personally within a 10’ movable circle of protection. This personal protection is lost if Gurgle attacks one of the creatures inside the inn. The creatures caught inside the circle of protection may freely cross the circle to leave but the circle then prevents them from re-entering.]
Gurgle has to get his supplies from the “thieving merchants” of the Keep and The Realm. He will buy things from caravans travelling the Bordermen’s Road but his focus is on things his clientele want and not luxury items. Whatever he buys he has to make a profit to keep the inn running.
Clientele of the Inn
The people found in the common room of the inn are typically honest merchants carrying goods by mule that they purchased from desert traders or The Realm and they travel from west to east and back again exchanging their wares. Foreign goods will be more expensive and the Ref can decide what on the equipment list is provided locally and what is not. Unless the Player Characters travel to the Keep they may have to pay more for items from the equipment list. Not everything will be available at the inn. Travelling west their goods are things obtained from far off Saphir and other lands such as manufactured items, spices and silk. Travelling east their goods are things obtained from The Realm, manufactured items, wool and cotton. There are lesser traders too serving local residents. Less frequent are common travellers but these will often be in the company of merchants. Swords for hire will come here seeking employment as protection for merchants. Scouts from the Keep will come here to gather news. Less frequent are Bandits, Barbarians, and Bordermen. Rarest of all are character parties of explorers, itinerant Clerics, and Magic-Users. One may imagine all sorts of people do pass through the inn, bandits, barbarians, diplomats, hermits, messengers, moneylenders, settlers, wanderers, and more, all going about their personal business.
Lodging and Meals
Lodging at the inn is 2 gp per night per person, 1 gp per person if they sleep on the ground floor in a common room, 1 sp if they sleep in the barn with the livestock. Sleeping on the ground or with the livestock may double the time required to heal from injury. Food is 5 gp per week, or 1 gp per day. Beverages, root beer, are 2 sp per serving.
Note – Characters are expected to eat and drink every day. Per page 56 of the Mentzer Player Manual (BECMI), normal rations go bad and are unfit to eat if characters stay in a dungeon “overnight” which is why there are preserved “Iron Rations”. A character must pay 5 gp per week for normal rations or 15 gp for a week’s Iron Rations. Ordinary rations are fit for use in the wilderness but will not last longer than 24 Turns (one Turn is an hour) in a dungeon before turning mouldy. What is the consequence of starvation? Moldvay Expert page 16, Mentzer (BECMI) page 21, and the OSE Classic Fantasy Rules Tome page 116, describe the effects of starvation, penalties to attack rolls, decreased movement, loss of hit points and eventual death. What the rules do not do is quantify what those penalties are so you will have to decide.
Characters can forage for food (nuts and berries) in the wilderness and have a 1-in-4 chance per day of finding an animal to hunt. In a dungeon are the creatures found there fit to eat? You can decide whether Giant Shrew-on-a-stick is a viable meal.
As the Ref, you may need to regularly remind your players to rest, to pay for their character’s meals, to eat, and to buy rations.
Swords-for-Hire
At the inn the player characters may sometimes meet (at the Ref’s discretion) itinerant swords-for-hire in the form of men-at-arms. These characters hire themselves out and prefer the work of protecting merchants. They sell their skills from the Keep to the desert. More often than not their only foes are Bandits and Goblins. They never travel north to the mountains and seldom venture off the road and into the wilderness without very good cause. Adventures into the underworld or off into the wilderness will cause them to demand high wages commensurate with the risks involved – Danger Pay!
When there are only two or three player characters they may choose to round out their party with these swords-for-hire. They can, for example, be hired to only to guard mules but not go into the Underworld.
These are 1st Level Fighters equipped with leather armor, sword and shield. They have 5 Hit points and are of Neutral alignment. They cannot be hired unless they are first provided with a beverage and meal.
They are a good source of information because they travel the Bordermen’s Road. For an underworld adventure they will expect to be paid at least 2 sp per day due to the hazards involved. The employer must also pay for food and lodging. These swords-for-hire do not receive a share of treasure found in the underworld. Refer to the topic Retainers in Moldvay on page B21.
They are loyal only as long as they are paid and treated fairly and a morale check is made when their loyalty is tested by danger or mistreatment; starvation, undue risks, companions slain, abandonment, failure to defend them from foes, capture of companion by foes, etc. For example: they cannot be used to assume risks that are properly those of the Player Characters. Morale, and the number of retainers which may be hired, is based on Charisma, refer to page B7. They cannot be unjustly treated or used as fodder or they will quit and you can then double or triple the wages of any others the Players might attempt to hire. Word will quickly spread of their mistreatment or the disappearance of any previous swords-for-hire. The Player Characters are expected to equip these characters and can purchase additional equipment, such as better armor, for them if they wish but once given any items then belong to these Non-Player Characters and are non-returnable.
Rumour – Never leave the path through the marsh or you’ll get lost. [True, refer to hex 06007]
Rumour – If you hear frogs peeping in the marsh and then they go silent danger is close by. [True, refer to hex 07007]
Rumour – There’s an old pine tree in the marsh, it has eyes! [True, refer to hex 07007]
Rumour – Borderman leave sticks arranged on the ground as messages. [True, refer to hex 09009]
Rumour – Borderman can imitate the calls of animals. [True, refer to hex 11009]
Rumour – Borderman stash food in cairns. [True, refer to hex 12009]
Rumour – Borderman stick the heads of their slain enemies on poles. [True, refer to hex 12009 and 12010.]
Rumour – Corpses from ancient battles can be found in the marsh. [True, refer to hex 15008]
Rumour – Campfires at night will draw the dead. [True, refer to hex 18010, 18011]
Rumour – You have to pay the Ferryman, 2 coins, any 2 coins. [True, refer to hex 14009]
Barbarians
These are either descendants of the Bordermen or are from tribes which have migrated into the former Realm of the Bordermen. They might be regarded as uncivilized and ill mannered but in reality they are simply observing their own customs. They are wary of strangers and protective of their own people and lands.
Rumour – There is said to be a lost magic sword in the underworld. (True) [refer to Level 1 Map Key 11.
Bordermen
The innkeeper is on good terms with the Bordermen. They sometimes call at the inn for provisions, or to trade, or for information. They can sometimes be hired as guides. In general the few wanderers of the wilderness keep to themselves. Sun Cult Bordermen cannot be hired. They regard “The Hole” Underworld as a forbidden place. Winter Cult Bordermen have no such scruples and can be hired but they are not trustworthy as they are in league with the Cult of Chaos.
The Bordermen regard the wilderland east of the river as theirs. However, their numbers are so few that the lands are overrun by others. When in their territory Characters are subject to their laws. They do not recognize the authority of The Realm, The Castellan, or any other official of The Keep.
The Bordermen are mainly members of a Sun Cult. A few however are un-men and members of their Winter Cult. The Winter Cultists are considered “supernatural” beings, touched by chaos, cold, and darkness. Winter is a time of great fear for the Sun Cult because they are afraid the Sun will not return and the Winter Cultists are dominant, refer to Erin Smale’s article here.
The Winter Cultists consider the Chaos Cult and Acolytes of Pestilence as mere upstarts as their own Winter God of Chaos is more ancient.
Rumour – Beware! An invisible terror is said to lurk in the underworld (True) [this is Chillyfist the Ghoul]
The Hermit
The innkeeper has taken a dislike to the hermit who lives at hex 15011 due to the man’s unsociable nature. Nobody knows the hermit’s real name and the man seldom speaks. Occasionally the hermit will bring Gurgle something to exchange for a bottle of root beer. He simply lays whatever it is down, usually very old coins, and takes the bottle without speaking.
This character is in fact Glumluck the Apothecary, a potion maker, who anonymously peddles potions and other quack cures through an intermediary, Wheedle the Itinerant Trader. This is a secret arrangement which Wheedle will never reveal as Glumluck has threatened that revealing his identity as the potion maker will result in providing Wheedle with no more product. Glumluck is trying to find a cure for his webbed feet, to no avail.
Wheedle the Itinerant Trader
This character travels back and forth along the Bordermen’s Road from the Keep to the end of the lost road and the edge of the Desert of Mirages and fetching and selling the things people living along the road want. This character’s name is Wheedle and is a very persuasive sales person. Wheedle likes to haggle. Wheedle carries a large pack from which dangle pots, pans, and all manner of items. Inside the pack is a bag of holding but Wheedle is careful never to reveal it instead rummaging “inside the pack” for whatever is wanted. The Player Characters can purchase most things they want from Wheedle; there may be a delay for some items, and the prices are greater than those found in the equipment list by 2-3 times. Wheedle has a good eye for value but will only give Player Characters 3/4 of the value of whatever it is they have to sell. Wheedle is keen to make a profit. This means reduced XP. There is a 20% chance Wheedle can identify lesser magic items, for a fee of course. Wheedle can interpret the Bordermen’s signs that they leave on the road. Wheedle travels the Bordermen’s road with their blessing and they protect the trader from bandits etc.
Wheedle Sells one of the following items 20% of the time:
- Glumluck’s Blindness Cure – 20gp, Ingredients: 1 portion of Shrieker Mushroom approximately the size of a slice of pie. Instructions: When blinded by snakes or other venomous creatures consume 1 portion of the mushroom raw. This mushroom has a somewhat unpleasant taste. Therefore, the Shrieker Mushroom may be lightly toasted, salted, and peppered to taste without affecting the cure. The restorative effect is immediate. The player must make a saving throw vs. Poison to avoid the side effects of eating the mushroom. Side effects lasting one hour may be a deep sleep in some patients.
- Glumluck’s Cure-All – 50gp, This cure-all acts as one half-strength potion of healing, curing 1-4 (1d4) points of damage. It smells terrible and has an extremely unpleasant taste. The player must make a saving throw vs. Poison to avoid the side effects of drinking this cure-all. Side effects lasting one hour may be a numbness and an inability to talk for 1d6 turns in some patients. In rare cases talking in reverse occurs for 1d6 hours (actually 55%). The bottle comes with a parchment warning: Do not use in conjunction with any other forms of magical healing. The player must make a saving throw vs. Poison to avoid a deep sleep lasting one hour.
- Glumluck’s Lock Syrup – 75gp, This single application liquid can be poured into any lock and it will then open the lock 30% of the time.
- Glumluck’s Stink Oil – 25gp, This deceptively small vial of liquid is bright green and made of insect guts. When poured out, or thrown and smashed, it creates a pool in the exact same manner as oil, which smells really bad and discourages pursuit by all creatures other than insects. Unlike oil it does have the advantage of not needing to be set alight. Characters passing through the oil, or otherwise coming into contact with it, lower their charisma to a value of 3 for 2d6 days due to the repellent smell during which time creatures with a sense of smell cannot be surprised. After 2d6 days the odour is no longer detectable.
Rumour – Acolytes, led by a cleric, have gone into the underworld to fight some evil there. (False) [refer to Level 1 Map Key 8]. These are the Acolytes of Pestilence whom we shall propose do not want anyone to know they are Servants of Chaos.
Chaos Cult
The Chaos Cult are not the natural allies of the Acolytes of Pestilence or the Winter Cultists. In fact they are rivals and seldom allies in common cause. Should they be at the inn they are not allowed to fight, by some ancient agreement they keep, but anywhere else and along the Bordermen’s Road – there may be trouble. Chaos Cult “Clerics” can heal Player Characters but they expect to be well paid for their trouble.
The Chaos Cult is busy at their intrigues; which they keep to themselves, refer to the Priest in the apartments and the Temple of Chaos in B2. They are certainly not welcome at the Keep and would, if they wanted to discover what the Castellan or the Chaos Cult were up to, travel to the Keep incognito or use a proxy. The members of this cult, while travelling, often conceal their red and black striped robes and uniforms under cloaks.
The Chaos Cult make use of the Winter Cultists in their intrigues for they control the Winter Cultists access to the Temple of Chaos. This the Winter Cultists resent but they are too few in number to overwhelm the Chaos Cult.
Rumour – Giant Shrews won’t find you if you are really really really quiet. (False) [refer to Level 1 Map Key 5]
Rumour – One of the Acolytes, in their cups, will contemptuously reveal the following: “The Castellan has no idea what lies under his very nose.” (True – the Caves of Chaos are near the keep.)
Acolytes of Pestilence
The Acolytes of Pestilence are hardly welcome at the inn but even they are not foolish enough to spread plagues here. They are certainly not welcome at the Keep and would, if they wanted to discover what the Castellan or the rival Chaos Cult were up to, travel to the inn or Keep incognito as spies.
The Acolytes of Pestilence once followed Devious Ingrate but now that the former Patriarch is a lesser undead creature “it” is considered disgraced and an abomination. Devious Ingrate worshipped a tentacled bat-like entity rather than Chaos, a heresy. The fate of the former Patriarch is seen as a punishment rather than a reward. The Acolytes are led by living Matriarchs and Patriarchs.
The current leaders of the Acolytes of Pestilence do not know about the stone at the inn which Devious Ingrate sought to possess.
Rumour – There’s nothing of value in “The Hole” [false.]
The Scouts
The Castellan’s Scouts, commanded by the Corporal of Scouts, are dispatched from the Tavern at the Keep. The Scouts will stop at the inn to pick up news. In particular they are interested in news of incursions of monsters, the Chaos Cult, the Winter Cult, the Acolytes of Pestilence, and the Bordermen; these last they seem to regard as bogeymen rather than potential allies. They are seldom as skilled as the Bordermen in woodcraft.
Rumour – Kobolds were seen entering the underworld. (True) [refer to Level 1 Map Key 2]
Rumour – The Corporal of Scouts at the Keep pays double a soldiers wages. (True)
Rumour – Merchants travelling east must bribe the desert tribes for safe passage. [True or False, you decide.]
Rumour – Merchants travelling the Bordermen’s Road must bribe the Bandits for safe passage. [True or False, you decide.]
Rumour – A Merchant Caravan left the Inn for the Saphir three days ago. [True or False, you decide.]
Rumour – A Merchant Caravan left the Inn for the Keep three days ago. [True or False, you decide.]
Rumour – A Merchant Caravan from Saphir is expected at the Inn within the next few days. [True or False, you decide.]
Rumour – A Merchant Caravan from the Keep is expected at the Inn within the next few days. [True or False, you decide.]
Rumour – A Merchant from the Keep is expected to hire men-at-arms when they arrive here. [True or False, you decide.]
Rumour – Goblins have a hideout near the road. [True, refer to hex 09009.]
Rumour – Merchants travelling alone are easy pickings for Bandits. [True, they are often insufficiently protected.]
Rumour – The Bordermen take the heads of their enemies and put them on poles. [True, refer to hex 12009 and 12010.]
Rumour – Bandits do not usually attack protected Merchant Caravans (usually 2-3 merchants travelling in a group and protected.) [True, the Bandits are not so strong they can successfully raid a larger caravan.]
Graycloak
An itinerant Magic-User, Graycloak, visits the inn from The Realm. What this Magic-User’s reason is for visiting the inn is never revealed. The visits are presumably tolerated by the Castellan. Graycloak never meets with anyone but spends evenings in the common room of the Inn, apparently waiting for someone, alone, who never arrives. This NPC takes a room at the Travelers Inn but never stays longer than a week at a time. The Magic-User will never travel further east than the inn, never takes sides in fights, doesn’t undertake quests, never gives advice, can’t be hired, doesn’t become involved in intrigues, etc. Graycloak will however identify Magic Items for a substantial fee.
Bandits
Individual bandits will occasionally visit the inn incognito to gain information they can use for their attacks on travellers and merchants.
Rumour – The Chaos Cult have a hideout near the Keep. [True, the Caves of Chaos.]
Rumour – Clerics with Red and Black striped robes are not to be trusted. [True, they are members of the Chaos Cult.]
Rumour – There is more than one group of Bandits and they are rivals. [True.]
Hex 20010
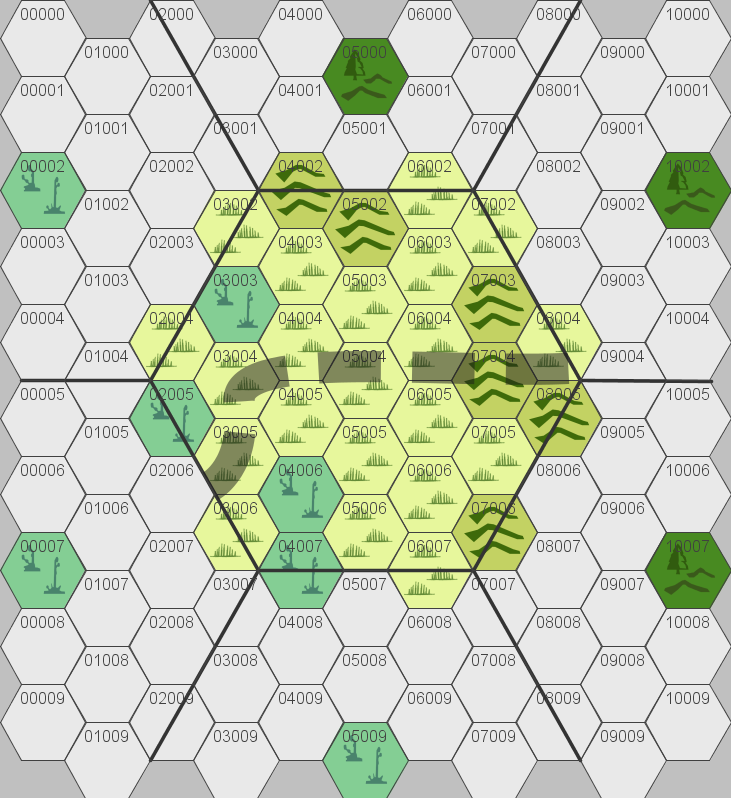
Hex 20010
Each sub hex of the above map is 5 miles.
Note – I did not prepare the wilderness encounters, per the article, for any of the sub-hexes in the map.
Hex 21010
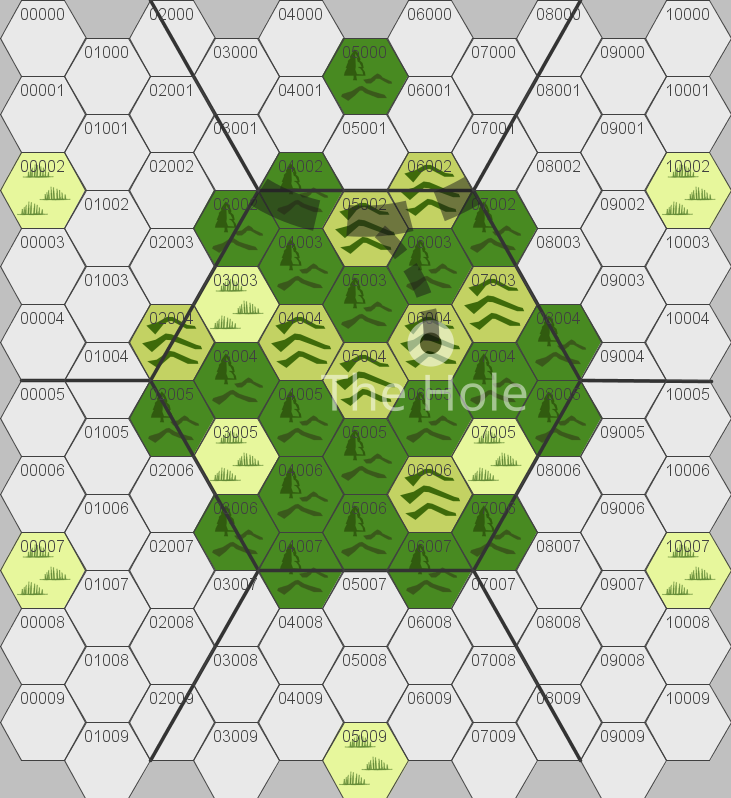
Hex 21010
Each sub hex of the above map is 5 miles.
Note – I did not prepare the wilderness encounters, per the article, for any of the sub-hexes in the map.
The road leaves the marsh, thankfully. Mosquitoes can be heard humming in the distance. A seldom used trail leads up a hill to the ruin where “The Hole” is located. It was once a watchtower, erected by the Bordermen in a long forgotten age, and their descendants now consider it a taboo to climb to the summit of the grassy hill. If any Bordermen of the Sun Cult are met they refuse to guide anyone here and say it is bad, evil. They will not hunt here.
POTB – Further Adventures
We are keenly focused on the underworld adventure we have created. Siting our underworld in a larger world opens the possibility that the Players will abandon our home-grown underworld adventure for B2’s Caves of Chaos and that’s fine. Our underworld isn’t going anywhere. Gary Gygax always intended that the Ref should learn how to create their own underworlds and in B2 provided The Cave of the Unknown as a possible location.
Even if when you do not feel inspired there are resources available to you. Insert the B1 module, In Search of the Unknown somewhere in The Project on the Borderlands map.; The Haunted Keep from Moldvay page B55, the dungeon from “Your First Game” in Mentzer’s Dungeon Masters Rulebook (BECMI) beginning on page 4, or Zenopus Tower from Holmes Basic page beginning on 40.
Keeping Things Fresh in the Underworld
For our own adventure, The Hole, at any point we can:
- Write new text for map keys, [Note – This same idea also applies to wilderness hexes.]
- Redraw a portion of the map and write new text for the map keys,
- Redraw the whole map and write new text for the map keys.
Let’s say the players have cleared out a map key and left the underworld. Re-writing the text of the map key is practical. You can easily do it between game sessions. If you don’t have an idea forming you can re-stock the map key using the random tables starting on page B52. Players will accept this kind of alteration without question. Roll 1d6 on the following table:
| Dice Roll | Result |
| 1-2 | Monster, 4-in-6 chance of treasure (dice result 1-4) |
| 2-3 | Empty, 1-in-6 chance of hidden treasure (dice result 1) |
| 4-5 | Trap, 2-in-6 chance it protects treasure (dice result 1-2) |
| 6 | Special, no treasure |
Example of new map key content:
Map key 22
The player character’s previously cleaned out this map key, the Kobold’s on guard have been slain or departed, and now we will renew the content. We’ll roll on our table to determine what the content is, we roll 1 on the above table, Monster, and 3, Treasure! We’ll roll on the Wandering Monster table as we are not feeling inspire yet, we roll 1d20 on the Level 1 Wandering Monster table in Moldvay on page B53, 14, Skeleton! This is not a lair so we’ll use the Unguarded Treasure Table in Moldvay on page B52. For Level 1 row, in the column for silver pieces we roll 1d6, 4 x 100 = 400 sp, in the column for gold pieces there is a 50% chance, we roll 36, we roll 1d6, 6 x 10 = 60 gp, there is a 5% chance of gems we roll 64, nothing, there is a 2% chance of jewelry, we roll 56, nothing, there is a 2% chance of Magic Items, we roll 87, nothing.
22 Alcove. This little area is occupied by skeleton soldiers armed with swords! They are dressed in rags and rusting armor, once painted bright red the paint is dull, faded, and flaking off. The front of the helmets is painted with a glyph, Ӝ. They attack!
Secret Ref Info: Beside the south secret door is a hidden switch, a stone which is slightly more worn than the others. There is a 3-in-6 chance of spotting it; 4-in-6 if the character is an Elf. There is a peephole in the door which allows Map Key 2 to be spied on from behind the door. If the switch is not found the door may 2-in-6 be forced open.
10 Skeletons, Armor Class 7, 1 Hit Dice, 5, 6, 4, 5, 6, 3, 6, 4, 5, 3 Hit Points, Move 60/20, Sword 1-6 damage, Save F:1, M12, Alignment Chaotic, not affected by sleep or charm spells, these undead can be turned by a cleric, they attack until destroyed, monster description pageB42. They carry coins in money bags tied to their belts, 400 sp and 60 gp are distributed between them.
The glyph on the helmet is the symbol of Devious Ingrate in whose service these soldiers once were.
Map Alterations
Map alterations stretch credulity somewhat even though this is a game of Magic and Dragons! Players will stubbornly look for a plausible cause and effect. You do not necessarily have to explain to the Players exactly why the Underworld is suddenly different other than to put it down to “magic” and “chaos”. This is easier when you are a fan of fun-house dungeons rather than more serious fantasy.
I proposed earlier that when fabulous ruby is not replaced in pillar c of Map Key 7 “Chaos” becomes dominant and causes the map changes. That is we can directly link our map changes to the actions or inactions of the players!
Redrawing Maps and Replacing the Content of Map Keys
What we want to do is to redraw some or all of the map and/or write some new map keys. I have a little gadget which I can use to trace over my map. This will shine through two layers of graph paper and I can trace the entrance to the underworld and all of the linking to levels below, stairs, chutes, shafts, and teleports. As demonstrated in a previous article a window and daylight will do just as well for tracing!
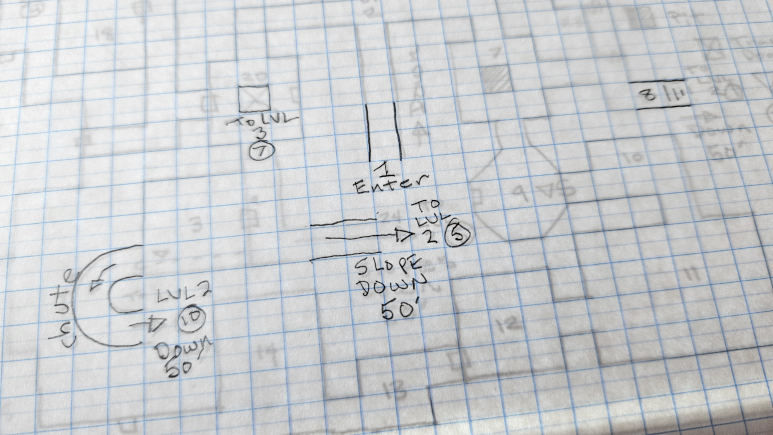
I trace the entrance to the underworld and all of the linking to levels above and below, stairs, chutes, shafts, and teleports. We can draw a new layout from these connections. We can continue to copy the parts of the level we want to keep; all some or none of our previous layout. We then use our imagination to create something completely different. Keeping the connections between levels makes it easier to connect them up and prevents dead ends — unless those are desired, in which case close them off.
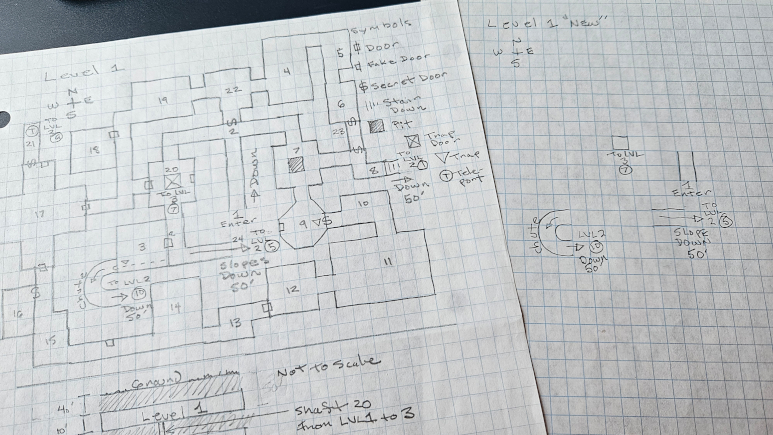
Half Level
The following layout, drawn from the connections between levels, is half old and half new. The area to the right of the dashed line is new. I continue the map key numbering from the last number previously used for Level 1.
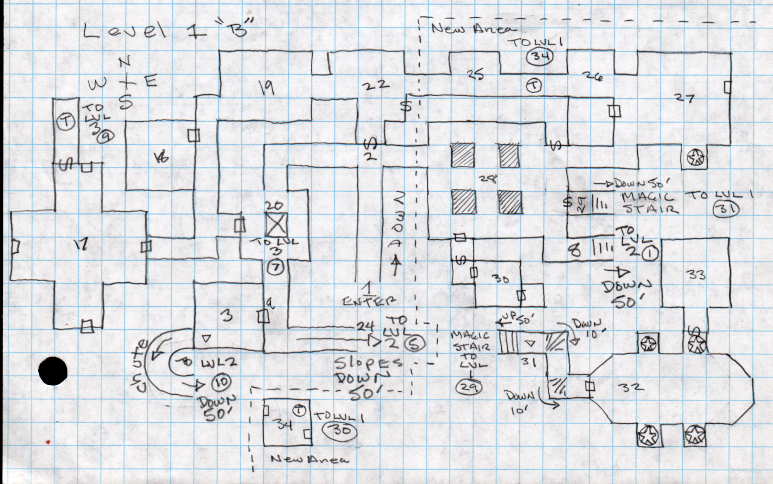
How to Deploy a New Map
We have a few options:
- Replace the map before the Player Characters next enter the underworld. In this scenario the players exit only to find that the next time they enter things have changed.
- It will throw the players expectations though if when as the players are attempting to leave the Underworld from Level 2 you then switch out the map. Let’s say the players take the stair from Level 2 to Level 1 Map Key 8 only to find they are now at a dead end. Things are no longer as expected and now they must explore their way out. The Players will be baffled by the map change. They may elect to retreat and look for another exit from Level 2 or 3. This could however create a dramatic crisis of character survival when the Player Characters are injured and simply trying to escape the underworld, a once familiar cleared route is no longer safe, situational awareness and care should be taken.
Can you switch back and forth between map layouts? Sure, if that is what you want to do. Be prepared to respond to player incredulity. They will be looking for a plausible reason for this occurrence and the agency to control it if they can. What did they do, or not do, to cause this to happen?
Can you change the layout more than once? Absolutely.
New Half Level Map Keys
For the half-level we will insert Level 1 Wandering Monsters. We will do so using the Wandering Monster tables and see what we can invent from that content. We’ll also insert new treasure where we want to do so.
Map key 25-26
We roll 1d6, we get a special and no treasure. We’ll group these two alcoves together as we will put a teleportal in the middle which transports anyone entering the square from either direction to Level 1 Map Key 34.
25-26. Alcove. These alcoves are jammed floor to ceiling with wooden boxes filled with mouldy straw. They are blocking the passage between them. Light shines through the cracks between the stacked boxes. Beyond, there is a lit black candle floating in the air which illuminates the square it is in with an eerie red light. The candle is half burned down.
Secret Ref Info: The lit black candle is a one way teleportal which transports anyone entering the square from either direction to Level 1 Map Key 34.
Map key 27
We roll 1d6, we get a 5, Trap, and rolling again 2, treasure. We’ll imaginatively make up some stuff here…
This room contains a bronze effigy of a man-like Bull walking on two legs. It is oxidized green. The eyes move and follow characters as they move through the room. The eyes shoot poisoned needles every round at visible characters, 1d8 damage +poison. We’ll say this trap attacks like a 3 Hit Die monster, so hit or miss. It shoots in an arc and can’t aim the needles at the western door and the area below it, or the SE corner square. By now we have decided poisons that cause death aren’t much fun because they end the game early. We can be creative beyond mere damage, lets make it interesting, the needles are coated with Tarantella poison.
When poisoned a Character fails their saving throw vs. poison they painfully and involuntarily dance which grants the Bull statue +4 to further attack dice rolls. A -4 dice roll modifier is applied to a poisoned Character’s to-hit rolls. The effect lasts 2-12 Turns. Dancers collapse and are helpless in 5 Turns. Observers, those Characters able to see the dancing one, must successfully save vs. spells or they too start to dance uncontrollably in the same way, and for as long, as the original victim.
How can we expect to implement this? Example: A character fails their saving throw vs. poison. The Ref rolls 2d6 and gets a 7 which means they will dance for 7 turns. The character begins to dance uncontrollably and will collapse in 5 Turns after which they can be attacked without retaliation. In the meantime the other Players in the party can all see the poisoned character and they must all save vs. spells or they too will have to dance for 7 Turns. Some pass and some fail. Dancing Characters may be attacked by monsters which gain a +4 dice roll modifier, example: if they roll a 7 add +4, sum and the result is 11, which may or may not indicate success. The dancing Players deduct -4 from their attack dice rolls, if they roll 14 subtract -4, the result is 10, which may or may not indicate success. All dancing Player Characters collapse in 5 turns.
Inside the bull we’ll place treasure, we determine the amount of silver, we roll 1d6, 5 x 100 = 500 sp, there is a 50% chance of gold, we roll d100, 32, we roll 1d6, 1 x 10 = 10 gp, there is a 5% chance of gems, we roll d100, 73, nothing, there is a 2% chance of jewelry, we roll d100, 50, nothing, there is a 2% chance of magic, we roll d100, 01, 1 magic item. On page B46 we’ll roll d100 for General Magic Items, we roll d100, 32, Weapon Armor, we roll 1d8 on the sub-table, 7, Armor & Shield (each +1). We can use the table on page B48 to determine the type of armor. We can pick from Leather (AC7), Chain (AC5), and Plate (AC3). We’ll pick Chain +1 and a +1 Shield, note the magical encumbrance is 150 coins. Chain normally weighs 400 coins, refer to Moldvay page B20, so there is definitely a benefit to magic armor once encumbrance is factored in; this is another reason to use the encumbrance rules!
The door to the west is locked. The room was once an armory but has been plundered. Its shelves and racks are empty except for a broken spear and for the magic armor, which looks like a pile of discarded rusty chain mail that has been left on the floor due to its condition.
27. Effigy of The Bull. This room is empty except for the oxidized bronze statue of a Bull. The door to the west is closed.
Secret Ref Info: The eyes move and follow characters as they move through the room. The eyes magically shoot poisoned needles every round at visible characters, 1d8 damage +poison. It shoots in an arc but can’t aim the needles at the western door and the area south of it, or the SE corner square.
When poisoned a Character fails their saving throw vs. poison they painfully and involuntarily dance which grants the Bull statue +4 to further attack dice rolls. A -4 dice roll modifier is applied to a poisoned Character’s to-hit rolls. The effect lasts 2-12 Turns. Dancers collapse and are helpless in 5 Turns. Observers, those Characters able to see the dancing one, must successfully save vs. spells or they too start to dance uncontrollably in the same way, and for as long, as the original victim.
How can we expect to implement this?
Example: A character fails their saving throw vs. poison. The Ref rolls 2d6 and gets a 7 which means they will dance for 7 turns. The character begins to dance uncontrollably and will collapse in 5 Turns after which they can be attacked without retaliation. In the meantime the other Players in the party can all see the poisoned character and they must all save vs. spells or they too will have to dance for 7 Turns. Some pass and some fail. Dancing Characters may be attacked by monsters which gain a +4 dice roll modifier, example: if they roll a 7 add +4, sum and the result is 11, which may or may not indicate success. The dancing Players deduct -4 from their attack dice rolls, if they roll 14 subtract -4, the result is 10, which may or may not indicate success. All dancing Player Characters collapse in 5 turns.
Hidden inside the bronze Bull are 500 sp and 10 gp.
The door to the west is locked. The room was once an armory but has been plundered. Its shelves and racks are empty except for a broken spear, battered shield, and for the magic armor, which looks like a pile of discarded rusty chain mail that has been left on the floor due to its condition. Chain +1 and a +1 Shield.
Note: The magical encumbrance of the armor is 150 coins.
Map key 28
We can use our imagination to describe part of this room before we check for the room content.
There is a secret door and passage which bypasses the teleport between map keys 25 and 26. Beside the secret door is a hidden switch, a stone which is slightly more worn than the others. There is a 3-in-6 chance of spotting it; 4-in-6 if the character is an Elf. There is a peephole in the door which allows Map Key 2 to be spied on from behind the door. If the switch is not found the door may 2-in-6 be forced open. This leads to map key 22, there is a new secret door here too.
We’ll put four hidden trap pits here. We’ll put spikes in the bottom. Characters that fall suffer 1d6 damage per 10’ of the fall. We’ll house rule this further and add +1 damage per 10’ for the spikes. There is a 3-in-6 chance the pit will open when its cover is stepped on, there is a 1-in-2 (3-in-6) chance that falling causes 1d6 points of damage. That’s a bit of old-schoolery which is not in the rules. In other words there’s only a 50% chance of injury falling 10’.
Note – The pit can be deeper, up to 30’ and/or have spikes which cause additional damage, 1-in-12 spikes are poisoned causing Death in 1d10 Turns or 1d6 damage.
There is a secret door to the East, leading to map key 29. There is a 3-in-6 chance of spotting it; 4-in-6 if the character is an Elf. The door may 2-in-6 be forced open.
The door to the south, we’ll imagine that this is a closet, there is an empty stone pot here covered with a lid. There is a bucket, brush, and mop here as well. At the back of this closet is a magical secret door. There is a 3-in-6 chance of spotting it; 4-in-6 if the character is an Elf. This magic door may be forced open with a Knock spell, there is no switch on this side but it may be easily pushed open from the other side. Filling the pot with 50 coins of any type opens the secret door; the coins will then disappear. We can add them to a hoard of unguarded treasure somewhere else!
Note: We’ll add the coins to the Bull Statues in map key 32.
On our table we’ll roll 1d6, the result is 6, Special.
We’ll add a trick to the western corridor, every time a character tries to enter map key 28 (moving East) they are turned around and find themselves moving West, unless they enter map key 28 by moving East backwards.
28. Pit Room. This large room is empty except for a door and passage to the South and a passage East. The walls are painted with frescoes of Bulls running on two legs in wilderness. They are chasing down prey, man-like creatures.
Secret Ref Info: There is a secret door and passage which bypasses the teleport between map keys 25 and 26. Beside the secret door is a hidden switch, a stone which is slightly more worn than the others. There is a 3-in-6 chance of spotting it; 4-in-6 if the character is an Elf. There is a peephole in the door which allows Map Key 2 to be spied on from behind the door. If the switch is not found the door may 2-in-6 be forced open. This leads to map key 22, there is a new secret door here too.
Every time a character tries to enter map key 28 (moving East) they are turned around and find themselves turned around and moving West, unless they enter map key 28 by moving East backwards.
There are four 10’ hidden trap pits here with spikes in the bottom. There is a 3-in-6 chance the pit will open when its cover is stepped on, there is a 1-in-2 (3-in-6) chance that falling causes 1d6 points of damage. That’s a bit of old-schoolery which is not in the rules. In other words there’s only a 50% chance of injury falling 10’.
Note – The pit can be deeper, up to 30’ and/or have spikes which cause additional damage, 1-in-12 spikes are poisoned causing Death in 1d10 Turns or 1d6 damage.
There is a secret door to the East, leading to map key 29. There is a 3-in-6 chance of spotting it; 4-in-6 if the character is an Elf. The door may 2-in-6 be forced open.
The door to the south opens to a closet, there is an empty stone pot here covered with a lid. There is a bucket, brush, and mop here as well. At the back of this closet is a magical secret door. There is a 3-in-6 chance of spotting it; 4-in-6 if the character is an Elf. This magic door may be forced open with a Knock spell, there is no switch on this side but it may be easily pushed open from the other side. Filling the pot with 50 coins of any type opens the secret door; the coins will then disappear.
Map key 29
This is a magical stair which descends seemingly 50’ to map key 31, which is a trap. The stair at map key 31 turns into a slide. The secret door can easily be opened from this side by pushing.
2. Magic Stair. A stair descends into darkness.
Secret Ref Info: This is a magical stair which descends 50’ to map key 31, which is a trap. The entire stair turns into a slide when map key 31 is entered. The secret door can easily be opened from this side by pushing.
Map key 30
Map key 30 and 34 interact with each other in an interesting way. Everything in map keys 30 and 34 can be seen and heard in either room, but any physical interactions are separate. Spells cast in either map key do not affect the other room or characters in it. There is a teleportal in the Northeast corner but it does not work all the time. When a character enters the square where the teleportal is they are 2-in-6 transported to map key 30 in the same square but appear to anyone else in the room not to have left. A character who leaves room 30 by either of the doors disappears from view. The doors in map key 34 are false but real in map key 30.
All doors, including the false ones, are locked; this means they must be forced open or the locks picked.
30. Jinx Room. The door to this room is locked.
Secret Ref Info: All doors, including the false ones, are locked; this means they must be forced open or the locks picked. The eastern closet contains a bucket and mop.
Everything in map keys 30 and 34 can be seen and heard in either room, but any physical interactions are separate. Spells cast in either map key do not affect the other room or characters in it. There is a teleportal in the Northeast corner but it does not work all the time. When a character enters the square where the teleportal is they are 2-in-6 transported to map key 30 in the same square but appear to anyone else in the room not to have left. A character who leaves room 30 by either of the doors disappears from view. The doors in map key 34 are false but real in map key 30.
Map key 31
This is a trap, the entire stair from top to bottom turns into a slide 2-in-6 when the square marked with a triangle is entered. Characters on the stair then slide down to map key 32. The slide cannot be climbed back up but it resets to a stair in 6 Turns.
31. Stair. A stair descends into darkness.
Secret Ref Info: The entire stair from top to bottom turns into a slide 2-in-6 when the square marked with a triangle is entered. Characters on the stair then slide down to map key 32. The slide cannot be climbed back up but it resets to a stair in 6 Turns.
Map key 32
I have an idea. We’ll link map keys 32 and 33 together. We’ll make the statues monsters but they won’t come to life until some spirits in map key 33 are released by the Player Characters.
We’ll make these Bull statues 1 Hit Die monsters but they will be inert and won’t come to life until a gas/spirits are released from the tomb in map key 33.
4 Bull Bronze Statues, Armor Class 7, 1+1 Hit Dice, 6, 7, 5, 6, Hit Points, Move 60/20, 1-6 damage, Save F:1, M12, Alignment Chaotic, not affected by sleep or charm spells, they attack until destroyed.
There are four scowling bronze statues of man-like Bulls standing on their hind legs. They are all green with oxidization. Water drips from the ceiling.
The secret door is opened by pulling the nose ring of the statue in front of it.
32. Shrine of the Bulls. Here are four scowling bronze statues of man-like Bulls standing on their hind legs. They are all green with oxidization. Water drips from the ceiling. The floor is 1 foot deep in green filthy, slimy water.
Secret Ref Info: This dank stinking room is the destination of the slide trap from map key 32. The secret door is opened by pulling the nose ring of the statue in front of it. The Bull Statues contain 50 copper coins, 50 silver coins, 30 gold coins, 20 electrum coins, the magic pot in map key 28 adds 50 coins to the insides of these statues.
4 Bull Bronze Statues, Armor Class 7, 1+1 Hit Dice, 6, 7, 5, 6, Hit Points, Move 60/20, 1-6 damage, Save F:1, M12, Alignment Chaotic, not affected by sleep or charm spells, they attack until destroyed. Inside the Bulls are distributed 50 copper coins, 50 silver coins, 30 gold coins, 20 electrum coins, and the magic pot in map key 28 adds 50 coins to the insides of the statues.
Map key 33
The floor of this tomb is covered with 1 foot of slimy stinking water. Water drips from the ceiling. There is a large sarcophagus here which has relief carving on it depicting a man-like Bull walking on two legs. The lid is quite heavy; requiring a STR ability check roll to push it aside. When the lid is pushed aside four luminous green chaotic spirits spew forth from within the sarcophagus and fly out into Map Key 32 where they each enter the nostrils of one of the Bull Statues. These then bring the bronze bulls in Map Key 32 to life, they attack!
Inside the sarcophagus is a putrid corpse of a man-like Bull.
33. Tomb of the Bull. The floor of this tomb is covered with 1 foot of slimy stinking water. Water drips from the ceiling. There is a large sarcophagus here which has relief carving on it depicting a man-like Bull walking on two legs.
Secret Ref Info: The lid is quite heavy; requiring a STR ability check roll to push it aside. When the lid is pushed aside four luminous green chaotic spirits spew forth from within the sarcophagus and fly out into Map Key 32 where they each enter the nostrils of one of the Bull Statues. These then bring the bronze bulls in Map Key 32 to life, they attack!
Map key 34
This room is the destination from the teleport at map keys 25-26. Map key 30 and 34 interact with each other in an interesting way. Everything in map keys 30 and 34 can be seen and heard in either room, but any physical interactions are separate. Spells cast in either map key do not affect the other room or characters in it. There is a teleportal in the Northeast corner but it does not work all the time. When a character enters the square where the teleportal is they are 2-in-6 transported to map key 30 in the same square but appear to anyone else in the room not to have left. A character who leaves room 30 by either of the doors disappears from view. The doors in map key 34 are false but real in map key 30.
Just to make things interesting, we can teleport a monster, burning oil, or some other annoyance including red herrings like a key that doesn’t fit the doors, into one of the squares of map key 34 some time after one or more Player Characters are transported here, roll 1d4, 1 – NW, 2 – NE, 3 – SW, 4 – SE. Any Characters in map key 30 won’t be affected, can’t be attacked, nor can they attack monsters in map key 34.
All doors, including the false ones, are locked; this means they must be forced open or the locks picked.
34. Jinx Room. This room has two doors.
Secret Ref Info: The false doors are locked; this means they must be forced open or the locks picked.
This room is the destination from the teleport at map keys 25-26. Map key 30 and 34 interact with each other in an interesting way. Everything in map keys 30 and 34 can be seen and heard in either room, but any physical interactions are separate. Spells cast in either map key do not affect the other room or characters in it. There is a teleportal in the Northeast corner but it does not work all the time. When a character enters the square where the teleportal is they are 2-in-6 transported to map key 30 in the same square but appear to anyone else in the room not to have left. A character who leaves room 30 by either of the doors disappears from view. The doors in map key 34 are false but real in map key 30.
1d4 rounds after one or more Player Characters are transported here. Each Turn there is a 2-in-6 chance something gets teleported into one of the squares of this room: roll 1d4, 1 – NW, 2 – NE, 3 – SW, 4 – SE.
| 1d8 Die Roll | Item |
| 1 | A Key, there is a 5% chance it will fit the doors. |
| 2-3 | Oil, a flask of oil appears and drops onto the floor. It forms a 3’ pool. A character in the square drips oil for 2 rounds. A character in the square may slip and fall prone 2-in-6. |
| 4 | Torch, a flaming torch appears and drops onto the floor. If it lands in the same square as oil, or a character dripping oil, it then lights. Burning oil causes 1d8 points of damage each round. Note that if oil has landed on a character it burns for 2 rounds. |
| 5 | A single Wandering Monster teleports into the room. Use the level 1 Wandering Monster Table. |
| 6-8 | Nothing. |
Any Characters in map key 30 won’t be affected, can’t be attacked, nor can they attack monsters in map key 34.
Full Level
Now that you know how it’s done here is a Level 1 map you can populate yourself. I was always inspired by maps and hopefully you will be too. You’ve got this. Let your imagination run wild. It is drawn from the same entrance and exits to the other levels.
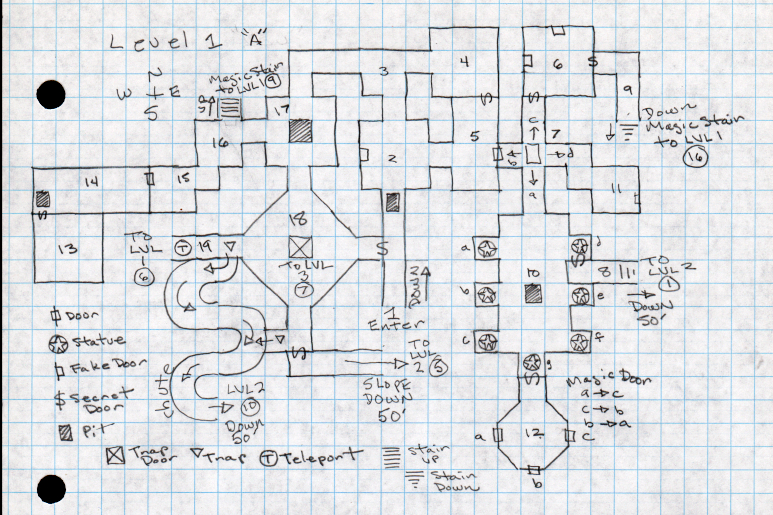
What Wandering Monster Table Do I Use Now?
In theory it is “Level 1” and we should use the Wandering Monster table for that level. However, if the Players have taken their characters to Level 2 or 3 with reasonable success then the Wandering Monsters for either of those two levels could be used to populate our new map keys. Much depends on your assessment of how the Players are faring. If their characters have accumulated enough experience to reach Level 4 by all means use the Level 4 Wandering Monster table in Cook/Marsh on page X55.
Map Key Notes
I’ll share a few thoughts of my own regarding the new map keys
Map key 7
This is the old moving block trick. The block moves randomly when approached, roll 1d4: 1→a, 2→b, 3→c, 4→d.
Map key 9
The magic stair goes down and down, any length you like really, and ends on this same level at map key 16. The distance could be different every time the stair is used.
Map key 10
Statues, a, b, c, d, e, f, g, these statues can be magical, and say or do something, or just be different from each other in some way.
Map key 12
This room has magic doors which when you go in you come out another, so a to c, c to b, and b to a.
Map key 16
The magic stair goes up and up, any length you like really, and ends on this same level at map key 9. The distance could be different every time the stair is used.
Map key 19
There is a trap here, a slide that goes to level 2. There are two traps that drop Characters into the chute. They are slippery and can’t be climbed back up. Also, the traps close at the top so even if someone could climb up they can’t open the trap and escape. It looks like a long hallway but it is a trick. If the Player Characters manage to get by the trap the teleport goes to map key 6 and the Characters can’t get beyond the teleport.
Collated Underworld
All three levels of our Underworld have been collated into a Post.
Conclusion
The value in aggregation of map keys is that they build interactions and story. If we invent connections as we go along, we improvise, we draw together elements of what can become more complex story. We did not know when we began that the Acolytes of Pestilence would feature so significantly but we drew together the Acolytes, the creature Devious Ingrate, and more. With the addition of B2, placing our Underworld in a greater Wilderness we readily tie the Acolytes, as a sect of Chaos, into a broader potential story along with the Chaos Cult and the Winter Cult of the Bordermen. These factions of Chaos surround the Keep and their interactions suggest the basis of potential further story.
We have suggested that the Acolytes, who have recovered the pox ridden Zombie in the coffin as part of a plot, will try to smuggle it into the Keep but first they must transport it on a long wilderness journey. This is assuming of course that the Acolytes survive their encounter with the Player Characters in the Underworld in Level 1 at Map Key 8. Note that we must always make the actions of the Player Characters the pivot upon which events for good or evil turn, so this too can be considered a test of alignment.
As I have pointed out above, a wilderness is a far less controlled environment purely in terms of its potential encounters. Unlike an Underworld, in wilderness monsters of high hit dice, and their number appearing, create the potential for an complete destruction of the Player’s Characters. We are cautioned in the text of the rules, and instructed, to fit the encounter to the Player Characters. Our moderation of the game has to allow the Players to weigh risks to their Characters and thus information regarding the potential danger of an encounter must be presented to them. Poor decision making should not ever shield Player Characters from consequences. As with all things, there is a certain amount of trial and error involved and Characters will perish from decision and the roll of the dice. Even in the Underworld chance plays its part in all of this and we must let the results stand. With luck and a little judicious caution the Players won’t bump their Characters off immediately.
In the next article I’ll discuss how I would administer this adventure from soup-to-nuts as a Ref and what game play might look like as a Player. In the mean time I’ll refer you to D&D Volume III of Gygax and Arneson’s The Underworld & Wilderness Adventures, Example Of The Referee Moderating A Dungeon Expedition beginning on page 12, the Example of play in Holmes on page 39, the Sample Dungeon Expedition in Moldvay on page B59, and both the Solo Adventure in Mentzer’s Players Handbook on page 13, as well as Your First Game beginning on page 4 of Mentzer’s Dungeon Master’s Rulebook, (BECMI). Mentzer’s text is the most comprehensive example of play but the others contain nuggets.
Related Posts – History of The Borderlands – Garrison of the Keep – Corporal of Scouts – Scouts – A New Wilderness Class – Rumours of the Borderlands – Hex Encounters on the Bordermen’s Road – Next Map – The Desert of Mirages