The Old School Dungeon – Levels 1-3
General Information
The doors in this underworld are wood bound with copper straps and studs. They are green with oxidization.
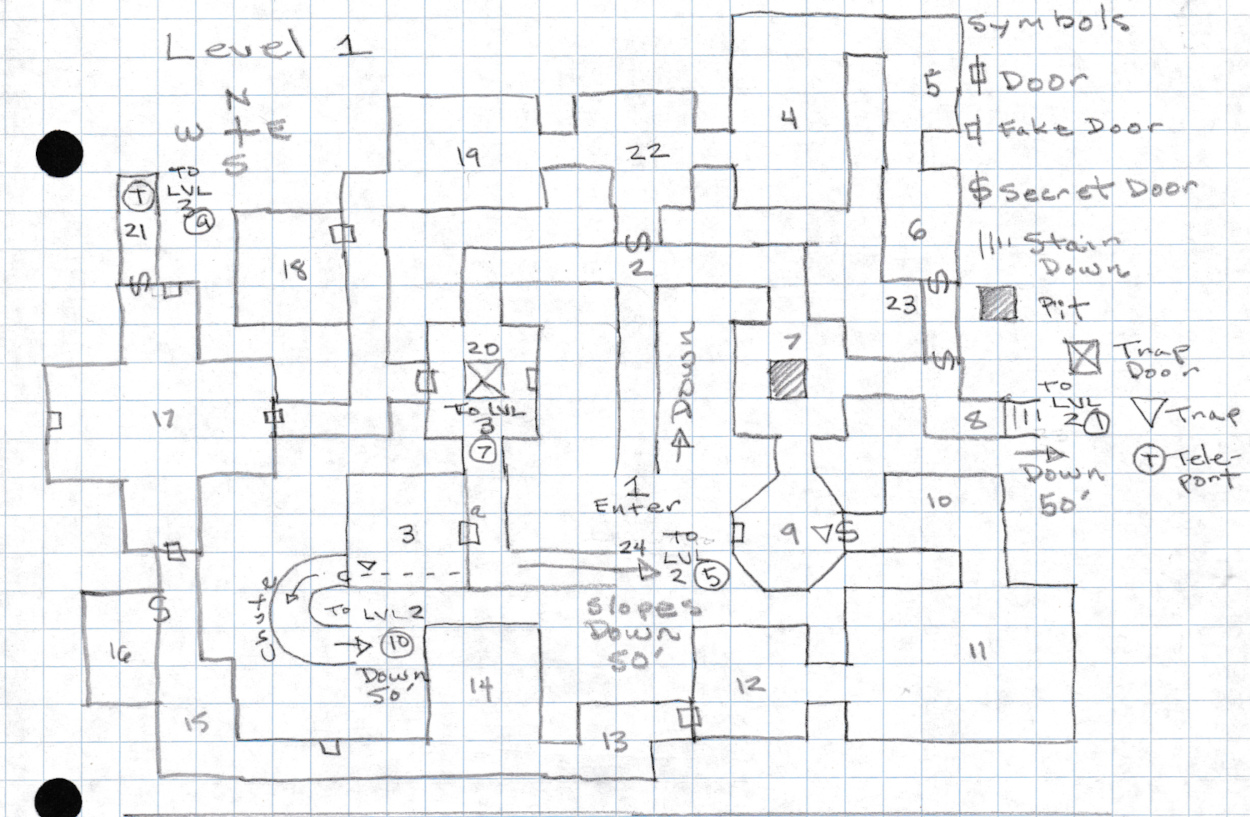
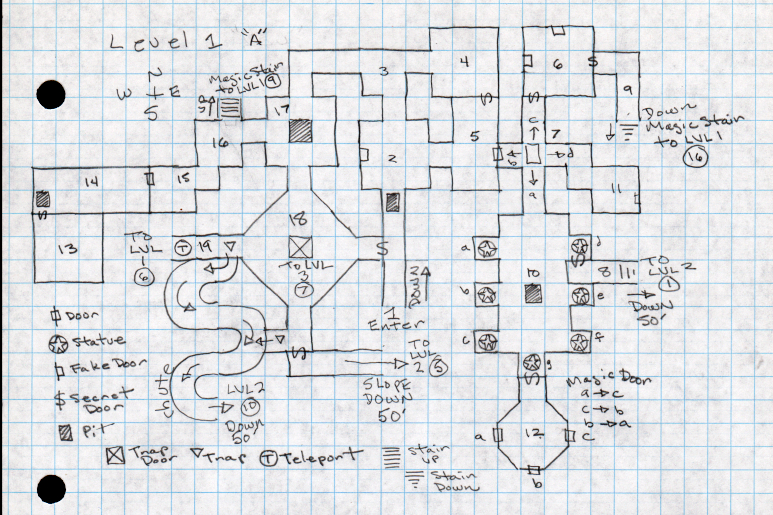
Level 1 Underworld
1. Enter. Dawn finds you at the site of an ancient ruin on a high barren hilltop. Large moss covered fallen stones reveal that there once was a building here. All that remains now is an outline where its proud walls once stood. Within the jumbled stones a weather-worn wood trap door, perhaps once an entrance to a cellar, lies broken and open revealing an entry into the ground. When you look closer you can see that a tunnel slopes downward; daylight shines into the first 30’ of the tunnel before shadows and the dark conceal whatever it is that lies beyond. It doesn’t smell very nice, dank, and something else you do not recognize.
A mere few steps from the entrance there is a cairn of stones. Cairns as you know are stones piled over items to protect them from animals.
Secret Ref Info: Inside the cairn is a backpack with 100’ of Elvish rope (thin but strong) tied to it containing:
- A Dwarf made lantern, one flask of oil, a pair of socks (one size fits all), a mirror, a fish-fur hat, a flask of water, 1 weeks Dwarf made iron ration rations (hard biscuits which can be eaten by anyone), a compass, and we’ll see what else comes up. A slice of Shrieker Mushroom wrapped in a bit of linen cloth.
- An initial map, incomplete. This will show the entrance and a hallway or two, and the secret door refer to Map Key (2) just for fun.
- An apothecary prescription on parchment:
Apothecary Glumluck’s Blindness Cure – Ingredients: 1 portion of Shrieker Mushroom approximately the size of a slice of pie. Instructions: When blinded by snakes or other venomous creatures consume 1 portion of the mushroom raw. This mushroom has a somewhat unpleasant taste. Therefore, the Shrieker Mushroom may be lightly toasted, salted, and peppered to taste without affecting the cure. The restorative effect is immediate. The player must make a saving throw vs. Poison to avoid the side effects of eating the mushroom. Side effects lasting one hour may be a deep sleep in some patients.
2. Corridor. A bit of tattered cobweb hangs from the ceiling at the end of the sloping tunnel. The sloping tunnel ends in an east-west intersection.
Secret Ref Info: Beside the door is a hidden switch, a stone which is slightly more worn than the others. There is a 3-in-6 chance of spotting it; 4-in-6 if the character is an Elf. There is a peephole in the door which allows Map Key 2 to be spied on from behind the door; refer to Map Key 22. If the switch is not found the door may 2-in-6 be forced open.
3. Dusty Room. This room appears to be mostly empty, dusty cobwebs hang in the entrance. What purpose it might have served is no longer obvious. It doesn’t look like anyone has entered in a long time. From the vantage point of the door, in one corner a cavity in the wall can be seen that contains a dusty bottle containing a mysterious liquid. There is something else there as well, two leather pouches.
Secret Ref Info: The bottle contains a potion of healing, it is still sealed. The two small leather pouches, tied shut, respectively contain 43 Silver and 50 Gold coins.
There is a concealed switch on the left outside the entrance to this room, a stone, which when pushed in and released, temporarily disables the Special (see below) for 1 Turn. If the stone is held in the Special is disabled as long as it is held. There is a 1-in-6 chance of spotting the switch; 2-in-6 if the character is an Elf.
Description of the Special. A character stepping on the northwest corner of the room, marked with an inverted triangle, triggers the floor Special. The floor splits open along the dashed line dropping all characters within the room into a chute that takes them to Level 2 Map Key 6. While the chute does not injure the characters the danger is that they are now on Level 2. Once triggered the floor closes 1 Turn later and is reset. The chute is too slippery to be climbed back up to Level 1 and even were this possible the floor cannot be opened from below.
4. Stalactite Plop. Water has made ingress here and slowly drips from the ceiling forming stalactites and stalagmites, plop, plop, plop. There is a big odd looking stalagmite partially blocking the eastern exit of this room but it is just possible to squeeze past it and into Map Key 5. It looks like some smaller stalactites in the ceiling have dropped to the floor recently.
Secret Ref Info: If players search this room they may 1-in-6 spot that there are large rat-like clawed animal tracks leading eastward and through the eastern exit. When tracks are visible (in wilderness or underworld) they can be followed by an INT attribute roll, a character must roll less than or equal to their INT. A character may also identify the type of tracks if a character has previously seen the creature that left them. Players can mine the 10’ square blocked by the stalagmite with a pickax (in one turn) to enlarge it in order to get by it with normal movement; otherwise it takes characters a full two melee rounds to wiggle through the gap. The sound of mining may 2-in-6 attract wandering monsters each turn. The Giant Shrews at map Key 5 will attack anyone mining and their movement is not restricted by passing through the hole.
5. Stalactite Drip. Water drips from the ceiling forming stalactites and stalagmites. Stalagmites partially block the southern exit of this room and one large one in Map Key 4 partially blocks the northern entrance. Hideous mottled three foot creatures crawl here, not rats, but something similar, ugly things with long snouts which are better left undisturbed, Oh my, too late, they squeal and squeak, they wiggle their hungry toothy snouts in your direction, and attack!
Secret Ref Info: Thin stalagmites partially block the southern exit of this room like vertical bars but it is just possible to squeeze through them and into Map Key 6. Players can mine the 10’ square blocked by the stalagmites with a pickax (in one turn) to enlarge it in order to get by it with normal movement; otherwise it takes characters a full two rounds to wiggle through the gap. The sound of mining may 2-in-6 attract wandering monsters each turn.
There are 3 Giant Shrews, Armor Class 4, 1 Hit Dice, 4, 1, 6 Hit Points, Move 180/60, 2 Bites 1-6, Saving Throw F1, M10, Alignment Neutral, Shrews, like bats, use the sound of their squeaks to “see.” Magical silence confuses them, refer to B42. Shrews always have initiative on their first attack; in addition they gain + 1 on their initiative roll for their second attack. As theatre-of-the-mind Giant Shrews attack the head and shoulders. Consequently, when they attack any creature of 3 hit dice or less, the victim must save vs. Death or run away in fear, monster description page B42. As part of our wholistic understanding of the rules we need to understand how they interact to successfully play this creature:
Initiative: The Giant Shrews have initiative by default. Therefore, at step A of the Combat Sequence on page B24 there is no need to roll for initiative, the Shrews proceed to step B.
Saving Throw vs. Death (Fear): The monster doesn’t have to make a successful attack so any attack will do. The attacked character then makes the required saving throw by class, e.g. a Cleric consulting the table on page B26, finds in the Death Ray or Poison column an 11 which means the player must roll 11 or better using 1d20 to completely avoid the effect of fear. Failure means they are forced to run away.
Application of Fear: Fear typically means that a character or monster runs away. In the case of the Cleric spell Remove Fear, in Moldvay page B16, we find out later in the Expert Rules, page 5, that the spell is reversible and Cause Fear can make a character/monster flee for two turns. There are not many examples in Moldvay in which the number of turns of running away is specified. For the Giant Shrew, the number of turns is not cited in the Monster’s description so we can leave it open ended or make a ruling to follow in future as part of our mastery of the game. We can decide, in principle, that at least two turns of running away due to fear is appropriate in this context. I also wouldn’t conflate a Cleric’s turning of undead with fear as it is not fear of the Cleric but the exercise of divine power which really causes them to retreat.
In practice, when a character flees in fear, they turn their back and run at their full movement towards “safety” which is a path we might speculate should be known to the character, and monster free, proceeding towards Map Key 1. We can speculate that an encumbered character carrying up to 80lbs will move 60’ per turn (20’ per round of melee) which means the Giant Shrews are faster than players moving 180’ per turn, (60’ per round of melee). They can easily pursue and attack fleeing characters. Attacks from behind, or against retreating characters gain +2 to the attack roll and the defensive benefit granted by a Shield to AC is lost, refer to the topic RETREAT on page B24. Example a fleeing character with an AC of 4 adjusted to AC 3 by a shield loses the benefit and the attacker gains +2 vs AC 4 when they make their d20 attack dice roll vs. the character’s back. Monsters of up to 1 Hit Dice must roll equal to or greater than 15 vs. AC 4, should the Dungeon Master roll 13 that is still a successful hit because they add +2 to their roll, 13 + 2 = 15.
6. Statue Room. The ceiling of this room drips forming stalactites and ribbons of calcium line the walls. In the northeast corner of this room is a bronze statue of a bear-like creature on a pedestal, only the head is a grinning jack-o-lantern. The damp has caused the statue to oxidize green. It too is partially covered in calcified drippings from the ceiling. The jack-o-lantern bursts into flame within, its fiery grin and eyes flicker illuminating the room with constantly moving light and dark shadows. The the head turns to look at you (the players) and growls before saying, “I am half as wide as I am tall, I am not seen yet I am there, where the compass cannot point to me I am to be found, an end is my beginning, where am I?”
Secret Ref Info: If players search this room they may 1-in-6 spot that there are large rat-like clawed animal tracks leading north and through the northern exit.
A riddle is just a way of describing something without saying what it is, so no obvious “door” words for example. The statues words refer to the nearby secret door to the south. The clues work out as follows: a door is half as wide as it is tall, secret doors are hidden until found, a compass needle always points north so the door is not north, in the southern end wall where it seems one can go no further.
The walls of this room, including the secret door, are covered in ribbons of calcified drippings from the ceiling. Beside the secret door is a hidden switch, a stone in the wall also covered by drippings. When pushed, the switch opens the secret door. There is a 1-in-6 chance of spotting the secret door; 2-in-6 if the character is an Elf. If the switch is not found the door may 2-in-6 be forced open.
7. The Chamber. Damp cobwebs hang in the doors of this chamber. Water drips from the ceiling and pools on the floor before trickling into cracks in the centre of the room.
Secret Ref Info: The centre of the chamber contains a hidden pit. There is a 3-in-6 chance the pit will open when its cover is stepped on, there is a 1-in-2 (3-in-6) chance that falling causes 1d6 points of damage. 5 Snakes, Cobras, Armor Class 7, 1 Hit Dice, 1, 3, 6, 2, 5 Hit Points, Move 90/30, Bite or spit 1-3 +poison (spit blinds, poison causes death 1d10 turns, alternatively 1d8 damage or half damage with a successful saving throw), Snake Saving Throw F1, M7, Alignment Neutral, description page B42. These snakes will strike anyone who falls into the pit. They cannot climb out. Any torches thrown down into the pit quickly go out in the following round due to the wet conditions.
At the bottom of the waterlogged pit is a rotting skeleton in rusted chain mail. It lies draped over a wet and rotting wooden chest, coins are spilling out of it into a puddle of wet water. The chest contains a Bag of Holding, a Healing Potion, 250 silver coins, and 150 gold coins. Any attempt to bring up the chest, say by using a hook and rope, will cause the chest to 3-in-6 fall apart spilling out its contents.
The “corpse” has a rusty dagger and sword in rotting leather sheaths. It has rusting chain armor and a helmet which are still good. There are 10 gold coins in a decaying leather bag attached to a rotting leather belt; its buckle a coiled silver dragon is worth 5 silver pieces. The belt, clothes, and boots are unusable.
There is a Shrieker in Map Key 9 which means it will shriek the moment light is brought near; which means as soon as it is within 60’ of illumination. Therefore as soon as light is brought into Map Key 7, (we see from looking at the map, Map Key 7 and 9 are within 60’) it will shriek, refer to Map Key 9 for more information.
8. Stair of Pestilence. The Acolytes of Pestilence wear costumes not unlike those of plague doctors underneath their armor, mottled and stained brown cowhide garments and the beaked leather mask of a plague doctor. A Cleric, carrying a lantern, leads this strange procession up the stair. The glow of this lantern is visible for some distance in the pitch dark. The Acolytes carry a wooden coffin which is bound with metal straps and locked with a padlock. It is common knowledge that the Acolytes of Pestilence are said to appear whenever there is a plague but some say this sect brings the plague with it wherever it travels. (True)
Secret Ref Info: There is a peephole in the northern secret door which allows the corridor, Map Key 8, to be spied on from behind the secret door, refer to Map Key 23. We’ll assign a 1-in-6 chance of spotting the peephole; 2-in-6 if the character is an Elf.
Note – if the Special Wandering Monster table at Map Key 9 indicates Chillyfist the Ghoul then the Acolytes cannot appear on the stair until after the encounter with the Ghoul. When Chillyfist is indicated by the special encounter table the Ghoul will enter Level 1 from the stair Map Key 8 and pass through 7, and 9 in pursuit of otherwise distracted player characters. If Chillyfist doesn’t appear proceed as follows:
The Acolytes have retrieved what they believe is the coffin of an ancient plague victim from Level 2. They intend to use it to spread plague in what they see as fomenting a dominant state of Chaos. The coffin contains a Zombie which will of course attack all present on being released as the 2nd Level Cleric cannot control it. The route they will travel is through 8, 7, 2, and 1 and exit the dungeon carrying their burden.
Thrax, 2nd Level Adept Cleric, Armor Class 2, 2 Hit Dice, 5 Hit Points, Move 60/20, Mace 1-6, Saving Throw C2, M7, Alignment Chaotic, spell Cure Light Wounds – B15, class B9. Thrax has instructions from Contagion the Patriarch of the Acolytes of Pestilence to obtain the coffin and take it to the Keep on the Borderlands without anyone interfering. They will try to smuggle the coffin containing the Zombie into the Keep, no easy feat. The plot is to spread the plague there. The Acolytes consider the former Patriarch Devious Ingrate a failure and an abomination. They have no loyalty to it. Devious Ingrate worshipped a tentacled bat-like entity rather than Chaos, a heresy.
Acolytes, names; Pox, Buboe, Pus, Boil, Fester, Putrid, Armor Class 2, 1 Hit Dice, 2, 4, 5, 6, 3, 1 Hit Points, Move 60/20, Mace 1-6, Saving Throw C1, M7, Alignment Chaotic, B30.
Zombie, Armor Class 8, 2 Hit Dice, 6 Hit Points, Move 120/40, Sword 1-8, Saving Throw F1, M12, Alignment Chaotic, monster description page B44, Undead Human, they are slow fighters, and always strike last (no initiative roll needed), make no noise, not affected by Sleep or Charm spells. May be turned by a Cleric.
We’ll propose that this particular Zombie carries disease, like a rat, refer to page B41, Anyone attacked by the Zombie has a 1 in 20 chance of being infected (this chance should be checked each time the Zombie successfully hits). The victim may still avoid the disease by making a saving throw vs. Poison. If failed, the victim will either die in 1-6 (1d6) days, otherwise the victim will be sick in bed (unable to adventure) for one month. Roll 1d4: the disease is only deadly on a result of 1.
Thrax objective is to follow the instructions of a superior and leave this dungeon with the coffin and its contents. The Zombie will be used to spread pestilence at the Keep if they can smuggle it in and then release the Zombie. The Adept isn’t particularly looking for a fight but will readily accept one as part of the Divine Universe of Chaos this sect believes in. Thrax carries a key to the lock of the coffin.
9. The Mushrooms. This dark damp room is choked with sickly chartreuse mushrooms with yellow spots. They are nauseating to look at and they don’t smell nice either. In fact this room smells of rot. They range in size from less than a foot in height to nearly eight feet and the largest have a trunk of one foot in diameter. They look to be as hard as wood. To pass under them human and elf characters will have to duck. Underfoot are bones, humanoid and animal bones.
Secret Ref Info: There is a Shrieker here which will shriek the moment light is brought near; which means as soon as it is within 60’ of illumination. Therefore as soon as light is brought into Map Key 7, (we see from looking at the map, Map Key 7 and 9 are within 60’) it will shriek, refer to Map Key 9 for information.
The shriek lasts 3 rounds and there is a 3-in-6 chance of attracting Wandering Monsters each round of the shriek. The Shrieker will then move at normal speed through the mushrooms and out the secret door. However, for player characters movement through this room is halved.
Shrieker: Armor Class 7, 3 Hit Dice, 10 Hit Points, Move 90/30, Saving Throw F1, M12, Alignment Neutral, there is a 50% chance (3-in-6) each round of the shriek that wandering monsters will be attracted; they arrive in 2d6 rounds, description page B42. The Wandering Monsters will come from the Wandering Monster List for level 1 on page B53. You can make your own Wandering Monster list for any level of the underworld, or any area if you so wish. The following is an example of a special Wandering Monster List:
Special Shrieker Wandering Monster List
| D8 Die Roll | Monster |
| 1-4 | Kobolds, refer to Map Keys 22, 17. (if the Kobolds are not in play use Skeletons, B42) |
| 5-6 | Fire Beetles, B31 |
| 7 | Cave Locust (1), B33 |
| 8 | Ghoul (1), Chillyfist, B35 |
3 Fire Beetles, Armor Class 4, 1+1 Hit Dice, 4, 5, 2 Hit Points, Move 120/40, 1 Bite 2-8, Saving Throw F1, M7, Alignment Neutral
Cave Locust, Armor Class 4, 2 Hit Dice, 10 Hit Points, Move 60/20, Fly 180/60, Jump 60’, Bite 1-2,Bump 1-4, Spit Poison (1 Turn), Saving Throw F2, M5, Alignment Neutral, when frightened or attacked they shriek which 20% per round attracts wandering monsters. Spits attack vs. AC 9 when cornered.
When the Shrieker shrieks and Chillyfist is indicated by the special encounter table the Ghoul will enter Level 1 from the stair Map Key 8 and pass through 7, and 9 in pursuit of otherwise distracted player characters. As Chillyfist is responding to the shriek it makes sense that the Ghoul cannot be surprised.
Chillyfist the Ghoul, Armor Class 2, 1 Hit Dice, 9 Hit Points, Move 90/30, 2 Claws, 1 Bite 1-3, +Paralysis (2-8 Turns), Saving Throw F2, M9, Alignment Chaotic, description page B35. Moves Silently and cannot be heard. Charm and Sleep spells these have no effect on Ghouls. Chillyfist wears a magic Ring of Invisibility which makes the Ghoul invisible granting a 5-in-6 chance of surprising others. Invisible characters cannot be attacked but when Chillyfist attacks the ring can no longer keep the Ghoul invisible for the remainder of the turn in which the Ghoul’s attack occurs. While invisible anything Chillyfist picks up becomes invisible until it is set down. Chillyfist responds to the sound of the disturbed Shrieker at Map Key 10 or is found as a wandering monster on Levels 1 or 2 when Ghouls are indicated. Using the advantage of surprise granted by the Ring of Invisibility, Chillyfist will attack living characters, including monsters, paralyse them and then carry them to the Ghoul’s lair on Level 2, Map Key 4. If Chillyfist fails a morale check the Ghoul will attempt to get away, becoming invisible, and hide in the lair.
The trap is a crushing block. There is a 3-in-6 chance the crushing block will strike when the trap square is stepped on, causing 1d6 points of damage. A character is not pinned by the block but struck. The block prevents movement through the square, blocking the secret door because it does not retract and it is 1d6 turns before the block is withdrawn and the trap reset. The trap switch beside the door, which would ordinarily disable it, is malfunctioning and only works as long as it is held in.
Beside the secret door are two hidden switches, stones in the wall. There is a 1-in-6 chance of spotting them; 2-in-6 if the character is an Elf. There is a peephole in the secret door which allows this room to be spied on from behind the door; refer to Map Key 10. If the switch is not found the door may 2-in-6 be forced open.
There is a half rotten false door in this room which can be removed as if the door was being forced open, 4-in-6. Concealed behind it is a niche in the wall containing a leather case. Inside the leather case is a Spell Scroll upon which are written two first level MU/Elf Spells, Magic Missile, and Shield.
10. Chartreuse Room. The walls and ceiling of this room emit a sickly chartreuse glow and therefore in this dim light no torch is needed. The light is emitted by a strange growth of luminous fungi.
Secret Ref Info: When the chartreuse fungi is touched it wilts temporarily where touched and the dim light is extinguished. Beside the secret door are two hidden switches, stones in the wall covered by fungi. The first switch opens the secret door and the second is meant to disable the crushing block trap in Map Key 10 but it no longer works. Pushing it does nothing. There is a 1-in-6 chance of spotting them; 2-in-6 if the character is an Elf. If the switch is not found the door may 2-in-6 be forced open. There is a peephole in the secret door which allows Map Key 9 to be spied on from behind the door. The glow from the fungi is not bright enough to reveal the peephole to anyone in Map Key 9. We’ll assign a 1-in-6 chance of spotting the peephole; 2-in-6 if the character is an Elf.
11. Mushroom. A narrow path winds through this room from Map Key 10 to 12. The room is also dimly lit by a sickly chartreuse glow similar to Map Key 10. This room is crowded on either side of the path with yellow spotted chartreuse mushrooms that nearly touch the ceiling. They are as hard as wood.
Secret Ref Info: The Shrieker from Map Key 9 will try to hide here among the Fungi. There is a 3-in-6 chance of spotting it but of course it can’t help shrieking if light is brought into this room or it detects movement, refer to Map Key 9 for details, and don’t forget the sound will draw monsters!
Hidden inside one of the mushrooms next to the path is a +1 magic sword. It is concealed in a secret compartment in the bole of the mushroom which can be spotted 1-in-6, 2-in-6 by an Elf. The compartment opens easily when the door in the bole of the mushroom is pushed, there is no switch.
This is the sword which fits in the wall niche in Map Key 17.
12. Burned Room. There were once fungi in this room similar to Map Key 11 but the walls are black and the mushrooms are all charred black from burning. The path from Map Key 11 continues to the wooden door. The wooden door in the west wall is blackened from fire.
Secret Ref Info: Among the wood-like charred remains of the mushrooms is a black iron box which was once concealed in a mushroom. It contains 250 silver coins, and 150 gold coins. This box is hard to spot, 1-in-6 when searching, and it is locked.
13. Soot. There is soot on the floor here from the burned door in Map Key 12.
Secret Ref Info: Stepping into this room launches spring-fired darts: 1-6 darts hit for 1-4 points of damage each. Opening the door resets this trap.
14. Armory. This room is draped with dusty old cobwebs. It was once an armory and there is a wooden rack here on the north wall where seven spears remain, seven shields which are painted with red dragons hang on the west and east walls. There was once armor here as well, as stands for them line the west and east walls. Helmets, also painted red, lay discarded on the floor.
Secret Ref Info: The spears, helmets, and shields, though old, are still perfectly usable. One shield is a +1 Magic Shield but there is nothing visually different about it.
15. Chamber. This room is empty except for some graffiti on the wall which says, “Nothing here”.
Secret Ref Info: Searching this room will reveal a loose flagstone in the Northeast corner of the room. The flagstone will sound hollow if tapped. Under it is a small sack containing 100 silver pieces.
The secret door which permits entry to Map Key 16 can only be opened by a Cleric, it is otherwise Wizard Locked. The switch will only respond to the touch of a Cleric. There is a 1-in-6 chance of spotting the switch that opens this secret door; 2-in-6 if the character is an Elf. There is a peephole in the secret door which allows the corridor, Map Key 15, to be spied on from behind the door. We’ll assign a 1-in-6 chance of spotting the peephole; 2-in-6 if the character is an Elf.
16. Cleric Secret. This room contains shelves of preserves contained in sealed jars and pots which are now spoiled and unfit to eat. It doesn’t look like anyone has been here in a very long time as all the jars and pots are covered in dust. There are three boxes as well which are stacked in the Southwest corner. On top of the boxes is a book.
Secret Ref Info: The secret door which permits entry to this room can only be opened by a Cleric, it is otherwise Wizard Locked. The switch will only respond to the touch of a Cleric. There is a 1-in-6 chance of spotting the switch that opens this secret door; 2-in-6 if the character is an Elf. There is a peephole in the secret door which allows the corridor, Map Key 15, to be spied on from behind the door. We’ll assign a 1-in-6 chance of spotting the peephole; 2-in-6 if the character is an Elf.
The book on top of the box is actually a Magic User spell book containing the spells Invisibility, Knock, and Wizard Lock. There is a note tucked into the first page on a bit of parchment which says;
“While lost and running from that invisible thing which hunts us I found this room by chance; a fortunate refuge indeed for it cannot enter. I hear it outside clawing at the door. I will wait for it to lose interest and then I will depart this underworld. I do not know where you are or where you went so I will wait for you at the entrance. I am leaving here what I cannot take with me as it will not do to be slowed from carrying overmuch.”
Of course here by “invisible thing” we are referring to Chillyfist.
The three boxes are filled with straw which protects some glass bottles within. These contain unspoiled root beer and magical potions; two of Healing, one each of Invisibility, and Growth.
17. Cross Room. What purpose this chamber once had is now forgotten and nothing is left which might provide a hint. The Kobold leader, Bark, has posted guards outside the south and east doors to warn of intruders and 8 Kobolds are waiting impatiently for orders.
Secret Ref Info: The Kobold leader, Bark, has planned an ambush and is awaiting news from the guards he\she has posted at Map Key 22.
The plan is that the Kobolds at Map Key 22 move to Map Key 17 and inform Bark (allow one turn for the Kobolds to deliver the message and for Bark to issue instructions) who then divides the pack into two with Bark in the first group, 8 in each group, first group moving through 17 through 20, to 2, and the second group moving from 17 through 19, through 22, to 2. The idea is to ambush the Player Characters from two directions at or near Map Key 2. The Kobolds know all about the secret door at Map Key 2. Remember that Monsters can open any door.
There are two half rotten false doors in this room which can be removed as if the door was being forced open, 4-in-6. Concealed behind the western door is a niche in the wall containing a lever switch that opens the northern secret door.
Behind the northern false door is a sword shaped niche which is empty. It once contained a magic sword. The sword is located on Level 2 in Map Key 4, Skullthrasher. When it is inserted in the niche it imbues the niche with the magical power to transform any other sword placed in the niche to a +1 magic weapon, +2 vs. Undead.
There is a secret door in the north wall which has a peephole that may be spotted 1-in-6 if there is light in this room 4-in-6 if the room is dark due to the faint glow from the candle showing in the peephole. There is no visible means of opening the secret door, nor may it be forced open except by magic. There is no x-in-6 chance of opening this door.
There are 10 Kobolds at Map Key 17. One, Growl, stands guard watching outside of room 22 in the eastern corridor at the bend looking North. There is another guard, Wag, posted at the door to the south corridor of Map Key 17. The remaining 8 Kobolds are inside the room, Map Key 17. Just for fun we’ll name them too; Bark (their leader), Yowl, Pant, Drool, Fearbite, Scruf, Limp, and Snort.
Kobolds: Armor Class 7, 1/2 Hit Dice, 4 (Bark), 2, 4, 3, 3, 4, 3, 2 Hit Points, Move 60/20, Saving Throw Normal Man, M6, Alignment Chaotic, Moldvay page B37.
18. Storage. This room is empty.
Secret Ref Info: Nothing to see here, unless you are a Magic-User, in which case you can see in the middle of the room a lit red candle floats in mid air illuminating the room. It cannot be touched, it burns but is not consumed, it marks an invisible teleportal to Level 1 Map Key 11. Entering the square transports a character or monster to the Southeast corner of Level 3 Map Key 11 whether they can see the candle or not.
19. Storage. This room is empty.
Secret Ref Info: Nothing to see here except that after a Cleric enters the room the message “GET OUT” is drawn in dripping poisonous ichor on the west wall. If touched the ichor causes 1d8 damage or half damage if a saving throw vs. poison is successful.
20. Covered Pit. There is a trap door here with a chain and padlock. There are wood doors west and east. The entrance to the passage south is blocked by spider webs, they are dusty and no longer sticky.
Secret Ref Info: Under the locked trap door is a shaft descending to Level 3. Its walls are damp. Once the shaft is opened a pungent odour of fungi and damp rises from below. There are iron rungs in the east shaft wall which descend into the darkness. 10’ below a leather sack is tied to the rungs and it contains 100 silver pieces.
On the walls of the shaft 4 Crab Spiders cling, concealed by their chameleon like camouflage, they have changed their colour to match the shaft wall. 4 Crab Spiders, Armor Class 7, 2 Hit Dice, 3, 10, 5, 11, Hit Points, Move 120/40, Bite 1-8 damage +poison (+2 Saving Throw, fail and character dies in 1d4 turns), Save F:1, M7, Alignment Neutral, monster description page B43.
Note – Save or Die results from poison are very harsh and can end the game pretty quickly for a player. You can customize the rules! You can house rule to avoid a game-ending-death:
- The poison of the Crab Spider is causes additional damage, Save vs. Poison, 1d8, a successful save causes only 1/2 damage, or nothing.
- The bite of the Crab Spider causes 1-4 turns of paralysation, Save vs. Paralysation;
- The bite of the Crab Spider causes Sleep, like the spell of the same name.
21. The Closet. This room might be best described as a closet. It stinks for there is a pile of dung here. At the end of the closet a lit red candle floats in mid air illuminating the closet.
Secret Ref Info: The secret door contains a peephole which is not easily detectable from the other side, Map Key 17. There is a pile of dung here behind the door, it is Ghoul dung which can be identified with an INT attribute check roll if a character has previously seen the creature that left it.. The players may infer there is a Ghoul somewhere in this underworld.
At the end of the closet is a lit red candle floating in mid air, it cannot be touched, it burns but is not consumed, it marks an invisible teleportal to Level 3 Map Key 9. Entering the northernmost square transports a character or monster to Level 3 Map Key 9.
Note – It might be interesting to have the candle burn down as it is used a certain number of times. This would limit the number of times the teleportal could be used.
22. Guard Room. This oddly shaped room once served as a guard post but little remains now except for some empty stacked wooden boxes. They are sturdy enough that Halflings and Dwarfs can stand on them but the weight of Elves and Humans cause them to break. Little toadstools have begun to grow on them.
Secret Ref Info: Beside the south secret door is a hidden switch, a stone which is slightly more worn than the others. There is a 3-in-6 chance of spotting it; 4-in-6 if the character is an Elf. There is a peephole in the door which allows Map Key 2 to be spied on from behind the door. If the switch is not found the door may 2-in-6 be forced open.
There are four Kobolds here taking turns as watchmen spying on Map Key 2 so they will not be surprised by Player Characters there. They are as short as Dwarfs and so they have found a box from the guardroom to stand on which allows them to use the peephole. The moment they see light at Map Key 2, or detect movement with their infravision, they will depart and report to their leader at Map Key 17. The route they take is from 22, through 19, taking the corridor south to 17. This trip takes 2 turns because Kobolds move 60’ per turn. Should combat begin the Kobolds move 20’ per melee round. Refer to Map Key 17. for what the Kobolds do after they inform their leader about intruders.
Kobolds: Armor Class 7, 1/2 Hit Dice, 3, 2, 4, 3 Hit Points, Move 60/20, Saving Throw Normal Man, M6, Alignment Chaotic, Moldvay page B37.
The four Kobolds at Map Key 22 will, in view of their self interest, think better of a fight with the player characters until they can re-join their “pack”. Even though their behaviour is Chaotic, their individual survival depends on the the pack which greatly outnumbers the player characters.
Should the Kobolds hear the shrieker at Map Key 9 they will inform Bark at Map Key 17 and then the Kobolds march to Map Key 9, this takes 10 Turns via 17, 20, 2, 7, 9.
23. Closet. Oops! There was no Map Key 23. We can add this key to the map, near Map Key 8. This closet is empty.
Secret Ref Info: Whichever secret door is used this appears to be a closet with a dead end. There is a 1-in-6 chance of spotting the switches that open the secret doors; 2-in-6 if the character is an Elf. There is a peephole in the southern secret door which allows the corridor, Map Key 8, to be spied on from behind the door. We’ll assign a 1-in-6 chance of spotting the peephole; 2-in-6 if the character is an Elf.
24. Slope. There is a sloping passage here. A column of ancient soldiers two abreast stand here, skeletons in rags and rusted armor, they point spears in your direction and attack!
Secret Ref Info: 8 Skeletons, Armor Class 7, 1 Hit Dice, 6, 5, 5, 1, 2, 5, 6, 4 Hit Points, Move 60/20, Spear 1-6 damage, Save F:1, M12, Alignment Chaotic, not affected by sleep or charm spells, these undead can be turned by a cleric, they attack until destroyed, monster description pageB42.
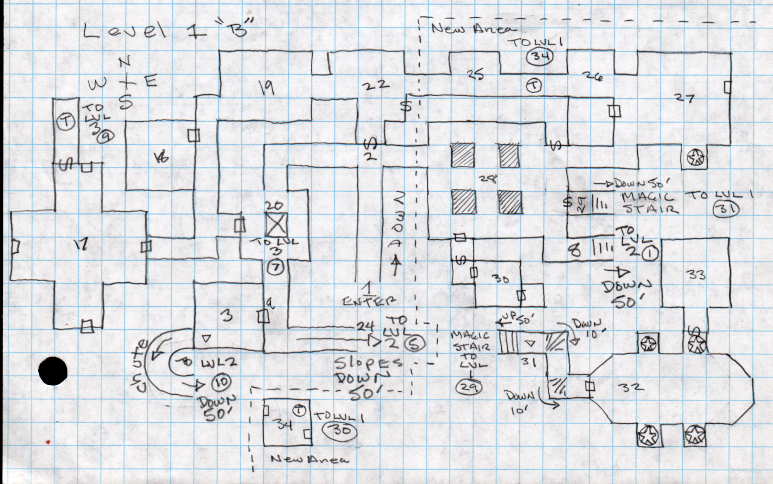
Level 1 New Half Level
The following layout, drawn from the connections between levels, is half old and half new. The area to the right of the dashed line is new.
How to Deploy a New Map
We have a few options:
- Replace the map before the Player Characters next enter the underworld. In this scenario the players exit only to find that the next time they enter things have changed.
- It will throw the players expectations though if when as the players are attempting to leave the Underworld from Level 2 you then switch out the map. Let’s say the players take the stair from Level 2 to Level 1 Map Key 8 only to find they are now at a dead end. Things are no longer as expected and now they must explore their way out. The Players will be baffled by the map change. They may elect to retreat and look for another exit from Level 2 or 3.
Can you switch back and forth between map layouts? Sure, if that is what you want to do. Be prepared to respond to player incredulity. They will be looking for a plausible reason for this occurrence and the agency to control it if they can. What did they do, or not do, to cause this to happen?
Can you change the layout more than once? Absolutely.
Map key 8
8. Stair. Map Key 8 is retained from the original. Only replace the map key when the Acolytes have been encountered as they appear but once in this location.
Map key 25-26
25-26. Alcove. These alcoves are jammed floor to ceiling with wooden boxes filled with mouldy straw. They are blocking the passage between them. Light shines through the cracks between the stacked boxes. Beyond, there is a lit black candle floating in the air which illuminates the square it is in with an eerie red light. The candle is half burned down.
Secret Ref Info: The lit black candle is a one way teleportal which transports anyone entering the square from either direction to Level 1 Map Key 34.
Map key 27
27. Effigy of The Bull. This room is empty except for the oxidized bronze statue of a Bull. The door to the west is closed.
Secret Ref Info: The eyes move and follow characters as they move through the room. The eyes shoot poisoned needles every round at visible characters, 1d8 damage +poison. It shoots in an arc and can’t aim the needles at the western door and the area below it, or the SE corner square.
When poisoned a Character fails their saving throw vs. poison they painfully and involuntarily dance which grants the Bull statue +4 to further attack dice rolls. A -4 dice roll modifier is applied to a poisoned Character’s to-hit rolls. The effect lasts 2-12 Turns. Dancers collapse and are helpless in 5 Turns. Observers, those Characters able to see the dancing one, must successfully save vs. spells or they too start to dance uncontrollably in the same way, and for as long, as the original victim.
How can we expect to implement this?
Example: A character fails their saving throw vs. poison. The Ref rolls 2d6 and gets a 7 which means they will dance for 7 turns. The character begins to dance uncontrollably and will collapse in 5 Turns after which they can be attacked without retaliation. In the meantime the other Players in the party can all see the poisoned character and they must all save vs. spells or they too will have to dance for 7 Turns. Some pass and some fail. Dancing Characters may be attacked by monsters which gain a +4 dice roll modifier, example: if they roll a 7 add +4, sum and the result is 11, which may or may not indicate success. The dancing Players deduct -4 from their attack dice rolls, if they roll 14 subtract -4, the result is 10, which may or may not indicate success. All dancing Player Characters collapse in 5 turns.
Hidden inside the bronze Bull are 500 sp and 10 gp.
The door to the west is locked. The room was once an armory but has been plundered. Its shelves and racks are empty except for a broken spear, battered shield, and for the magic armor, which looks like a pile of discarded rusty chain mail that has been left on the floor due to its condition. Chain +1 and a +1 Shield.
Note: The magical encumbrance of the armor is 150 coins.
Map key 28
28. Pit Room. This large room is empty except for a door and passage to the South and a passage East. The walls are painted with frescoes of Bulls running on two legs in wilderness. They are chasing down prey, man-like creatures.
Secret Ref Info: There is a secret door and passage which bypasses the teleport between map keys 25 and 26. Beside the secret door is a hidden switch, a stone which is slightly more worn than the others. There is a 3-in-6 chance of spotting it; 4-in-6 if the character is an Elf. There is a peephole in the door which allows Map Key 2 to be spied on from behind the door. If the switch is not found the door may 2-in-6 be forced open. This leads to map key 22, there is a new secret door here too.
Every time a character tries to enter map key 28 (moving East) they are turned around and find themselves turned around and moving West, unless they enter map key 28 by moving East backwards.
There are four 10’ hidden trap pits here with spikes in the bottom. There is a 3-in-6 chance the pit will open when its cover is stepped on, there is a 1-in-2 (3-in-6) chance that falling causes 1d6 points of damage. That’s a bit of old-schoolery which is not in the rules. In other words there’s only a 50% chance of injury falling 10’.
Note – The pit can be deeper, up to 30’ and/or have spikes which cause additional damage, 1-in-12 spikes are poisoned causing Death in 1d10 Turns or 1d6 damage.
There is a secret door to the East, leading to map key 29. There is a 3-in-6 chance of spotting it; 4-in-6 if the character is an Elf. The door may 2-in-6 be forced open.
The door to the south opens to a closet, there is an empty stone pot here covered with a lid. There is a bucket, brush, and mop here as well. At the back of this closet is a magical secret door. There is a 3-in-6 chance of spotting it; 4-in-6 if the character is an Elf. This magic door may be forced open with a Knock spell, there is no switch on this side but it may be easily pushed open from the other side. Filling the pot with 50 coins of any type opens the secret door; the coins will then disappear.
Map key 29
2. Magic Stair. A stair descends into darkness.
Secret Ref Info: This is a magical stair which descends 50’ to map key 31, which is a trap. The entire stair turns into a slide when map key 31 is entered. The secret door can easily be opened from this side by pushing.
Map key 30
30. Jinx Room. The door to this room is locked.
Secret Ref Info: All doors, including the false ones, are locked; this means they must be forced open or the locks picked. The eastern closet contains a bucket and mop.
Everything in map keys 30 and 34 can be seen and heard in either room, but any physical interactions are separate. Spells cast in either map key do not affect the other room or characters in it. There is a teleportal in the Northeast corner but it does not work all the time. When a character enters the square where the teleportal is they are 2-in-6 transported to map key 30 in the same square but appear to anyone else in the room not to have left. A character who leaves room 30 by either of the doors disappears from view. The doors in map key 34 are false but real in map key 30.
Map key 31
31. Stair. A stair descends into darkness.
Secret Ref Info: The entire stair from top to bottom turns into a slide 2-in-6 when the square marked with a triangle is entered. Characters on the stair then slide down to map key 32. The slide cannot be climbed back up but it resets to a stair in 6 Turns.
Map key 32
32. Shrine of the Bulls. Here are four scowling bronze statues of man-like Bulls standing on their hind legs. They are all green with oxidization. Water drips from the ceiling. The floor is 1 foot deep in green filthy, slimy water.
Secret Ref Info: This dank stinking room is the destination of the slide trap from map key 32. The secret door is opened by pulling the nose ring of the statue in front of it. The Bull Statues contain 50 copper coins, 50 silver coins, 30 gold coins, 20 electrum coins, the magic pot in map key 28 adds 50 coins to the insides of these statues.
4 Bull Bronze Statues, Armor Class 7, 1+1 Hit Dice, 6, 7, 5, 6, Hit Points, Move 60/20, 1-6 damage, Save F:1, M12, Alignment Chaotic, not affected by sleep or charm spells, they attack until destroyed. Inside the Bulls are distributed 50 copper coins, 50 silver coins, 30 gold coins, 20 electrum coins, and the magic pot in map key 28 adds 50 coins to the insides of the statues.
Map key 33
33. Tomb of the Bull. The floor of this tomb is covered with 1 foot of slimy stinking water. Water drips from the ceiling. There is a large sarcophagus here which has relief carving on it depicting a man-like Bull walking on two legs.
Secret Ref Info: The lid is quite heavy; requiring a STR ability check roll to push it aside. When the lid is pushed aside four luminous green chaotic spirits spew forth from within the sarcophagus and fly out into Map Key 32 where they each enter the nostrils of one of the Bull Statues. These then bring the bronze bulls in Map Key 32 to life, they attack!
Map key 34
34. Jinx Room. This room has two doors.
Secret Ref Info: The false doors are locked; this means they must be forced open or the locks picked.
This room is the destination from the teleport at map keys 25-26. Map key 30 and 34 interact with each other in an interesting way. Everything in map keys 30 and 34 can be seen and heard in either room, but any physical interactions are separate. Spells cast in either map key do not affect the other room or characters in it. There is a teleportal in the Northeast corner but it does not work all the time. When a character enters the square where the teleportal is they are 2-in-6 transported to map key 30 in the same square but appear to anyone else in the room not to have left. A character who leaves room 30 by either of the doors disappears from view. The doors in map key 34 are false but real in map key 30.
1d4 rounds after one or more Player Characters are transported here. Each Turn there is a 2-in-6 chance something gets teleported into one of the squares of this room: roll 1d4, 1 – NW, 2 – NE, 3 – SW, 4 – SE.
| 1d8 Die Roll | Item |
| 1 | A Key, there is a 5% chance it will fit the doors. |
| 2-3 | Oil, a flask of oil appears and drops onto the floor. It forms a 3’ pool. A character in the square drips oil for 2 rounds. A character in the square may slip and fall prone 2-in-6. |
| 4 | Torch, a flaming torch appears and drops onto the floor. If it lands in the same square as oil, or a character dripping oil, it then lights. Burning oil causes 1d8 points of damage each round. Note that if oil has landed on a character it burns for 2 rounds. |
| 5 | A single Wandering Monster teleports into the room. Use the level 1 Wandering Monster Table. |
| 6-8 | Nothing. |
Any Characters in map key 30 won’t be affected, can’t be attacked, nor can they attack monsters in map key 34.
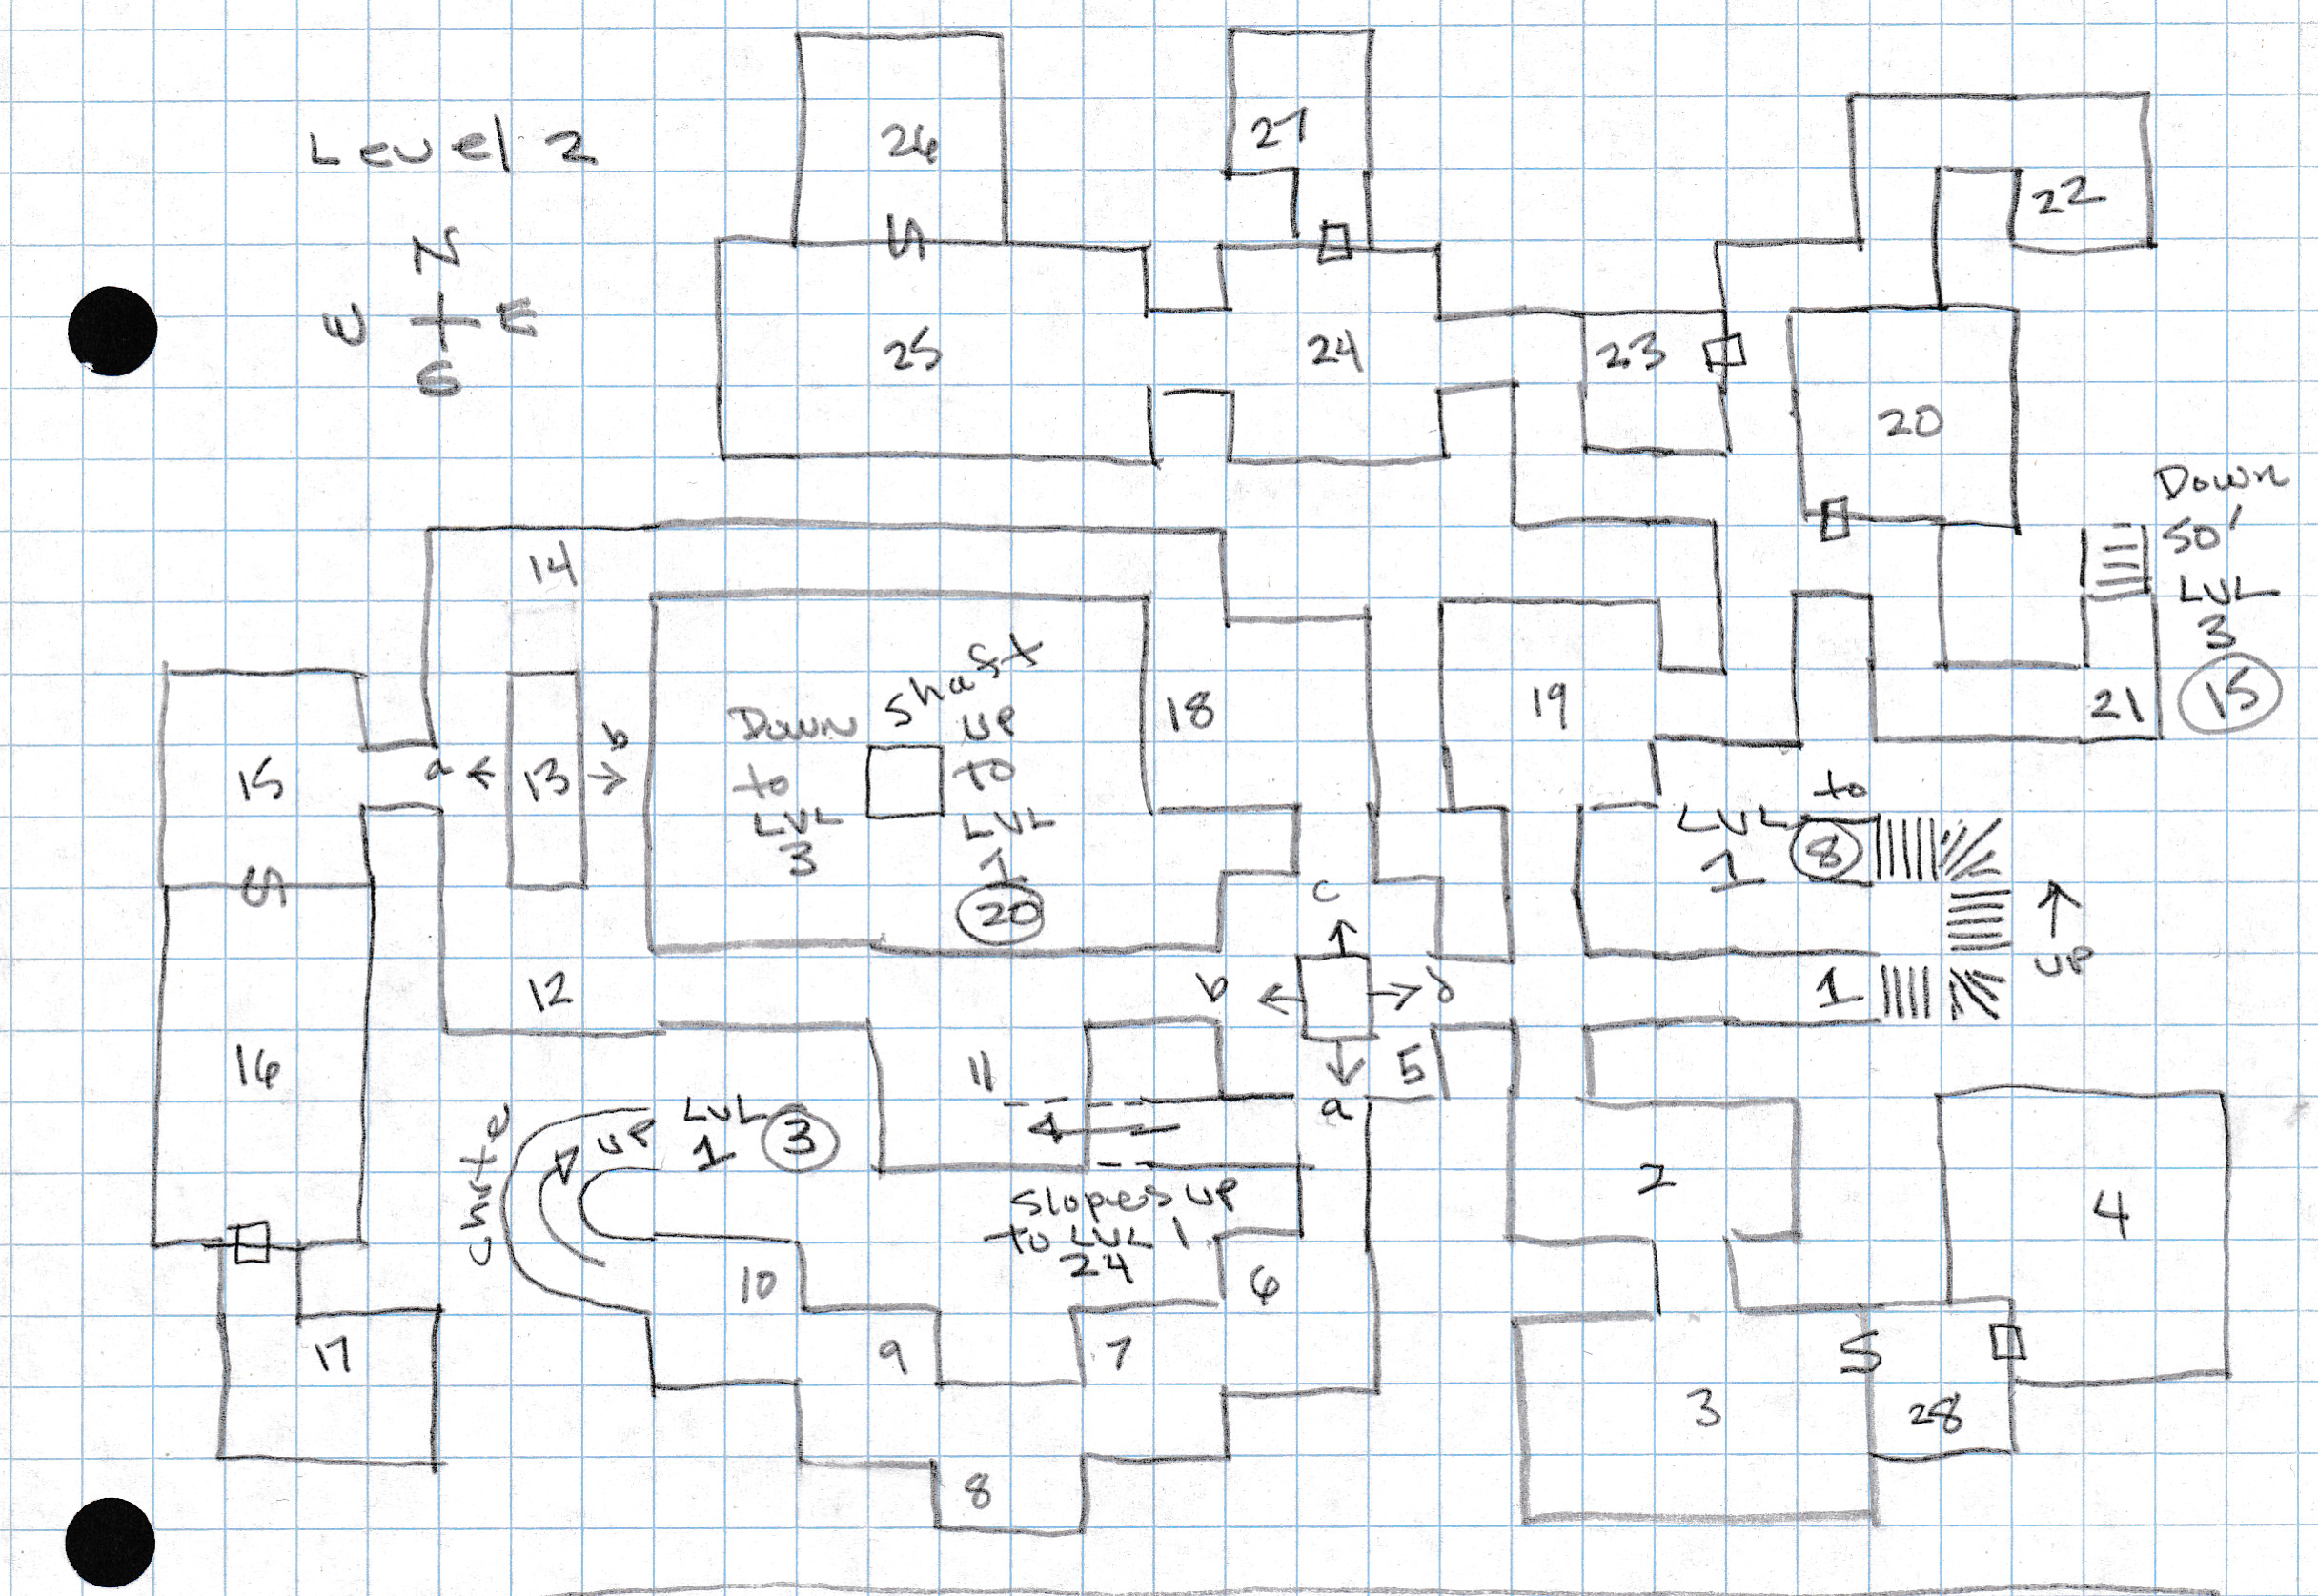
Level 2
Map key 1
1. Bottom of the Stair. The stair from Level 1 Map Key 8 ends here.
Secret Ref Info: There is a trap here, a murder step at the bottom of the stair, which is of a different height and causes characters to trip and fall 3-in-6 of the time if they do not spot it, 1-in-6, 2-in-6 for Elves and it qualifies as “unusual stonework” for Dwarves. Falling causes no damage the character merely falls prone at the bottom of the stair.
Note – It may be implied from the rules of melee that a fallen character forfeits a round of combat in order to stand, would lose any defensive bonus for dexterity or shield and the attacker gains +2 to their attack.
Map key 2
2. Track Room. There are tracks on the floor.
Secret Ref Info: An INT attribute check roll can be used to follow and identify the tracks which belong to Ghouls. They lead North and East to the stair and south but toward and into Map Key 3 where they lead to the East wall and end. The tracks cannot be followed after they reach the stair as they have been disturbed.
There is a 3-in-6 chance the trap door covering chute will open when its cover is stepped on dropping whoever is in the square down the chute. Curiously all the tracks lead around the square containing the trap door, so that is a hint the Ghouls know all about the chute! The chute descends 50’ to Level 3 Map Key 5 where it is a hole in the wall leading upward. The chute is too slippery to climb back up but not for monsters!
Map key 3
3. Mystery Room. There are tracks on the floor which lead from Map Key 2 into this room and to the east wall, where they mysteriously end.
Secret Ref Info: An INT attribute check roll can be used to follow and identify the tracks which belong to Ghouls. They lead to the not-so-secret door, but players will simply see it as ending at a wall. There is a secret door here; there is no peephole. Beside the secret door is a hidden switch, a stone in the wall. When pushed, the switch opens the secret door. There is a 1-in-6 chance of spotting the secret door; 2-in-6 if the character is an Elf. If the switch is not found the door may 2-in-6 be forced open.
Map key 4
4. Ghoul Lair. 3 Ghouls, 4 if Chillyfist is present. The Ghouls are hunched over a corpse of a Giant Shrew which they are in the process of consuming with great relish. They have poor table manners. What table? They are eating off of the floor.
Secret Ref Info: There are 4 Ghouls, Armor Class 6, 2 Hit Dice, Chillyfist, (9 Hit Points) Bonecracker, (4 Hit Points) Nevertaste, (8 Hit Points), and Bilebite (8 Hit Points), Move 90/30, 2 Claws, 1 Bite 1-3, +Paralysis (2-8 Turns), Saving Throw F2, M9, Alignment Chaotic, description Moldvay page B35.
Scattered on the floor amid Ghoul dung, bones, and gristle, are 2000 Silver Pieces, 3000 Gold Pieces, and a +1 Magic Sword named Skullthrasher (it’s written on the blade), +3 against undead which the Ghouls have taken to prevent it from being used against them and they are loathe to touch it. The Ghouls swiped it from the grave of Captain Dumb Fist at Map Key 27, and a leg because they needed a snack.
Map key 5
5. Blocking Stone. There is a grinding sound. A very large stone is moving. It is painted with a mysterious glyph on every side, Ӝ.
Secret Ref Info: An INT attribute roll may be used to discover the meaning of the painted glyph, Ӝ, a player, using d20, must roll equal to or better than their character’s INT; the painted mark on the blocking stone marks the boundary of a tomb. If a character fails the roll they do not understand what the painted glyph represents.
The blocking stone moves 10 feet per melee round and it is triggered by the approach of a character within 60 feet. So when a Fighter is the first closest character to the stone it moves to (a), when a Cleric is the first closest character to the stone it moves to (b), When a Magic-User is the first closest character to the stone it moves to (c), When a Thief is the first closest character to the stone it moves to (d). It then stays put, only returning to its centre home position after characters have departed and are beyond 60’.
If the marching order of the character party is two abreast you can pick one of the two characters as the principle influencer of the stone.
As soon as this stone is in position the characters will want to move it. Don’t allow this. Let them figure out the puzzle.
The blocking stone is not an obstacle to monsters and returns to its home position at the centre of the room when monster’s approach if it is not already there.
Note – just beyond (a) is the sloping path to Level 1 Map Key 24. If the player characters haven’t already met the Skeletons, and (a) is open, these monsters turn about face and attack. We can say that their purpose is to prevent access to Levels 2 and 3.
Map key 6
6. Segmented Chamber. There are tracks on the floor. Frescoes on the walls depict men wearing plague masks hunting large beetle-like insects in an underground cavern.
Secret Ref Info: The tracks on the floor were made by the Oil Beetles in Map Key 8. They can be followed by an INT attribute roll, a character must roll less than or equal to their INT to identify the tracks if a character has seen Oil Beetles before.
There are tracks on the floor made by a Draco Lizard which come from the Magic Door and lead toward Map Key 7. They can be followed by an INT attribute roll, a character must roll less than or equal to their INT to identify the tracks if a character has seen Draco Lizards before.
The Magic Door in the South Wall goes to Level 3 Map Key 12. When the door is opened its interior glows blue with mysterious magical energy (non-reproducible blue?) and the other side cannot be seen. When entered, a character steps into Level 3 Map Key 12.
Map key 7
7. Segmented Chamber. There are tracks on the floor. Frescoes on the walls depict men wearing plague masks hunting large beetle-like insects in an underground cavern.
Secret Ref Info: The tracks on the floor were made by the Oil Beetles at Map Key 8. They can be followed by an INT attribute roll, a character must roll less than or equal to their INT to identify the tracks if a character has seen Oil Beetles before.
Tracks from the Draco Lizard lead from the magic door at Map Key 6. They can be followed by an INT attribute roll, a character must roll less than or equal to their INT to identify the tracks if a character has seen Draco Lizards before.
There is a loose flagstone in the floor, under it are two leather sacks, one contains 300sp, and the other 50gp.
Draco Lizard, Armor Class 5, 4+1 Hit Dice, 13 Hit Points, Move 120/40 fly 210/70, Bite 1d10, Saving Throw F3, M7, Alignment Neutral, description Moldvay page B38. The Draco Lizard is hunting the Oil Beetles but will attack Player Characters.
Map key 8
8. Segmented Chamber. The walls and ceiling of this vault are painted with a colourful fresco depicting men wearing plague masks hunting large beetle-like insects in an underground cavern.
Secret Ref Info: 6 Oil Beetles, Armor Class 4, 2 Hit Dice, 8, 7, 8, 6, 8, 7 Hit Points, Move 120/40, Bite 1-6,Saving Throw F1, M8, Alignment Neutral, monster description Moldvay page B31, Oil beetles are 3′ long giant beetles, they squirt an oily fluid at one attacker range 5’, a “to hit” roll is needed. When hit a victim fights with a penalty of -2 on their “to hit” rolls for 24 hours or until a Cure light wounds spell is used.
Map key 9
9. Segmented Chamber. A ghostly lantern appears, it floats in the air and begins moving.
There are tracks on the floor. Frescoes on the walls depict men wearing plague masks hunting large beetle-like insects.
Secret Ref Info: The tracks on the floor were made by the Oil Beetles at Map Key 8. They can be followed by an INT attribute roll, a character must roll less than or equal to their INT to identify the tracks if a character has seen Oil Beetles before.
A ghostly lantern floats in the air and leads in the direction of a nearby treasure for 1d12 Turns. It moves 60’ per Turn. The lantern will advance ahead of the player characters if they move in the correct direction and stop when the room containing the treasure is reached; it will vanish when the time limit expires.
With regard to the Magic Lantern, we can be a little flexible with the location of treasure; if a treasure has been taken the lantern will move on to the next available treasure. It can pass through doors and secret doors. So the first treasure is in Map Key 7. The lantern will move to that Map Key at 60’ per turn, the same speed as typical player characters, and hover above the loose flagstone if the unguarded treasure hasn’t been found.
Map key 10
10. Segmented Chamber. A chute leads upward to Level 1 Map Key 3. At the bottom of the chute from Level 1 is a pile of debris. There are tracks on the floor.
Secret Ref Info: The tracks on the floor were made by the Oil Beetles at Map Key 8. They can be followed by an INT attribute roll, a character must roll less than or equal to their INT to identify the tracks if a character has seen Oil Beetles before.
The chute is too slippery to climb up to Level 1 Map Key 3. There is a pile of junk here collected from Level 1; an old boot, one glove, bones, a candle, three copper coins, 10’ of rope. We can also put something useful in here from the equipment list; 100’ of Rope, a Sack containing 10 GP, one weeks Iron Rations in a backpack, Boots, Gloves, 6 Torches, Mirror, Holy symbol, a Key to the Zombie coffin padlocks in Map Key 26.
Map key 11
11. Offering Room. This room has an altar in the centre which is about waist high and made of stone, obsidian. The walls bear painted plaster, which is suffering from damp and parts of the scenes painted there have fallen away to the floor. The murals depict offerings being made to a Cleric by humans, humanoids, and monsters. Here it was intended that offerings could be left for the inhabitant of this tomb to be used in the afterlife. On the altar are a bowl and jug.
Secret Ref Info: Bowl contains 50 gold coins. The jug has a stopper and contains a mysterious liquid, a Healing Potion.
The walls of this room sound hollow and if broken open, stones are removed, they will reveal skeletons are hidden in cavities. They remain in place unless the offerings in the following paragraph are removed, see below.
Looting of the tomb always provokes its defence and a hostile reaction by its inhabitants. If the offering is removed Skeletons break out of the walls and attack! 9 Skeletons, Armor Class 7, 1 Hit Dice, 2, 6, 2, 2, 1, 4, 5, 6, 4 Hit Points, Move 60/20, Spear 1-6 damage, Save F:1, M12, Alignment Chaotic, not affected by sleep or charm spells, these undead can be turned by a cleric, they attack until destroyed, monster description Moldvay page B42.
Offerings may be left on the obsidian altar for the Patriarch Devious Ingrate propitiate (gain the goodwill or favour of) Devious Ingrate. They must be of at least 50 sp value. Devious Ingrate has been collecting the offerings and taking them to Map Key 17 thus increasing this monster’s hoard of treasure.
What favour is granted by leaving an offering? This is an opportunity for role-playing this monster. We can imagine that Devious Ingrate won’t want anyone looting the tomb. As long as the player characters are respectful, and take nothing, they may leave unharmed by the tomb’s inhabitants, and with further inducement perhaps some secret about this underworld might be revealed,refer to Map Key 15.
Map key 12
An empty area next to the cage.
12. Arm Area. There is an arm on the floor here, severed at shoulder length, which uses its fingers to crawl across the floor.
Secret Ref Info: The arm on the floor is harmless but it keeps moving around. If anyone tries to attack it the hand makes an offensive gesture and tries to move away. We can propose for the purposes of attack it is AC 9 and has 1/2 Hit Point.
Map key 13
13. Zombie Cage. There is a grilled cage of strange shambling humanoid creatures here, they do not smell good, an unpleasant mouldy rot. They might once have been alive but now they are clearly corpses; dressed in rags. They move silently toward you and without speaking. Fortunately for you they cluster against the grille of the cage, lashing out through the grille with outstretched arms. It is clear they will attack anyone who comes near. It might be a good idea to stay out of reach.
Zombie, Armor Class 8, 2 Hit Dice, 6 Hit Points, Move 120/40, Sword 1-8, Saving Throw F1, M12, Alignment Chaotic, monster description page B44, Undead Human, they are slow fighters, and always strike last (no initiative roll needed), make no noise, not affected by Sleep or Charm spells. May be turned by a Cleric.
Secret Ref Info: The Zombies will roll the cage confining them back and forth, west or east, towards anyone who tries to pass by the cage or enter the passage to Map Key 15. There is a door, which is locked, in the middle of the western side of the cage. One of the Zombies has a key. Devious Ingrate, Map Key 17, can command the Zombie to unlock the door releasing them all to do his bidding.
Zombies can be turned by a Cleric but they cannot retreat further than the limits of the cage.
The players can jam something in the track to keep the wheeled cage from moving at the risk of an attack. They can lure the Zombies back and forth.
Map key 14
14. Slippery Area. There is a slippery pool of what appears to be lantern oil on the floor.
Secret Ref Info: The oil is lantern oil and can be burned. If characters step in it there is a 3-in-6 chance of slipping and falling. Falling causes no damage the character merely falls prone.
Note – It may be implied from the rules of melee that a fallen character forfeits a round of combat in order to stand, would lose any defensive bonus for dexterity or shield and the attacker gains +2 to their attack.
Map key 15
15. Oracle Room. This room is dark, until entered, then braziers in the corners mysteriously alight with heat-less green flame. The room is then illuminated revealing an obsidian statue of Patriarch Devious Ingrate in the middle of the room. The walls are painted with scenes of humanoids bringing offerings to the winged statue in this room. These are depicted as being placed before the statue or in the hollow horned skull the statue is holding. Devious Ingrate is portrayed as a hunched and scowling bat winged human. The body is carved as if it were draped in robes. The Patriarch’s clawed hands hold a horned red crystal skull hollowed to form a basin. This imposing statue practically reaches the ceiling. Its base is a stone block which has Oracle Patriarch Ingrate carved in large block letters.
There is a bronze gong and striker here, green with age and damp.
Secret Ref Info: The bronze gong must be rung to summon the Patriarch. When rung, the gong sounds loudly, check for wandering monsters!The Patriarch will stand behind the secret door 1 Turn after the gong is rung.
When the statue is then approached a reedy voice, barely above a whisper then says, “Place your offering in the skull and I will reveal a secret of this place.”
The voice comes from behind the statue and this can be detected 1-in-6. Devious Ingrate is speaking from behind the secret door to Map Key 16. Beside the secret door is a hidden switch, a stone in the wall. When pushed, the switch opens the secret door. There is a 1-in-6 chance of spotting the secret door; 2-in-6 if the character is an Elf. If the switch is not found the door may 2-in-6 be forced open.
Any offering to Devious Ingrate must be of 50 sp value or he will not reply. Only one of Patriarch Devious Ingrate’s “secrets” is revealed per day. After revealing it the Patriarch will not reply to further offerings, gong ringing, or say anything more. Patriarch Devious Ingrate’s intent is to send player characters into harms way so that this undead monster can collect any treasure they might be carrying. The Ref can pick any Falsehood that suits them:
Falsehoods:
- The bound coffins are locked to keep the dead safe. (False – They are locked to keep the plague Zombies from getting out.)
- The undead can be restrained with the collar-poles found in this tomb. (False – The poles are rotten and unsafe to use.)
- The dead sleep, they care nothing for their grave goods. (False – Taking anything out of a tomb will cause the undead to rise.)
- There is no invisible creature here. (False – One of the Ghouls has an ring of invisibility)
- The magic door leads out. (False – The magic door leads to Level 3.)
- The stair birds can be driven away by loud noise. (False – The Stirges are attracted by noise.)
- Placing the Heart of the Caverns in the pillar will bring calamity. (False – Placing the Heart of the Caverns Ruby in the niche lights Level 3.)
- The wandering dead cannot pass my glyph Ӝ. (False)
- Captain Dumb Fist’s missing sword, Skullthrasher, is cursed. (False)
Map key 16
16. Grave Goods. This room contains the grave goods thought to be needed by Patriarch Devious Ingrate in the afterlife. Everything is in semi ruinous state. Vermin, damp, and mould have ruined the upholstered furniture. Among the bric-a-brac are are three closed chests. Dust covers everything. The walls are painted showing humanoids serving the bat winged Patriarch in the afterlife. There are tracks in the floor which lead southward and to the chests.
They stand so still you might have thought them statues. Silent humanoids stand motionless at the south end of the room. They are armed with swords and clad in rusty mail. Like everything else in this room they are damp, mildewed, and clearly dead. They silently move towards you…
Secret Ref Info: Beside the secret door is a hidden switch, a stone in the wall. When pushed, the switch opens the secret door. There is a 1-in-6 chance of spotting the secret door; 2-in-6 if the character is an Elf. If the switch is not found the door may 2-in-6 be forced open. When anyone searches for the secret door, tries to open it , or succeeds in opening it, Devious Ingrate will command the Zombies which are positioned here to defend the room and attack any intruders.
Should the number of Zombies defending Map Key 16 be reduced in battle to three or less Devious Ingrate will retreat to the sarcophagus at Map Key 17, get in, and close the lid. The sarcophagus protects Devious Ingrate and prevents attack. It is a refuge.
6 Zombies, Armor Class 8, 2 Hit Dice, 6, 10, 8, 5, 11, 7 Hit Points, Move 120/40, Sword 1-8, Saving Throw F1, M12, Alignment Chaotic, monster description Moldvay page B44, Undead Human, they are slow fighters, and always strike last (no initiative roll needed), make no noise, not affected by Sleep or Charm spells. May be turned by a Cleric.
An INT roll may be used to reveal what the tracks are, shoe prints.
The chests are locked (Devious Ingrate has the keys), they contain treasure, the offerings given to Devious Ingrate.
Chest 1:
- +1 Dagger
- Bag of Holding
- 100 Gold Coins
- 150 Silver Coins
Chest 2:
- +1 Ring of Protection
- Scroll, 3 MU/Elf Spells
- Hold Portal
- Magic Missile
- Web
- Scroll Protection from Undead
- Elven Boots
- 250 silver coins
- 200 gold coins
Chest 3:
- 3 Healing Potions
- 1 Poison Potion
- 500 silver coins
- 200 gold coins
Map key 17
17. Sarcophagus Room. This room contains a black obsidian sarcophagus. It has a single glyph carved on its top. Ӝ.
Secret Ref Info: Devious Ingrate, Armor Class 7, 2+1* Hit Dice, 13 Hit Points, Move 60/20, Mace 1-6 damage, Save F:2, M12, Alignment Chaotic, not affected by sleep or charm spells, this undead monster can be turned as if it were a ghoul by a cleric, successful attacks paralyze any creature of Ogre-size or smaller. When an opponent is paralyzed the monster will turn and attack another until all the opponents are paralyzed, or slain. Paralysis lasts 2-8 turns unless removed by a Cure Light Wounds spell, this monster can use speech to command skeletons and Zombies to do its bidding.
Our former Patriarch is now an undead skeleton still wearing the ancient ragged yellow clerical robes of its office and slippers with curved toes. Within its skull, luminous eye sockets blaze with green flame. These shine through pupil holes in a carved wood mask painted in a likeness of the Patriarch’s living face. Around the neck of the skeleton is a red jewel (The Heart of the Caverns) suspended on a silver chain. At its waist, suspended from the waist, are three keys to the chests in Map Key 15. On its skull is a yellow leather skull cap.
This monster is untruthful and devious. It collects treasure but seldom if ever tells the truth. Its pronouncements will send player characters into danger. Devious Ingrate worshipped a tentacled bat-like entity rather than Chaos (heresy) and as such the Acolytes of Pestilence consider the former patriarch an abomination.
This monster will defend its tomb from being looted using its Skeleton and Zombie servants. Devious Ingrate created them long ago to defend the tomb. However, now undead, the former Patriarch has lost the ability to cast spells and all other class abilities. Should the number of Zombies defending Map Key 16 be reduced in battle to three or less Devious Ingrate will retreat to the sarcophagus at Map Key 17, get in, and close the lid. The sarcophagus protects Devious Ingrate and prevents attack. It is a refuge.
The sarcophagus, once closed, is not easily opened. The lid must be pushed aside. It can only be opened on a 1-in-8. The chance of opening may be modified by adding the bonus for a character’s strength. A STR of 14 grants a bonus of +1, meaning the sarcophagus can be opened in 2-in-8. The chance, modified by STR, can never be less than 1-in-8.
The ruby necklace is worth 1000gp (The ruby is the Heart of the Caverns and when it is placed where it was taken from, a niche in Level 3 Map Key 7 pillar c, refer to this map key for more information.)
The skull cap is magical. On the inside of the cap in its silk lining are embroidered the following poetry “Over the mountains, under the stars, the Bat sings, fly! fly! fly!”. Upon reciting this poem at night, the Bat Cap will allow its wearer to sprout bat wings and fly through the air at a rate of 240′ per turn. The flying character can carry 1 extra person, reducing speed to 180′ per turn. The cap does not work during the day; it only works at night or in the dark of an underworld.
Map key 18
18. Guard Room. The walls are painted with murals showing soldiers in the service of the Patriarch. Standing here are 8 skeletons armed with spears. They stand silently, waiting.
Secret Ref Info: The skeletons block the passage to the north. No one may pass unless they are accompanied (led) by a Cleric with an alignment of Chaos or Neutral. The skeletons will move aside allowing passage. Lawful Clerics may not pass; the skeletons attack. Once living these skeletal soldiers continue to serve their master in death.
8 Skeletons, Armor Class 7, 1 Hit Dice, 6, 4, 3, 5, 3, 6, 2, 5 Hit Points, Move 60/20, Spear 1-6 damage, Save F:1, M12, Alignment Chaotic, not affected by sleep or charm spells, these undead can be turned by a cleric, they attack until destroyed, monster description Moldvay page B42.
Map key 19
19. Painted Room. A fresco is falling off of the walls due to damp. There are coloured fragments of plaster on the floor. There is enough of it left still on the wall showing a funeral procession. Soldiers bear a bound coffin.
Secret Ref Info: The bound coffin in the fresco is an ominous hint, the coffins contain plague ridden Zombies. The idea is to scare the players, a little, but they have to make the connection there might be something bad ahead.
Map key 20
20. Sepulchre. The door to this room is wood bound with copper straps and studs. They are green with oxidization. Squeaking and hooting can be heard to the south. It sounds like a flock of birds. There are tracks on the wall and the ceiling.
When the door is opened: The tracks on the wall and ceiling belong to a Carrion Crawler but the players won’t know that, the tracks can be followed with a successful INT attribute Check Roll and they lead up from the stair toward Map Key 24 but the players won’t be able to identify the creature unless they have seen one before other than it is quite large and multi-legged.
This room is very damp and wet. The ceiling drips. Water collects in puddles on the floor. The ceiling was once painted blue with white stars but they have mostly fallen off. The west wall has peeling fresco painting showing coffins being placed in this sepulchre. The east wall shows the soldiers receiving rewards in the afterlife, food being presented by servants, servants working farms, etc. Eight wood coffins lay in the middle of the floor, they are covered in wet plaster debris from the ceiling. At the base of the walls are boxes and little clay figures, the servants of the soldiers in the afterlife, in various acts of work, planting reaping, herding cattle, etc., some are broken.
Secret Ref Info: The squeaking and hooting are the Stirges at Map Key 21.
The coffins contain the remains of the soldiers depicted the fresco. They are still dressed. The boxes contain grave goods, common personal household items without much worth. Each of the eight boxes contain the mask of a Plague Doctor, gloves, and a cowhide shift. These will protect a character from the mysterious miasma (gases) in the Caverns of Level 3. The shift can be worn under armor. The little clay statues have a value of 10 sp each. The skeletons remain inert so long as the grave goods and little statues remain in the room, these items can even be handled. However, if anything is taken out of the room,or broken, the skeletons in the coffins rise and attack intruders.
8 Skeletons, Armor Class 7, 1 Hit Dice, 4, 6, 3, 1, 2, 5, 4, 3 Hit Points, Move 60/20, 1-6 damage, Save F:1, M12, Alignment Chaotic, not affected by sleep or charm spells, these undead can be turned by a cleric, they attack until destroyed, monster description Moldvay page B42.
Map key 21
21. Stair – Roost. The ceiling drips, water trickles down the stairwell which descends into darkness. You can hear numerous creatures squeaking and hooting, like a flock of birds. There are tracks on the floor here which come from the stairway and the level below but they don’t stay on the floor, they go up the wall and are on the ceiling.
Secret Ref Info: The tracks on the floor and ceiling belong to a Carrion Crawler but the players won’t know that unless they have seen one before, the tracks can be followed with a successful INT attribute Check Roll and they lead to Map Key 24 but the players won’t be able to identify the creature other than it is quite large and multi-legged.
As soon as the stair is approached and the first lamp light falls upon the first 10’ of the stair the strange bird-like creatures roosting in this stairwell attack. They fly up and out of the dark. They make shrill and eager cries as they attack.
17 Stirges, Armor Class 7, 1 Hit Dice, 1, 5, 6, 5, 6, 5, 3, 1, 2, 1, 2, 1, 3, 1, 6, 1, 2, 4 Hit Points, Move 30/10 Fly 180/60, 1-3 damage, Save F:2, M9, Alignment Neutral, +2 first attack, successful attack means it is attached and automatically sucks blood each round after its first attack, monster description Moldvay page B43.
The Stirges will chase the player characters if they run. They fly much faster than the players. The players can take refuge in Map Key 20 and shut the door to keep the Stirges out (Refer to Map Key 27 Playing the Carrion Crawler below for a brief discussion of door rules). The Stirges will lose interest in 1d12 Turns (1-12 Hours) and return to their roost in the stair. They do not attack again unless their roost is approached.
Map key 22
22. Chamber of Gnashing. A fresco painted on the walls and ceiling depicts bestial fanged mouths. There is a niche in the South wall which contains a wooden coffer with brass straps.
Secret Ref Info: The wooden coffer is locked and contains 600sp and 40 gp. A Thief can pick the lock. The treasure is protected by a trap. A successful Find or Remove Traps roll will disable the Trap. When the coffer is lifted from the niche a spray of deadly gas fills the room from the mouths, all present in the room must Save vs. Poison or die.
An alternative to death is a save-for-half damage situation. The gas causes 1d4 damage per round and a saving throw reduces the damage by 1/2.
Map key 23
23. Closet. This room has a clothes rack upon which are hanging cow hide shifts. On a shelf above the rack are cow hide gloves and Plague Doctor masks.
Secret Ref Info: These 6 sets of cow-hide garments will protect their wearers from the miasma (gases) on Level 3. They can be worn under armor.
Draco Lizard, Armor Class 5, 4+1 Hit Dice, 18 Hit Points, Move 120/40 fly 210/70, Bite 1d10, Saving Throw F3, M7, Alignment Neutral, description Moldvay page B38.
Map key 24
24. Antechamber. The walls of this chamber are painted with frescoes depicting marching soldiers. The faces have all been defaced. This room smells bad. There are tracks all over the room, floor, walls, and ceiling. There is a door in the northern wall but it has been barricaded shut with spikes and boards. The door is wood bound with copper straps and studs. They are green with oxidization.
Secret Ref Info: The smell is from some monster dung in the Southwest Corner. It’s Ghoul dung can be identified with an INT attribute check roll if a character has previously seen the creature that left it.
An INT attribute check roll can be used to follow the tracks, it looks like a large multi-legged creature and they came from the eastern entrance and lead to the northern door of this room, as if it were chasing something. The tracks belong to the Carrion Crawler in Map Key 27 but the players won’t know what they are unless they have seen one before.
Map key 25
25. Sepulchre. This tomb is in disarray, coffins here are in a jumble, smashed and opened. Boxes of grave goods have been opened and overturned. Little clay figures are smashed. The walls are painted with frescoes.
Secret Ref Info: The following is a more detailed description of the room which requires the players to look more closely; in many respects it is very similar to Map Key 20. It appears this tomb has been looted.
There are 6 bound coffins here, most have been pried open or their lids smashed revealing skeletonized corpses inside.
There are boxes of grave goods which have been opened, searched, and overturned. There are small clay figures, servants and farmers, all of which have been smashed. The grave goods are common personal household items without any value because they are spoiled. The little clay statues are damaged and have no value.
There are six 10’ poles with rusty iron collars here stacked at the west corner. These, if secured around the neck of a Zombie (by pushing – the collars close around the neck of a Zombie, there is a spring and a latch, a rope pull releases the collar), allow the Zombie to be held at a distance and its movement controlled. This requires a successful to-hit roll. The Zombie no longer moves silently. These collars are rusty, the poles are rotten and unfit for use, and will break 5-in-6 if this is attempted.
The walls are painted with frescoes that are still intact but all the faces of the figures are defaced. (South Wall) The bound coffins are shown being carried to other lands by soldiers commanded by Patriarch Devious Ingrate. (West Wall) The coffins are opened by the soldiers who then hold the Zombies at the end of long poles. (North Wall) The Zombies are used to attack the populace of other lands and spread pestilence. It shows plague spreading and claiming many victims in these other lands. A tentacled bat-like entity (also defaced) is shown rewarding the Patriarch for these these deeds. Right next to Devious Ingrate is a glyph Ӝ.
There is a secret door concealed behind the North Wall fresco. Remember, most rules allow any character a 1-in-6 chance of finding Secret Doors and that means they roll a d6 and on a roll of 1, 2-in-6 for Elves. That doesn’t mean they can open it! There is a hidden switch concealed by the fresco painting, the glyph of Patriarch Devious Ingrate is over it, Ӝ. If pressed it opens the secret door. Per the description above be sure to mention the glyph, its a clue! Otherwise, there is a 1-in-6 chance of spotting the switch; 2-in-6 if the character is an Elf. There is a peephole in the secret door which allows this room to be spied on from behind the door; refer to map key 10. If the switch is not found the secret door may 2-in-6 be forced open.
When the secret door is opened the skeletons in the coffins rise 1d4 rounds later and attack. They are here to protect the secret vault. 10 Skeletons, Armor Class 7, 1+1 Hit Dice, 7, 2, 4, 3, 5, 3 Hit Points, Move 60/20, 1-6 damage, Save F:1, M12, Alignment Chaotic, not affected by sleep or charm spells, these undead can be turned by a cleric in the normal way, they attack until destroyed, monster description Moldvay page B42.
Map key 26
26. Secret Vault. The walls and ceiling of this vault are painted with a colourful fresco. There are places on each wall for two coffins. Five coffins remain and they are bound with metal straps. There are two coffins on the West and East walls. There were two on the Northern wall but one is missing. The floor is clean where it once lay.
Secret Ref Info: This vault is painted with scenes of woe. All of the faces have been defaced, chipped away. On the West Wall cities are falling to flame, sword and plague. In the stormy sky above, painted from the walls to the ceiling, looms a black hole in the clouds, a fanged mouth of enormous size. The Northern Wall depicts the Patriarch Devious Ingrate raising pox ridden Zombies from the dead. The East wall depicts the Zombies being imprisoned in bound coffins.
Each wooden coffin is bound with metal straps and locked with a padlock. When the player characters enter the room the coffins shiver and shake as the Zombies would attack the player characters were they able to escape their confinement. They cannot, unless someone is so foolish as to open the locks which keep the bound coffins shut. (The key which opens the padlocks is at Map Key 10.)
We’ll propose that only one imprisoned Zombie still carries disease, like a rat, refer to page B41, Anyone attacked by the Zombie has a 1 in 20 chance of being infected (this chance should be checked each time the Zombie successfully hits). The victim may still avoid the disease by making a saving throw vs. Poison. If failed, the victim will either die in 1-6 (1d6) days, otherwise the victim will be sick in bed (unable to adventure) for one month. Roll 1d4: the disease is only deadly on a result of 1.
5 Zombies, Armor Class 8, 2Hit Dice, 6, 9, 11 (diseased), 4, 7Hit Points, Move 120/40, Damage 1-8, Saving Throw F1, M12, Alignment Chaotic, monster description page B44, Undead Human, they are slow fighters, and always strike last (no initiative roll needed), make no noise, not affected by Sleep or Charm spells. May be turned by a Cleric.
Map key 27
27. Sepulchre. The door to this room is shut with spikes. There is an obsidian sarcophagus in the centre of this room. It has the name Captain Dumb Fist engraved on the top. There is something on the ceiling, a huge hideous worm-like creature with many legs and a mouth surrounded by tentacles.
Secret Ref Info: An Acolyte of Pestilence is hiding in the sarcophagus from a Carrion Crawler which hangs from the ceiling waiting for him to come out. There are bones in the sarcophagus as well belonging to Captain Dumb Fist of the Guards. One leg is missing, taken by the Ghouls. The Captain is wearing a belt and scabbard, which is empty. It fits the sword Skullthrasher in Map Key 4. The scabbard appears to be armor + 1, and a character can only test an item by using it, until it is worn in deadly combat. The curse then takes effect lowering AC to 9. Once revealed, the cursed scabbard may only be removed by a Remove Curse or Dispel Evil spell. Refer to Moldvay B48 Swords, Weapons,and Armor, and Cook-Marsh X48, Weapons and Armor.
The moment the door is opened to this room the Carrion Crawler will lose all interest in the Acolyte Pimple and attack the player characters. Pimple isn’t too pleased his Chaotic companions abandoned him and will join in on any attack against the Carrion Crawler. After that he may be persuaded to temporarily join the party of player characters, for mutual safety, until they leave the underworld or run back into Thrax, in which case his loyalty changes. Pimple will know the names of all the other Acolytes, Thrax, and that they are getting a pox ridden Zombie to use to spread pestilence but that’s all he knows. As we don’t have a wilderness yet we don’t have to speculate where the Acolytes of Pestilence come from or if there is a larger plot.
There are boxes of grave goods, common household items, and painted clay figures of farm workers and servants. Some of the little figures are broken. Ten are worth 1 GP each.
Carrion Crawler, Armor Class 7, 3+1*Hit Dice, 13 Hit Points, Move 120/40, Damage Paralysis, Saving Throw F2, M9, Alignment Neutral, monster description Moldvay page B32, This monster is worm-like, 9′ long with lots of legs. Its mouth is surrounded by 8 paralysing tentacles, all 2′ long. The attack of this creature paralyzes for 2-8 turns on a successful hit unless a saving throw vs. Paralysis is made. The Carrion Crawler will stop and eat its defenceless paralysed prey unless it is attacked. The paralysis can be removed with a cure light wounds spell.
The Acolytes of Pestilence wear costumes not unlike those of Plague Doctors underneath their armor, mottled and stained brown cowhide garments and the beaked leather mask of a Plague Doctor. Acolyte, name; Pimple, Armor Class 2, 1 Hit Dice, 6 Hit Points, Move 60/20, Mace 1-6, Saving Throw C1, M7, Alignment Chaotic, refer to Moldvay page B30.
Map key 28
28. Entrance. There is a secret door here; there is no peephole. This room is empty. The eastern door has a lock.
Secret Ref Info: Beside the secret door are is a hidden switch. The switch opens the secret door. The door is locked and only Chillyfist has the key.
Level 2 Special Wandering Monster Table
The following Special Wandering Monster Table is in keeping with the other descriptions of the level but you do not have to use it if you do not want to.
Special Level 2 Wandering Monster List
| D10 Die Roll | Monster |
| 1-4 | Skeleton (1+1 Hit Die) |
| 5-6 | Zombie |
| 7 | Oil Beetles |
| 8 | Ghoul |
| 9 | Special: Magic Lantern, refer to Map Key 9 for an example |
| 10 | Trick: All lights, torches and lanterns, suddenly extinguish and must be re-lit. |
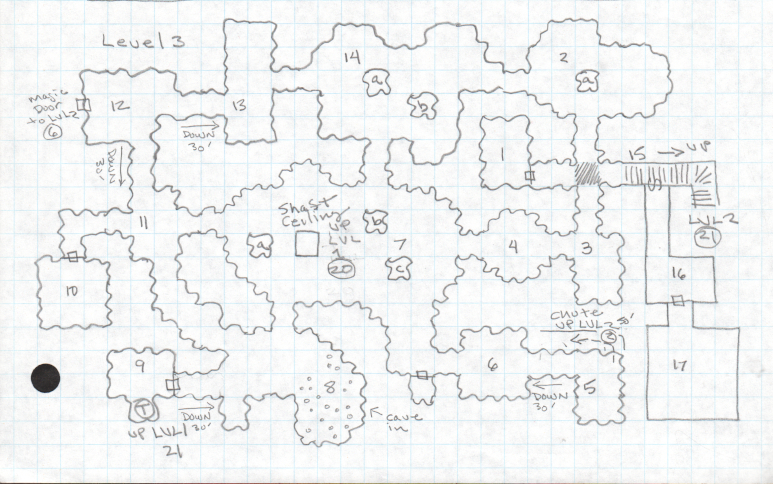
Level 3
Miasma
A good part of this level is filled knee deep with a mysterious pestilential miasma, which requires the Player Characters to wear the protective garments of Plague Doctors until they replace the Heart of the Caverns in its place. If the Player Characters do not wear the Plague Doctor garments, mask, gloves, hat and shift, or remove a part of it, then they risk falling ill from disease as a result.
Undead and Insect Monsters are not affected by the miasma , nor are Jellys and Slimes, but other living creatures suffer the same fate as Characters.
The miasma (gas) carries disease, like a rat, refer to Moldvay page B41. Anyone not wearing the Plague Doctor garments in the presence of the miasma has a 1 in 20 chance of being infected (this chance should be checked each time a character removes a part of the garments). The victim may still avoid the disease by making a saving throw vs. Poison. If failed, the victim will either die in 1-6 (1d6) days, otherwise the victim will be sick in bed (unable to adventure) for one month. Roll 1d4: the disease is only deadly on a result of 1. You can change this to 1-in-8, or 1-in-10 if you would prefer to reduce the chance of death.
Example: Unlucky Fingers has seen a warning and is wearing the Plague Doctor garments found on Level 2 but removes the mask to sniff the air thus exposing the Character to the pestilential miasma. The Player must make a successful saving throw vs. Poison to avoid the disease, Fingers is a 2nd Level Thief so must roll 13 or better, refer to Moldvay page B26 (or the rules of your choice). The Player rolls 10, failure! This means there is a 1-in-4 chance Fingers will fall ill and die in 1d6 days, or become bedridden for a month and unable to go on adventures. The Character will be bedridden for a month if they do not die in the first 6 days. Fingers becomes bedridden and cannot adventure for 28, 30, or 31 days. Roll the d6 to determine on which day to check and see if the character dies in the first six days from the disease. It can be common knowledge that a living Character who contracts the pox/plague often perishes in less than a week. On the day in question I’d tell the Player, roll a d4 (or d8/d10) and if you get a 1 your Character dies from the plague, if not they are sick and bedridden and cannot adventure until you are cured.
How soon does this illness start? At a minimum allow at least 24 hours to pass before the character breaks out in a pox to show the start of the disease. Can other characters catch this plague from the sick one? Not as long as they wear the Plague Doctor garments.
Diseases can be cured with the 3rd Level Cleric spell, Cure Disease, refer to the Cook/Marsh Expert Rules page X12. Clerics do not gain access to this spell until 6th Level which means that a diseased Character’s only hope is chance or, a Non-Player Cleric willing to perform this service for a tithe, or a scroll with the spell on it which even then only a Cleric may read.
Map key 1
1. Workshop. This area is knee deep in miasma. The door to this room is oxidized green bronze. It is painted with a number, 3, and locked. The inside of this room makes one feel as though they are within a clock. The walls and ceiling are covered in oxidized green bronze moving gears and machinery. They tick, tock, click, and whir.
Secret Ref Info: Every Automaton has a key to the door built into their claw, they can open the door and come in for servicing. The room is a magical clockwork which cleans, lubricates, and replaces broken parts, or it once did, now it is not working so well and has fallen into the same decrepit state as the Automatons themselves. This room will not restore any hit points that Automatons have lost. The parts bins are empty, save for a few bits and pieces. There is one bin with a number of discarded heads. When an Automaton enters this room claws from the machine will restrain it and other instruments will go through the motions of cleaning and servicing. The machine will remove evil possessed heads and place them into a waste bin. Unfortunately it will select and a replacement head from the same bin and there is a 65% chance any alternate head will also be a possessed one if not the same one. It will attempt to remove broken or malfunctioning parts and, as the bins are empty or contain broken parts, will replace them with similarly malfunctioning parts or just re-install them. It does not even re-assemble the Automatons properly 25% of the time. Right and left hands and feet will be swapped, heads will be put on backwards, etc. The Automatons act as if everything is assembled normally and try to continue whatever it is they were doing previously, returning to the map key they came from.
Once an evil possessed head is installed an Automaton becomes an uncontrollable self-determining monster. It no longer takes any instruction, though it may feign compliance, selecting an appropriate moment to betray any man-like Character. It will deliberately choose its time with the most impact, doing something wrong at an inconvenient moment, ringing its bell at inconvenient times to attract wandering monsters, running away, or even attacking. This is an area where you, the Ref can be spontaneous and inventive during the play of the game as you role-play this monster.
Map key 2
2. Pillar Room. This room is knee deep in miasma. The pillar holds up the ceiling. Standing in this room are three motionless Automatons covered in rotting blue sack cloth, painted with yellow numbers 6, 12,and 13 front and back. They carry picks. They face the North wall of the cave.
Secret Ref Info: When anyone enters this room the Automaton’s begin to chime. The chimes means that the Automatons are waiting for instruction. Check for Wandering Monsters as they may be attracted by the ringing. 3 Decrepit Automatons numbered 6, 12, and 13, Armor Class 7, 3+1* Hit Dice, 14 Hit Points, Move 30/10, claws 1-6 damage or pick 1-8 damage, Save F:3, M12, Alignment Chaotic, not affected by sleep or charm spells and disease. They always attack last in every round. In 1d6 turns their bells ring and they will leave and go to Map Key 1 for servicing. If attacked they defend themselves and will go to Map Key 1 when damaged. Although they may be commanded by any man-like Character they perform any task but mining very poorly 45% of the time. The Automatons misinterpret and apply non-mining instruction in the wrong way, drop, or break items, with the result they do not know what to do next and stop. If two Characters give simultaneous or conflicting directions they do not know what to do next and stop. They can carry up to 1600 coins.
There are a few gemstones and gold nuggets scattered on the floor at their feet but the Automatons have filled the buckets they carry on their backs with valueless rocks. They automatically empty them making the journey at a walk to Map Key 3.
Map key 3
3. Storage Room. There is a large wooden mine cart here which is overflowing with rock. It is not so big that at one time it could have been pushed through the mine. It is currently stuck and would have to be dug out as the floor is covered wheel deep in rocks.
Secret Ref Info: The Automatons mindlessly dump out their buckets of valueless rock here. The bin contains nothing real of value.
Map key 4
4. Antechamber. The miasma is knee deep here. There is a pick stuck in the south wall.
Secret Ref Info: Under the mist lay three broken Automatons which the Player Characters will stumble across if they search. There are enough parts to make one working Automaton out of the three and the clockwork in Map Key 1 will assemble a working Automaton out of the wreckage of the three, number 7. We have already decided to have some gemstones in this Level so we will consult our unguarded treasure table in Moldvay on page B52 and roll 1d6 to determine a number appropriate to Level 3, we roll a 4. Let us imagine that the Automaton will then return to its place of work at the south wall of Map Key 4 and continue mining until it reveals the gemstones; we can consult the table in Moldvay on page B47 to determine the potential range of worth and either roll for the value or choose it, lets pick 1000 gp, 500 gp, 100 gp, and 50 gp because after all this is Level 3.
Map key 5
5. Cave. This cave is elevated above those below by 30’. A steep passage leads west. Above the door is a wooden sign upon which, painted in yellow, are crudely painted crossbones and the words Danger Miasma.
Secret Ref Info: This room is the exit of the chute from Level 2 Map Key 2. The sign was painted by the miners. At the bottom of the sloped passage can be seen a fog hanging close to the floor, miasma. This room is a little higher and that the western passages slope downward we’ll say that at the bottom of the passage the foggy cloud of miasmic gas clings to the floor of map key 6. Should the player characters descend to the adjacent map key 6 without the necessary protective clothing they will expose themselves to the miasma.
Map key 6
6. Antechamber. Three silent wretches stand here, knee deep, in miasma. They might once have been alive but Their contorted pox ridden bodies are shrivelled and decaying. They immediately turn and move towards you…
Secret Ref Info: 3 Zombies, Armor Class 8, 3 Hit Dice, 10, 9, 14 Hit Points, Move 120/40, Damage 1-8, Saving Throw F2, M12, Alignment Chaotic, monster description Moldvay page B44, Undead Human, they are slow fighters, and always strike last (no initiative roll needed), make no noise, not affected by Sleep or Charm spells. May be turned by a Cleric.
The Zombies will attack. In their ragged clothes each Zombie carries a scroll:
- Scroll, 3 Cleric Spells: Cure Light Wounds, Protection from Evil, Cure Disease.
- Scroll, 3 Cleric Spells: Detect Evil, Light, Cure Disease.
- Scroll, 3 MU/Elf Spells: Magic Missile, Invisibility, Web.
Map key 7
7. Great Cave. The view from the cave floor. The cave is dark, it’s ceiling is not visible as it is beyond the reach of lanterns and torches. The floor of the cave is covered in a heavy knee deep fog and rising from this are waist high stony fungi and foliage. Periodically the stony fungi make a puffing sound and emit a cloud of fog (miasma). Every step crackles and tinkles underfoot as the floor is covered in shards. Water occasionally drips from the dark above you landing with an audible plop.
The view from the shaft from Level 1. The cave is dark, it’s floor is not visible as it is beyond the reach of lantern light. The ceiling of the cave is covered with dripping stalactites. There is a wooden sign upon which, painted in yellow, are crudely painted crossbones and the words Danger Miasma Below. (If the Player Characters lower themselves on a rope below the level of the ceiling a pillar just to the west is revealed – a great pillar descends into the darkness below you.)
Secret Ref Info: At the bottom of the cave can be seen a fog hanging close to the floor, miasma. Should the player characters descend to the floor of this cave, or enter it, without the necessary protective clothing they will expose themselves to the miasma.
The ceiling of this cave is covered with stalactites. The ceiling cannot be illuminated from the floor by a lantern. Water drips from the stalactites, whenever characters enter a square they have a 1-in-8 chance of being struck, it is poison which when consumed causes damage the reverse of a cure light wounds spell, damage 2-7 (1d6+1) hit points; a successful saving throw vs. poison avoids the damage. Shields may be held like umbrellas to shield a player from the water. Wearing the garments of a Plague Doctor also protects characters from the poison.
A swarm of Carnivorous Flies (Robber Flies) fly about in the dark, attracted to light they will attack 1-6 rounds after player characters shine a light in the cavern, they will fly within 30’ and jump to attack from shadow thus surprising on a 4-in-6. 5 Carnivorous Flies (Robber Flies), Armor Class 6, 2 Hit Dice, 6, 6, 8, 3, 10 Hit Points, Move 90/30 Fly 180/60, Damage 1d8, Saving Throw F1, M8, Alignment Neutral, monster description Moldvay page B41, Labyrinth Lord page 75. They can fly into the shaft and climb on the walls. These monsters are patterned similarly to bees and immune to poison.
Pillar (a) Fountain of pain – When the bottom of this pillar is approached the sound of running water can be heard. In a niche on the west side there is a fountain which endlessly and magically fills a small basin and though the water never seems to drain away it never spills over. The water is currently a poison which when consumed causes damage the reverse of a cure light wounds spell, damage 2-7 (1d6+1) hit points; a successful saving throw vs. poison avoids the damage. If the heart of the Cavern is restored to its place this water restores damage and cures paralysis as if it were a cure light wounds spell, 2-7 (1d6+1) lost hit points are restored. This only works once per character once per day. Drinking a second time merely quenches thirst. It would take 3 rounds to fill a flask.
When the player characters approach the base of this pillar (within 30’ in any direction) check for surprise. Tiger Beetles are 4’ long and most of their bodies are concealed by the miasmic fog until they attack, grant an additional +1 to surprise rolls. When these creatures are observed the Player Characters will see the curved striped backs of insects moving through the knee high fog. It billows in their wake. These aggressive creatures attack; they are lairing here and (imagining their behaviour) have laid a cluster of eggs around the foot of the pillar. The mace (which has the name “SMITER” forged in it) lays among the eggs. 4 Tiger Beetles, Armor Class 3, 3+1 Hit Dice, 10, 10, 6, 11 Hit Points, Move 150/50, Bite 2d6, Saving Throw F1, M9, Alignment Neutral, description Moldvay page B31. Treasure: a +1 mace lies on the floor. The eggs are harmless and can be crushed. If left they will be scavenged by other monsters but a few might hatch and later become formidable beetles in their own right.
Pillar (b) This pillar, though stone, is moist and slick with poison which courses and pulsates through veins in the rock as though it were a living thing. Striking the pillar with a weapon causes it to spray poison at the attacker, which causes damage the reverse of a cure light wounds spell, damage 2-7 (1d6+1) hit points; a successful saving throw vs. poison avoids the damage. These veins in the rock, like roots, extend through the ceiling and floor. It is from these that the poison in the ceiling drips. When the ruby the Heart of the Cavern is replaced this pillar becomes inert rock once more.
Pillar (c) This pillar contains a niche which once held the ruby the Heart of the Cavern. The ruby fits exactly in the spot and if replaced here magically: illuminates the caves, changes the water so it is not poison, brings all the fungi back to life, and clears the miasma.
Note – in our previous article I referred to this as pillar 3” (what was I thinking?) so we will have to amend our text for Level 2 Map Key 17.
Carrion Crawlers have made this pillar their lair and they lurk in the darkness above. When the pillar is approached these creatures run down the pillar and attack.
3 Carrion Crawlers, Armor Class 7, 3+1*Hit Dice, 13, 14, 12 Hit Points, Move 120/40, Damage Paralysis, Saving Throw F2, M9, Alignment Neutral, monster description Moldvay page B32, This monster is worm-like, 9′ long with lots of legs. Its mouth is surrounded by 8 paralysing tentacles, all 2′ long. The attack of this creature paralyzes for 2-8 turns on a successful hit unless a saving throw vs. Paralysis is made. The Carrion Crawler will stop and eat its defenceless paralysed prey unless it is attacked. The paralysis can be removed with a cure light wounds spell. These monsters have stuck their treasure into crevices in the rock of the pillar 30’ feet above (the glint of gold and silver coins can be seen at the edge of lantern light) 4000 sp, 2000 gp, 6 gems (rubies) 10 gp, 10 gp, 10 gp, 50 gp, 50 gp, 100 gp. The player characters will have to climb in order to retrieve the treasure and this activity will take a number of turns to complete.
Closet to the west of Map Key 6
There is a wooden door here and the door has a padlock. It is also bound with chains to keep it shut.
Secret Ref Info: This closet is empty. Save for a clay pot here with a lid which is stuck shut that takes considerable effort to remove, A STR check roll can be used to pry off the lid without breaking the pot. This in turn releases a black cloud of noxious fumes, it’s a chamber pot. Not even the plague doctor mask can protect the affected character. The character opening the pot must make a successful saving throw vs. poison or have their prime attribute temporarily reduced to 3 for 1d6 Turns. Characters lose any abilities granted by their prime attribute during this period, saving throws and dice roll modifier penalties may be affected, etc.
Map key 8
8. Cave In. The ceiling has fallen here leaving an open dome-like space above the rubble covered floor. A pair of legs ending in rotten boots stick out from under the rubble. Undoubtedly some unfortunate soul perished here. You barely have time to take another step when silently, from the body, rises a sickly green luminous mist which takes the form of a glowing spirit with blazing eyes.
Secret Ref Info: You may decide upon two Wights; if you do so there are two bodies. Each “body” under the rubble is wearing the garments of a Plague Doctor/Acolyte of Pestilence. When approached a glowing immaterial figure with blazing eyes will rise from the body. It is a Wight which can be attacked with silver, or magical weapons, fire, and of course spells. It can only attack with a weapon if it is inhabiting a dead body. We’ll propose that it can inhabit any nearby dead body at will. The body of the Acolyte(s) in the rubble has(have) a mace. Player Characters drained of energy are dead and themselves become a Wight in 1-4 days. Why wait? The dead body of a Player Character could be inhabited immediately by our ghastly monster, which can then attack using the Player Character’s own weapons, won’t that be fun!
Wight, Armor Class: 5, No. Appearing: 1-6 (1-8), Hit Dice: 3*, 8 Hit Points (and 12 Hit Points if you decide to add a second Wight), Save As: Fighter: 3, Move: 90′ (30′), Morale: 12, Attacks: 1, Damage: weapon + touch, energy drain, Alignment: Chaotic, monster description refer to Moldvay Page B44.
Among the rubble from the ceiling is the treasure this evil spirit has gathered and is hoarding: 3000 Copper coins, 2000 Silver coins, No Electrum Coins, 1000 Gold Coins, 4 Gems : Ruby 500 gp, Emerald 100 gp, Ruby 50 gp, Ruby 10, gp and 2 Jewelry: Tiara 1400 gp, Bracelet 400 gp, Bejeweled Falcon 900 gp, Bejeweled Cup 700 gp, and 10 +1 Arrows.
Map key 9
9. The Cave. This small cave has a lit red candle floating in the air of the southern niche illuminating much of this room. There is an iron door in the east which has a small rectangular open grille of iron bars at face height. Above the door, is a wooden sign upon which, painted in yellow, are crudely painted crossbones and the words Danger Miasma. A short steep passage descends 30’ and the end is covered in a heavy knee deep fog.
Secret Ref Info: The lit and glowing candle floating in mid air cannot be touched, it marks an invisible teleportal to Level 1 Map Key 21. The candle burns but is not consumed. The easternmost door is made of iron and locked; there is a keyhole. The iron door cannot be opened without the key except with magic or unless it is picked. If the grille in the door is peered through characters can see more cave beyond the short passage, Map Key 8.
Map key 10
10. Sepulchre. There is a door here but it has no handle or obvious means of opening. It is simply a slab of stone.
Secret Ref Info: This is a tomb. It has a sliding door that descends vertically into a groove in the floor so it has to be raised, and needs to be propped open or the door will close. It cannot be pushed or pulled open. Once the door is lifted — the player characters notice that for some reason, the miasma outside this room does not enter it. Inside this room are three stone sarcophagi on the West, East, and South walls, each of which has a marble effigy, presumably of the person interned within, on its top. They are very lifelike, a warrior priestess and two noble companions. The three effigies on top of the sarcophagi rise and the Warrior Priestess speaks to the characters: Halt! What do you want here?
The evil of the miasma is prevented from entering the room due to magic. The Players have an opportunity to parley with the three effigies (Living Crystal Statues). They will not attack until the Player Characters have demonstrated their intentions to defile the tomb by looting it. This they will not allow and they will attack the Player Characters to prevent it.
As they are lawful, and as part of our alignment test, these statues desire that the Heart of the Cavern be returned to its place and the caverns restored, refer to Map Key 7. To that end in any parley the “Priestess” will tell the Player Characters that the Patriarch Devious Ingrate has taken the ruby and that it must be returned to the niche in the Great Cavern. If the Players perform this the Living Statues will reward them with the contents of the three sarcophagi as they will have proven themselves to be worthy. As in keeping with our previous alignment test we present the Players with a choice to make. The three living statues cannot leave this room until this is accomplished.
Marble Living Statue, Armor Class: 4, No. Appearing: 1-6 (1-8), Hit Dice: 3*, 8, 15, 10 Hit Points, Save As: Fighter: 3, Move: 90′ (30′), Morale: 11, Attacks: 1, Damage: 1-6, Alignment: Lawful, monster description refer to the Living Crystal Statue in Moldvay Page B37.
Each sarcophagus contains the following, a skeletonized body and grave goods:
- West, +1 Chain Armor, +1 Shield, Potion of Diminuation, Scroll, 3 Cleric Spells: Cure Light Wounds, Protection from Evil, Cure Disease, 1/2 of a broken rod. If re-united with the other half is a magical Rod of Cancellation or some other magical widget. The search for the missing half is an opportunity for further adventure in this Ruin and Underworld.
- East, +1 Sword, +3 vs. Undead, Ring of Fire Resistance
- South,+1 Leather Armor, +1 Dagger, Rope of Climbing
Each Living Statue is capable of bestowing a memory of the long dead interned Character within their sarcophagus if a Player will accept it:
Noble – Clouds gather in the sky above the tower. A hole forms in the sky and a hideous mouth appears. A stone is brought to the parapet, it is marked with a symbol Й. In the hands of the priestess a white light springs forth from the stone and rising upward it closes the hole in the sky. Still, legions of the undead are approaching. “The stone must be hidden or they will capture it”, says the priestess. “We have little time.” The stone is placed in a lined box you take it from the tower and ride away into the marsh. Unfortunately you are being followed so you throw the box into the river just before you are captured by men in plague masks, one of the Acolytes of Pestilence shouts at you: “Where is the stone?”
Secret Ref Info: The finding of this magical Stone is an opportunity for further adventure.
Noble – A mist, miasma, covers the land below the parapet of a tower. Out of this mist come shambling plague ridden corpses. They climb over one another forming a mound as they try to gain the top of the parapet. You know your doom approaches and though valiant you are overwhelmed when the creatures surmount the parapet. Overcome and subdued by the creatures they drag you over the parapet to their master waiting below, an evil priest, who shouts at you: “Where is the stone?”
Secret Ref Info: The finding of this magical Stone is an opportunity for further adventure. The evil priest is recognized as Devious Ingrate if the Player Characters have met it.
Priestess – You are surrounded by the undead. All your defenders have been taken or slain. The undead press at the limits of your magical protection but they cannot cross the magical barrier. There is but one thing remaining you can do. Raising your rod in both hands you break it in two releasing a terrible force which throws back the horde of undead; unfortunately the tower beneath your feet collapses into ruin from the release of the magical energy contained within the rod and you perish in the destruction.
Secret Ref Info: Finding the second part of the magical Rod is an opportunity for further adventure.
Map key 11
11. Intersection. There is a yellow-ish blob of something disgusting slithering over the floor here.
Secret Ref Info: The Ochre Jelly slithers towards Players and attacks. The first attack is presumed to penetrate clothing, leather, etc.
Ochre Jelly, Armor Class: 8, No. Appearing: 1 (0), Hit Dice: 5*, 18 Hit Points, Save As: Fighter: 3, Move: 30′ (10′), Morale: 12, Attacks: 1, Damage: 2-12, Alignment: Neutral. For a description of this monster refer to Moldvay page B40, Mentzer page 35. After the first hit, the Ochre Jelly will stick to its victim, automatically destroying any leather armor, wood shields, and clothing doing 2d8 points of damage each round. This monster can seep through cracks, destroys wood, leather, and cloth in 1 round. It cannot destroy metal or stone, including a Player Character’s armor. Attacks with weapons (or lightning) make 2-5 (1d4+1) 2 Hit Dice Ochre Jellies. These cause 1/2 their normal damage; roll 2d6 and divide the result in half, round down. The monster is damaged by cold and fire.
Map key 12
12. Cave. This cave is elevated above those below by 30’. Steep passages lead south and east. Above each door, is a wooden sign upon which, painted in yellow, are crudely painted crossbones and the words Danger Miasma.
Secret Ref Info: This room is the exit of the magic door from Level 2 Map Key 6. It must work in two directions. The signs were painted by the miners. At the bottom of the sloped passages can be seen a fog hanging close to the floor, miasma. Should the player characters descend to the adjacent map keys, 11 and 13 without the necessary protective clothing they will expose themselves to the miasma.
Map key 13
13. Ruby Mine. This room appears to be empty, the floor is knee deep in miasma.
Secret Ref Info: We’ll make this room a place where a Player can mine the rock for rubies. Gemstones are found in cave areas underground. Where there is a gemstone resource to be mined it may be discovered 2-in-6 by a Dwarf if they are searching as unusual stonework.
There are 4+1d6 gemstones to be mined. Roll on the Gems table to assign the value of each gemstone.
A pick must be used. They must be mined in sequence e.g. there are 9 gemstones to be extracted (1 per Turn) with a value of 10, 100, 100, 500, 100, 25, 250, 50, 50 gp.
The sound of mining may 2-in-6 attract wandering monsters each turn.
Precious metals may be discovered and mined in the same way. Roll 1d6 to determine the vein type; 1-2 copper, 3 silver, 4 gold, 5 Electrum or 6 Platinum. A single vein will have a value of (4+6) x100 coins (weight).
Map key 14
14. Storage Room. Under the knee high mist the floor of this room is a graveyard of Automatons. The floor is covered with clockworks and bits of twisted metal.
Secret Ref Info: The ceiling of this room is held up by two pillars, (a) and (b). Opposite to the entrances of this room two Tarantella Spiders cling to the North sides of Pillars (a) and (b).
If the Player Characters are noisy, or show a light, the spiders will move before the Player Characters enter the cave to the opposite side of the pillars from the entrance of approach, from which they cannot be spotted. These unseen spiders may surprise Player Characters. Light negates the chance of Characters surprising the spiders but not the other way around!
If the Player Characters are quiet, and/or do not show a light, the spiders do not move and there is a 2-in-6 chance that at least one can be spotted clinging to the north side of the pillars from the West (a) or East (b) entrance. The spotted spider cannot surprise the Player Characters. If Player Characters enter quietly, and without light, from the south the two spiders cannot be detected. Unseen spiders may surprise the Player Characters.
Tarantella Spider, Armor Class: 4, No. Appearing: 1 (0), Hit Dice: 4*, 14, 9 Hit Points, Save As: Fighter: 2, Move: 120′ (40′), Morale: 8, Attacks: 1, Damage: 1-8 + Poison, Alignment: Neutral. For a description of this monster refer to Moldvay page B43, Mentzer page 38. When a bitten Character fails their saving throw vs. poison they painfully and involuntarily dance which grants the spider +4 to attack dice rolls. A-4 dice roll modifier is applied to a poisoned Character’s to-hit rolls. The effect of the spider’s bite lasts 2-12 Turns. Dancers collapse and are helpless in 5 Turns. Observers, those Characters able to see the dancing one, must successfully save vs. spells or they too start to dance uncontrollably in the same way, and for as long, as the original victim.
How can we expect to implement this? Example: Lindy the Lucky is bitten by a Tarantella Spider and fails their saving throw vs. poison. The Ref rolls 2d6 and gets a 7 which means Lindy will dance for 7 turns. Lindy begins to dance uncontrollably and will collapse in 5 Turns after which the Spider can expect to attack Lindy without retaliation. In the meantime the other Players in the party can all see Lindy and they must all save vs. spells or they too will have to dance for 7 Turns. Some pass and some fail. The spiders can attack dancing Characters gaining a +4 dice roll modifier, example: if they roll a 7 add +4, sum and the result is 11, which may or may not indicate success. The dancing Players deduct -4 from their attack dice rolls, if they roll 14 subtract -4, the result is 10, which may or may not indicate success. All dancing Player Characters collapse in 5 turns. The spiders may , instinctively, attack non-dancing Characters but that is completely at the discretion of the Ref.
Scattered among the bits of clockwork on the floor is the following treasure: 15 silver coins, 85 gold coins, a Potion of Diminution, and a Ring of Weakness.
Map key 15
15. Stair and Intersection. The ceiling drips, water trickles down the stairwell which descends into darkness. There are tracks on the floor here which come from the stairway and the level below. There is a knee high fog at the foot of the stair, which obscures the floor. A human body lays here on the stair above the fog, a dark lantern lays on the step above its head, an Acolyte of Pestilence whose mask and gloves are missing. The withered face and hands of the Acolyte are covered with pox and in one clawed hand is a vellum scroll, in the other is a quill. Nearby a bottle of ink has been spilled.
Secret Ref Info: An INT attribute check roll can be used to follow the tracks, it looks like a large multi-legged creature crawled up the stair. The tracks belong to the Carrion Crawler in Level 2 Map Key 27 but the players won’t know what they are unless they have seen one before. For Level 3 the tracks lead North into Map Key 2, and West to Map Key 14. They are on the floor, walls, and ceiling.
The deceased Acolyte is wearing plate armor under which are mottled and stained brown cowhide garments and gloves. The beaked leather mask of a plague doctor is missing. A mace lays on the step. In a bag tied to the waist are 10 gold coins. In a back pack are quills, a bottle of ink, vellum parchment, and three flasks of oil. The Acolytes’s scroll has a message written on the scroll. An INT attribute check roll must be used to read the faltering hand writing.
Thrax, There are terrible creatures here in this dark place and something terrible in the air, it smells bad. I lost my mask and soon after a sickness from which we are usually divinely protected quickly overcame me. I can go no further. I leave you this message as I meet my end. By this act I earn my place among our departed brethren. We do not need the Patriarch’s creatures after all for the Miasma of the Great Pestilence is here. – Buboe
The knee-high fog at the foot of the stair indicates miasma, indicating this area is filled with the pestilential gas, and it is so thick it obscures any view of the floor thus concealing the open pit. Due to the fog treat this open pit as a trap. Any character who enters the intersection without checking the floor falls into the pit. The fog can be waved aside by hand to temporarily reveal the floor, and open pit, for 1 round before the miasma closes back in again. The pit is 30’ deep but Characters can only fall 20’ before landing on a Gelatinous Cube. This Monster cushions the fall and the Character suffers no damage until the Gelatinous Cube attacks.
There is nothing that tells us how soft the Gelatinous Cube is and whether or not a Character can stand on it. We’ll assume it’s squishy but firm enough to at least stand without sinking more than knee deep. A Gelatinous Cube sweeps over surfaces to consume living or dead organic matter.
Gelatinous Cube, Armor Class 8, 4* Hit Dice, 18 Hit Points, Move 60/20, Damage 2d4 +Paralysation, Saving Throw F2, M12, Alignment Neutral, This monster causes damage and paralyses with a successful attack, attacks against paralyzed characters automatically hit – just roll for damage, the paralysis lasts 2-8 Turns but can be lifted with a Cure Light Wounds spell, monster description Moldvay page B35.
There is a secret door in the wall of the stair. There is a 1-in-6 chance of finding Secret Doors, 2-in-6 for Elves. There is a hidden switch, a round hole 1/2 inch in diameter and 2 inches deep in the step just in front of the door, which only when filled with water then opens the secret door. The hole is easily spotted by Dwarfs as it qualifies as “unusual stonework” whereas other characters will only spot it on a 1-in-6, Elves 2-in-6. There is a peephole in the secret door which allows the stair to be spied on from behind the door; refer to map key 16. The peep hole can be spotted 1-in-6, Elves 2-in-6. If the secret of the switch is not found this secret door may not be forced open.
Map key 16
16. Mine Bunk Room. This room contains 2 bunk-beds on each of the North and South walls, and a heavy wooden table in the middle with bench seats on either side. The table has 8 place settings and there is dried out mouldy food on the table. A bottom bunk on the North wall has a human body in it. The West wall of this dusty room has racks with 8 shovels and 8 picks. 5 metal buckets contain ruby dust. There is a bench against the east wall and over it on the wall are wooden pegs from which lanterns and sacks hang. From one peg hangs an old green hat and cloak. There is a straw filled crate which once contained flasks of oil, only 3 remain. It appears no one has been here in a very long time. There is a reinforced wood door in the south wall. A large padlock secures the door. It has three keyholes.
Secret Ref Info: The 8 sacks each contain 2 week’s Iron Rations. The picks and shovels, while old, are perfectly usable. The bunk-beds have straw mattresses. The bottom bunk in the North Wall contains a pox ridden corpse covered with a blanket drawn up over the head. The corpse cannot spread the pox. Under the mattress of a top North bunk is a diary.
Day 1 – Mining in the great cavern today. We filled two buckets with rubies. Rumour has it we are to be replaced with Drones by the “Masked Priests” What do they know of mines or mining? Bad idea. They haven’t found our secret rooms yet.
Day 2 – Mining in the great cavern again. We filled three buckets with rubies. Drones were brought in today by the Masked Priests. The Drones are proving hard to control. Everyone is afraid. We keep our distance.
Day 3 – The Drones are made to pick at the stone but they are rubbish and didn’t find anything as expected. What do these Priests know of mining? Nothing. We miners found a great ruby in a pillar of the large cavern today. The Patriarch himself is coming tomorrow to admire it.
Day 4 – The Patriarch removed the great ruby. Buckle said it was the Heart of the Caverns and bad luck to take it, no good will come of this.
Day 5 – Buckle left us today to go to another mine in the north where there are no Masked Priests, and told us we should all go too before it was too late.
Day 6 – The light in the caves is going out since the Patriarch took it. Was Buckle right?
Day 7 – There is a bad smell in the mine today. We couldn’t work. There is a lot of talk about leaving.
Day 8 – Drones attacked Bottle and Rabbit today. Rabbit was killed, Bottle is hurt, we put him into his bunk. Those Priests don’t care about us that much is clear.
Day 9 – Bottle is sick with the pox. Nobody is going into the mine today. There is miasma gathering at the foot of the stair. The Masked Priests went in though. We later heard a cave in where the Drones were mining. It killed some of the Priests but not the Drones! Now the creatures are loose in the mine!
Day10 – Bottle is dead. Buckle was too right. Things have taken a bad turn. We are all agreed on leaving tonight with what we can carry. The trick will be to get away without the Patriarch and the Priests knowing.
The reinforced door can’t be forced open as it is not a “normal” door or “stuck”. There is one key in a pocket of the green cloak. The other two keys are located at Map Key 7. Each part of the triple lock can be picked by a Thief to open the door; we are giving the Player characters one key, so two successful rolls are required , otherwise the three keys are needed.
Map key 17
17. Mine Vault. This room contains 8 locked reinforced wood chests.
Secret Ref Info: The chests have a false bottom spotted 1-in-6, 2-in-6 by Elves. There is no obvious way of gaining access. There is a keyhole on the side hidden under a boss, spotted 1-in-6, 2-in-6 by Elves, which unlocks the bottom so it can be opened.
Chest 1- contains clean if simple workman’s clothing, a shirt and pants, false bottom 3 rubies worth 10gp, 10gp, and 100gp.
Chest 2 – contains a lantern and oil, false bottom contains 1 ruby worth 500 gp.
Chest 3 – contains 100’ rope, false bottom contains 1 ruby worth 50 gp.
Chest 4 – contains a mirror, false bottom contains rubies worth 10gp, 10gp, and 50gp.
Chest 5 – contains a pair of boots, false bottom contains a magic scroll of Protection from Magic,a protection scroll can be read by any character.
Chest 6 – contains an empty leather sack, false bottom contains 1 ruby worth 500 gp.
Chest 7 – contains 6 torches, false bottom contains 1 ruby worth 50 gp.
Chest 8 – contains 12 iron spikes, false bottom contains 1 ruby worth 500 gp.
Level 3 Special Wandering Monster Table
The following Special Wandering Monster Table is in keeping with the other descriptions of the level and I strongly suggest it is used due to the effects of the miasma. Undead and Insects predominate as living things cannot withstand the pestilence. If you decide to use the normal table for Level 3, and you have a living creature, check to see if it has contracted the plague from the miasma.
Special Level 3 Wandering Monster List
| D10 Die Roll | Monster |
| 1-4 | 1d8 Skeletons (2+1 Hit Die) |
| 5-6 | 1d6 Zombies (3 Hit Dice) |
| 7 | 1-6 Tiger Beetles |
| 8 | 1-3 Carrion Crawlers |
| 9 | Special: Magic Lantern, refer to Level 2 Map Key 9 for an example |
| 10 | Trick: All lights, torches and lanterns, suddenly extinguish and must be re-lit. |