The Old School Dungeon – Level 3, Miasmic Mines
Level 3
If we remember our instruction, we are to prepare at least three levels in advance of our game. This is important when we have stairs, shafts, and slopes which grant access between levels. Anywhere players can go has to be accounted for. So, this is something to bear in mind when designing our underworld. We won’t add any further descents from Level 3. You can do this if you want to, even adding them later, but for the purpose of our exercise we’ll stop.
On Level 1 we introduced the Acolytes of Pestilence at Map Key 8, On Level 2 we tied that into the level, expanded on it with our nefarious, defeat-able, and untrustworthy villain the former Patriarch Devious Ingrate, and we’ve added some leading references (or clues) to the past hunting of insects in the caverns of Level 3, the fabulous ruby the Heart of the Caverns which lights the caves if returned to its place, and a mysterious miasma which the masks and garments of Plague Doctors protect the wearer from. We have also suggested that the Carrion Crawler, substitute the monster of your rules, came up the stair from Level 3 to Level 2.
What I have been advocating is that we build a dungeon from a curated association of the map keys and to tie the entries together in a meaningful consistent way. Our associating the map keys has begun to build connections. For our purposes, we have narrowed the scope to the very basic tenets of the game. The “idea” is very much about exploring the underworld so the “story” is really the one the players themselves create as they play and it is important not to lose sight of this. However, it is more than just a room clearing exercise because of the connections we are building between the map keys. Player Characters only progress by accumulating experience points and that requires them to defeat monsters and gather treasure.
Level 3 will prove to be a formidable experience for our First and Second Level Player characters. The Monsters have a much greater chance of a successful hit, and more hit dice means that they also have more hit points. There is nothing really preventing low Level Player Characters from from eventually finding their way from Level 1 to Level 3 but the players do have agency, that is their choices contribute to determining outcomes, and they must evaluate and manage risk. If the players choose recklessness in the face of obvious danger their doom is all but inevitable and as a Ref you should not try to intervene. There is a certain amount of trial and error in which pushing the action to its limit is a part of learning the game and you can’t and shouldn’t prevent the sting of defeat.
That said there are different ways players can cope with Monsters when they are outmatched. An important lesson players need to learn is that running away from danger, if their movement rate will permit escape from a Monster, is a perfectly valid choice! Monsters only chase Characters as long as they are in sight. The idea is to get out of sight of a Monster so that a pursuit ends and the means to this is creating a delay. Pursuing Monsters will stop 3-in-6 of the time if the Player Characters drop food as a distraction (or treasure, refer to the topic PURSUIT, Moldvay page B24). Burning oil can also be used to delay pursuit. A flask of oil contains enough oil to make a pool 3′ in diameter which burns out in 1 turn, refer to the topic OIL in Moldvay on page B21. It would take 3 flasks to effectively block a 10’ passage. Hints regarding the above can be passed on in the form of tales, rumour, legends, and lore during the game.
Alignment as Inspiration for Level 3
There are many stories in which Good battles Evil, and this concept is baked into the game in the form of Character and Monster Alignment, in which Law and Chaos are contrasted. For the Ref, Alignment is both a useful tool and a constraint. The word “usually” associates Law with Good and Chaos with Evil, refer to Moldvay page B11 or Mentzer page 55. All Monsters and Player Characters are quantified in terms of their Alignment Role; Law, Neutrality, and Chaos. This conception provides a structure, perhaps a subliminal one, in which we have a singular storytelling viewpoint. As this is a game of “role playing” the players must, on character creation, decide where in this scope their characters are to fall. The players therefore choose whether to “role play” their game character nobly or basely. In case you hadn’t noticed a Player Character’s Alignment is meant to be kept secret from other players.
Thus far we have not really engaged with this core concept which so clearly, in my estimation, frames many adventures if not the rules of this game. We are presented with a very simplistic definition which makes sense strictly in terms of game rule rather than as an introduction to the wider dictionary meaning of chaos. To associate chaos strictly with evil is to ignore its potential as a positive force for chance and even liberation.
Nevertheless, our underworld might be considered a setting in which a battle of Alignments is playing out, a pivot point in which Law or Chaos could prevail depending upon the critical actions of the Player Characters. For them the stakes are always personal, whereas the consequences of their actions or in-actions might have greater implications and provide opportunities for further adventure. This is exciting stuff.
We have not delved too deeply yet into Player Character agency; whether or not the player characters are actually servants of good or evil. Moreover, we have not yet intentionally created a pivotal point in which the player characters actions lead to a triumph of good or evil, or simply a return to balance in which neither gain the upper hand.
The improvement mechanism in the game means that characters benefit from gaining experience effectively without regard for the alignment of the underworld’s inhabitants. The word “Monster” casts all opponents into the same category; in effect turning them into a boundless resource for exploitation were it not for the limitations imposed by Alignment. The illustration in Moldvay on page B11 conveys the concept of Alignment very well. A Chaotic character attempts to slay a captive Monster and is stopped by a Lawful character while a Neutral character remains aloof; will the latter intervene for good or evil? It is not necessary, we learn, to slay a Monster to gain an experience award:
- The original game presents the defeat a Monster through mortal combat although subdual in combat and capture was an option. On page 13 the concept of capture is presented in the topic Capture of Non-Player Characters (Including Monsters) “When this happens an offer of service can be made (assuming that communication is possible) as outlined above. Subdued monsters will obey for a time without need to check their reactions, and such monsters are salable (see Vol. II).”
Note – As the early rules present the idea that captured characters can be forced into temporary service of the Player Character (for a time) and may even be sold, they include and result in moral and ethically questionable practices. This is the consequence of the design of the game which quantifies every creature in terms of its value in gp/xp as a means of character progression. Although normal rules of conduct are suspended within the fantasy construct player character behaviour becomes problematic when slaying captives, selling captives into slavery, or forcing them into servitude is by default beneficial. Lawful Alignment therefore may present the only rules-based limitation to such unquestionably evil conduct and practices. Much depends on what you as a Ref will choose to allow in your game beyond what the rules cite. The rules point out that NPCs resent this treatment, disobey, and rebel. If you decide you will not allow intelligent characters that surrender to be maltreated, enslaved, or sold, you must write this down as a new rule and how captured characters are to be treated. Moreover you must communicate it to the players. For example:
Intelligent captured monsters are to expect to be released in return for giving up at least a part of their treasure hoard (example: a map to the hoard may be provided and the character must then be released). Even if the character does not have a treasure one equivalent to the xp value of the character should be provided in order to successfully resolve the capture. If captives are maltreated in any way after surrender the amount of such treasure may be reduced and the slaying a captive provides no xp reward at all. No xp are ever awarded for selling captives into slavery.
- In the topic Experience Points and Experience Levels Holmes introduces the following on page 11 “Experience points are awarded on the basis of treasure obtained and monsters killed or sub- dued.” and “Monsters killed or overcome by magic or wits are worth experience points to be divided among the entire party.”
In Holmes we find that monsters may be overcome by magic or wits although just what that exactly means is not defined with examples. We could interpret wits as overcoming a monster without the use of force.
- The topic Giving Experience Points in Moldvay on page B22 cites “Experience points are also given for monsters killed or overcome by magic, fighting, or wits.”
- Experience points are awarded for Monsters slain or overcome, refer to the topic Dividing Treasure and Computing Experience in Module B2, Gary Gygax’s Keep on the Borderlands (KOTB) page 5.
- Overcoming Monsters is not mentioned in the topic Experience in Mentzer on page 12.
- Labyrinth Lord cites defeated monsters as being “outsmarted or killed” in the topic Awarding Experience on page 49.
- OSE’s Classic Fantasy Rules Tome in the topic Awarding XP on page 148 broadly defines the meaning of defeat into “slain, outsmarted, captured, scared away, etc.)”
These various interpretations are something to bear in mind when the Player Characters encounter the Kobolds of Level 1 and other monsters. In particular they grant Player Characters of all Alignments a scope of role-play beyond merely slaying all monsters which is much more interesting. As a Ref your mastery of the rules should include the ability to recognize Player Character actions deserving of the experience awards. Is evading a chasing Monster not a defeat of the Monster by wits? A Monster which fails a Morale check roll and runs away has certainly been defeated and an award of xp should be made.
Note – You are probably wondering what happens later if the Monster is encountered a second time and is defeated again. I would award the experience points as they are awarded on a per-session basis.
How can a consideration of Alignment fit into our prospective Level 3? If you have not already noticed the most satisfying adventures in books and films are those in which the protagonists are cast as champions fighting evil and for us that means the Player Characters. Alignment gives us, the Ref, the opportunity to superimpose over mere experience point collection the initial elements of story. Admittedly this has something of a moral or ethical cast to it but that is in keeping with the design of the rules and not something I am imposing on it. For example, Lawful (synonymously good) characters are expected to be role-played in a manner consistent with that Alignment, refer to Moldvay page B11. What the rules do not do is clearly and effectively tie XP rewards for treasure collection to ethical behaviour. When treasure is collected players are awarded XP regardless of whether they role-play their Character’s alignment or ignore it entirely. Our underworld is typically inhabited by Chaotic “Monsters” whose certain evil is meant to legitimize conflict, if not their slaying, and justify the subsequent plundering of their treasures. We don’t often question the construction of this fantasy but its objectifications deserve study as much as those of any fairy tale. The conditional use of force in our fantasy, which might not otherwise be considered acceptable, is justified by a Monster’s categorization as an unacceptable evil.
In terms of map key design, Law and Chaos are contrasted and opposed. Neutrality occupies a middle position between these opposed principles ensuring that neither Law nor Chaos becomes stronger than the other, refer to Moldvay page B11. The resolution of opposites is a matter for Role-Playing.
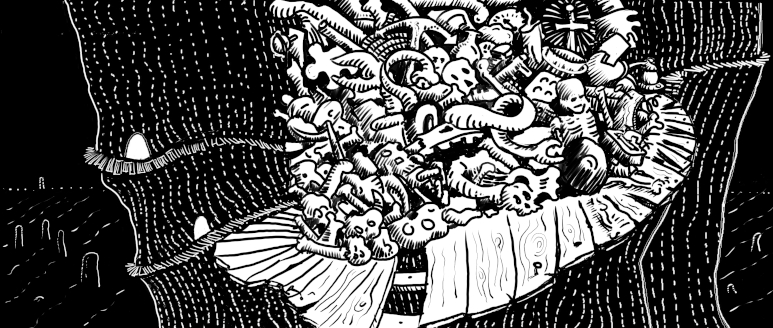
Let’s begin with the Heart of the Caverns; as one of our Map Key interactions we have decided that returning this magical jewel taken by the Chaotic Monster former Patriarch Devious Ingrate to its proper place causes the ceiling in the caverns of Level 3 to illuminate.
Let us propose something more; that without the magic jewel the cavern has become an evil place inhabited by monsters, its foliage petrified, its waters poison, its airs contaminated by pestilential miasmas, etc., this is Chaos. We over-emphasize negative qualities; instead of light we have darkness, instead of life we have death. We propose also that returning the magic jewel to its place restores the underworld to its natural order, a Neutrality, in which neither Law nor Chaos prevail over one another. Why not Law? Because that would be the extreme opposite of Chaos. Is this therefore an ethical test? When we write Map Key text in this way, we conceive it as a struggle for balance between Law and Chaos. It tests Player Character Alignment such that a role-playing response is required from the Players.
What we are proposing from the map key associations is that the greedy act by the Chaotic Monster Devious Ingrate has spread its evil to Level 3 and whether or not this will be opposed by Lawful or Neutral Player Characters has yet to be determined. Neutral and Chaotic characters might be content with simply looting the caves and taking the jewel because it benefits them personally and whether that damages Chaos or not is of no great matter to them in the grand scheme of things; particularly when, per the rules, they are only actually rewarded in XP for keeping the jewel.
In terms of our underworld adventure, and depending upon the consequence of the player’s choice, further map key interactions, if not stories, could be developed from the agency of the Player Characters; what happens should the caves remain in Chaos; what happens if they are restored? Much like stairs, chutes, and shafts, the Ref should prepare for whether something or nothing at all happens. Ignoring the Chaos for example might cause it to proliferate in the underworld and wilderness above. Underworld maps might be revised, the layout modified, with new and dangerous foes arriving to contest the Player Characters, etc.
Using Alignment as a Player Character test in map keys is a good way to introduce the beginning of story and plot into your underworld. It provides direction based on Player Character agency; in a flowchart this might be expressed as a “what if?” with at least two or three potential outcomes.
A Normal Underworld?
This brings us to the question: what is actually a “normal” underworld? Is it just simply an evil place? Surprisingly the answer is no. In the wandering monster tables for Levels 1 and 2 Neutral Monsters comprise half or more of these tables. On Level three this is diminished to 6 out of 20. In the Level 3 wandering monster table there are 10 Chaotic Monsters out of a total 20. In this sense Chaos dominates the tables of Level 3. In the Level 3 wandering monster table there is only 1 Monster with an alignment of Law, the Crystal Living Statue. What are we to make of this?
Once we get to the Expert book the wandering monster tables inconveniently leave out a Monster’s alignment which doesn’t help our alignment planning at all. We have to look them all up. However, from the first three levels of Moldvay’s wandering monster tables we can infer that our introductory underworld, the place in which we adventure, is not a place where Law/Good is ever intended to be dominant. This part of the game design quantifies the Underworld as an adversarial place from the outset.
While I consider the Alignment rules to be an important and useful part of the game whether you consider it significant enough to implement, and how you do so, is entirely at your discretion. It is useful in describing to the Ref how to role-play the actions of the monsters.
What of our Underworld? In greedily removing the ruby from Level 3 (which we may interpret as a selfish transgression consistent with Chaos alignment) Devious ingrate has inadvertently prevented most living creatures (of any alignment) from inhabiting the level due to the effects of the poisonous miasma created by the removal of the ruby such that Neutral Insects, Jellies, and the Chaotic Undead predominate. Aside from choosing a Medium (which is a fancy way of saying 1st Level Magic User, refer to Moldvay on page B39), or an NPC party (refer to Moldvay on pages B40 and B52) and assigning a Law alignment and the appropriate Plague Doctor Costumes, there is only one Law monster available. The “territory” is in effect denied to any living creatures of Chaos and Law which are unable to withstand the effects of the miasma. The only creature of Law from the Level 3 Wandering Monster table able to withstand the miasma is the Living Crystal Statue.
Alignment Test What If Outcomes
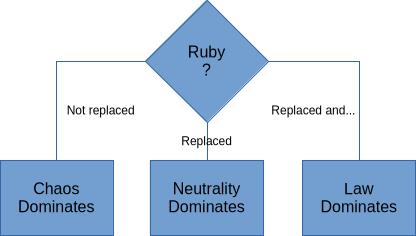
The point of our alignment test is to make the actions of the Player Characters significant and to develop potential consequences of those actions. This contributes to player immersion in the game and a meaningful experience. For Neutral and Chaos aligned characters it potentially requires a selfless act from which they will not profit if the ruby is replaced; Chaos aligned characters place their individual interests first before groups. For Neutral and Law aligned characters if the ruby is replaced the group benefits; however, Neutral aligned characters expect to personally benefit from the group activity, Law aligned characters embrace a group benefit ethic. What can we propose for three potential “story” outcomes?
Chaos Dominates – Alignment Test: The ruby is not replaced; the characters either do not retrieve and replace the ruby or they keep it for the xp, only monsters capable of withstanding the miasma may be present, numbers of the Chaotic monsters such as Undead are drawn to the area, revise the map introducing new irregular areas and Chaotic monsters, consider the spread of the miasma to other levels with the same effects, reveal new Chaotic levels below Level 3, Chaos emphasizes individual liberty, chance outcomes are increased.
Neutrality Dominates – Alignment Test: The ruby is replaced; the characters retrieve and replace the ruby. Restoration of the ruby doesn’t bring about a triumph of Law but the dissipation of the miasma. The result is a return to the “normal”, yet still adversarial, state of this Underworld in which most Chaos, Law, and Neutral alignment creatures can co-exist. Player Characters may have to defend the ruby from the self interest of Monsters of Chaotic and Neutral alignment to keep the miasma from returning; revise the map introducing new areas and monsters, reveal new levels below Level 3. Chance outcomes are normal.
Law Dominates – Alignment Test: The ruby is replaced; the characters retrieve and replace the ruby, moreover, they then further slay or drive away all monsters of Chaos and Neutrality (assuming they are not replaced) monsters of Law, such as the Living Crystal Statues, predominate, revise the map of Level 3 to impose grid-like regularity, consider the spread of Law to other levels with the same effects, revise the map introducing new Law areas and monsters, reveal new Law levels below Level 3. Law diminishes individual liberty and imposes a group-first ethic, chance outcomes are diminished.
Werguild
Alignment can be potentially divisive but it does not have to be. There is no reason why player characters can’t negotiate a solution. We can borrow from the example of werguild in which characters receive compensation for injury. Normally characters divide all rewards from dungeon diving equally. The value of the ruby in gold, a characters loss of their share, the injury, must be made good. Example:
- Chaos aligned characters always place their personal self interest first ahead of groups. They expect to personally profit from keeping the ruby and would see no reason to replace it without compensation for their personal loss.
- Law aligned characters choose outcomes which benefit the group as a whole. They expect fair and equal treatment for all in the group. These characters should be willing to replace the ruby for the greater good of all, in particular to remove the miasma, and if compensating Chaos or Neutral aligned characters is necessary to achieve this then that is acceptable. They would prefer that everyone in the group be equally compensated for their loss. However, resolving the differences between the characters might take the form of a payment from the character’s own personal treasure hoard or a temporary alteration to the division of treasure; the reward of additional future underworld treasure equal to the value of the shares lost passing to Chaos or Neutral aligned characters.
- Neutral aligned characters believe that individuals within groups must somehow work together but at the same time they would also expect to personally benefit from any group activities and that includes compensation for loss of the ruby.
Will Players Role-Play Character Alignment?
It’s only natural for players to forget about the role and act if they were personally on the adventure rather than to play the role. Despite the usefulness of Alignment Players notoriously fail to role-play their Character’s Alignment and you, the Leader of the Game, will have to decide whether you want to fall off this particular cliff by insisting. Remember that occasional behavioural deviation from Alignment is permitted. Another Alignment may in fact prove to be more appropriate than the one a Player may initially choose for their Character and as a Ref I would advocate for and permit the Player to migrate the Alignment of the Character without penalty. That’s an easy way out of the problem. However, were a Player to refuse and insist their character is Lawful, but then persist in performing Chaotic acts inconsistent with the Law Alignment I would ensure there be some kind of consequence.
Example: a Lawful Cleric’s divinely given powers might then be unable to heal the wayward Lawful character until that Character has made amends in some manner and/or reformed. Through role playing, the solution can appear in a dream or vision as a quest to be performed, or be revealed by a wise mentor. Such things are as much an opportunity for further adventures as they are a penalty.
The Big Picture
Do not be too surprised if the Players do not interact with alignment designed map keys in the expected way. Players can, quite literally, do anything, and they may invent unforeseen solutions. We then have to devise an appropriate response on the fly. This is not something to be afraid of but a big part of the fun and our mastery of the game includes sufficient background over which we can improvise role-play.
Whatever the big picture is the stakes for the players are always personal and any “grand design” may fail a simple risk/reward test. Players may simply decide out of the self interest of their characters not to bother replacing the ruby if there is no obvious XP reward. However, per our alignment based design we have planned for this; even if your game doesn’t strictly apply alignment we know what will happen if the players simply keep the fabulous ruby.
No matter what happens the Underworld is not a closet to be cleaned out but a dynamic changing place in which we can introduce new monsters and even alter the map itself. We’ll follow up further in a subsequent article with what we can do to keep things fresh so that when the Players re-enter the underworld things are not always quite as they last left them.
Entrances to Level 3
Let us propose the caverns were once a fabulous ruby mine, once a source of great wealth, which has largely been mined out but we will allow limited mining for gems in a few caves and we’ll include some ruby mining rules. The mine is no longer safe due to the miasmas created when Devious Ingrate removed the fabulous ruby the Heart of the Caverns. We need to describe what the miasma (gas) does. As with our previous levels we’ll pick some Monsters and Treasure to place.
Level 3 Revised Map
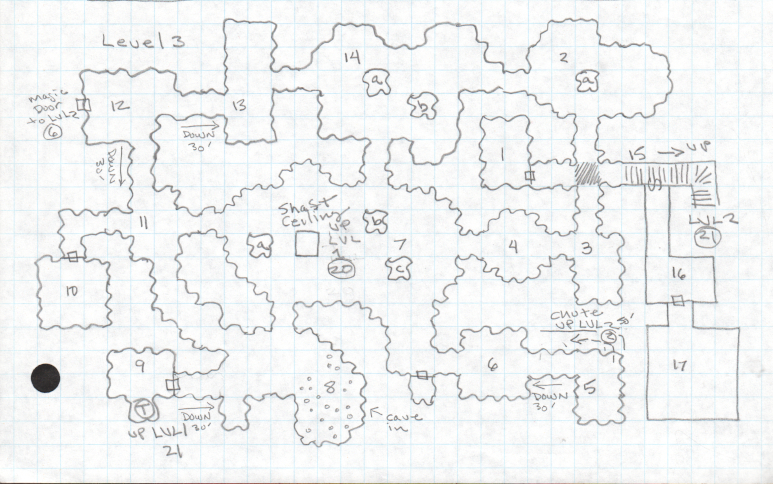
I revised the above map to show some steep down sloping passages, refer to Map Key 9 in the above illustration for an example. We shall propose that the short passages which lead from cave to cave are 10’ in width and height. The caves themselves are higher, 20’ or more in height and we will describe these individually. They can be up to 40’ in height. The Map Keys 5, 9, 12, and 15, the entrances to this level, are at a higher elevation than the remainder of the level (30’) such that the miasma (which we shall also propose is heavier than air) lays below these caves. Map Key 7 has a shaft from Level 1 to the ceiling of the cave; the miasma is well below the exit of the shaft. I also included a partial cave-in in Map Key 8.
Monsters
We will propose that the Undead and Insect Monsters are not affected by the miasma , nor are Jellys and Slimes, but other living creatures suffer the same fate as Characters. We’ll pick suitable Monsters for this level from the Level 3 Wandering Monster table; I’ll use Moldvay on page B54 but you can use the rules of your choice; the Mentzer and OSE rules cover the same territory. Labyrinth Lord however includes Giant Carnivorous Flies on Level 3, refer to page 75, and as we like the name we’ll include them too, for the same monster refer to Robber Flies in Moldvay page B41.
For this level we will also choose that some of these Monsters are in a “Lair”, and we will indicate which below. This means there will be extra treasure beyond that we have chosen for this level. In retrospect we should also revisit Devious Ingrate because that monster is by any definition in its lair.
Note – We have not identified Lairs for levels 1 and 2. The approach I have taken is to treat most of our Monsters as wandering monsters and pre-assign treasure for the level. In other words the monsters are as much explorers as the player characters. The Kobolds on Level 1 are a perfect example and do not have a lair. When you feel though that monsters like the Stirges on level 2 could be roosting in their lair on the stairs you can add some additional treasure to their descriptions by treasure type. This will make additional experience points available to the player characters.
- Carrion Crawler (Lair)
- Driver Ant
- Gelatinous Cube
- Giant Carnivorous Flies
- Living Statue (Lair)
- Ochre Jelly
- Shadow (Lair)
- Tarantella Spider (Lair)
- Tiger Beetle (Lair)
- Wight (Lair)
Miasma
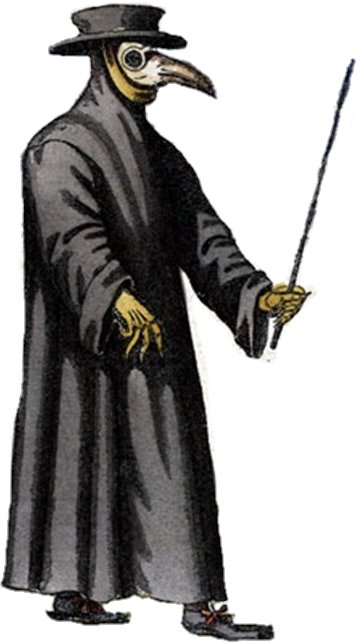
Here we are drawing on history for our inspiration. It was a Medieval belief (an incorrect one) that miasmas caused the plague and so Plague Doctor garments were devised as a form of protection. Although factually and scientifically incorrect we’ll use this idea in our fantasy remembering that it is a game not meant as a simulation of the real.
A good part of this level should be filled with our mysterious pestilential miasma, which requires the Player Characters to wear the protective garments of Plague Doctors until they replace the Heart of the Caverns in its place. If the Player Characters do not wear the Plague Doctor garments, mask, gloves, hat and shift, or remove a part of it, then they risk falling ill from disease as a result.
We’ll propose that the miasma (gas) carries disease, like a rat, refer to page B41. Anyone not wearing the Plague Doctor garments in the presence of the miasma has a 1 in 20 chance of being infected (this chance should be checked each time a character removes a part of the garments). The victim may still avoid the disease by making a saving throw vs. Poison. If failed, the victim will either die in 1-6 (1d6) days, otherwise the victim will be sick in bed (unable to adventure) for one month. Roll 1d4: the disease is only deadly on a result of 1. You can change this to 1-in-8, or 1-in-10 if you would prefer to reduce the chance of death.
In the play of the game an arbitrary death is not the same thing as a managed risk. If the Players are aware of the danger the miasma poses that is a risk they can use their judgment to avoid. Its a good idea to place warnings of one sort or another regarding the miasma. Wandering into the gas, and an arbitrary character death as a result, is not the same as seeing a warning, disregarding it, and then the character dying because they ignored the danger.
Example: Unlucky Fingers has seen a warning and is wearing the Plague Doctor garments found on Level 2 but removes the mask to sniff the air thus exposing the Character to the pestilential miasma. The Player must make a successful saving throw vs. Poison to avoid the disease, Fingers is a 2nd Level Thief so must roll 13 or better, refer to Moldvay page B26 (or the rules of your choice). The Player rolls 10, failure! This means there is a 1-in-4 chance Fingers will fall ill and die in 1d6 days, or become bedridden for a month and unable to go on adventures. The Character will be bedridden for a month if they do not die in the first 6 days. Fingers becomes bedridden and cannot adventure for 28, 30, or 31 days. I’d then roll the d6 to determine on which day I want to check and see if the character dies in the first six days from the disease. It can be common knowledge that a living Character who contracts the pox/plague perishes in less than a week. On the day in question I’d tell the Player, roll a d4 (or d8/d10) and if you get a 1 your Character dies from the plague, if not they are sick and bedridden and cannot adventure until you are cured.
How soon does this illness start? At a minimum I would allow at least 24 hours to pass before the character breaks out in a pox to show the start of the disease. Can other characters catch this plague from the sick one? Not as long as they wear the Plague Doctor garments.
Diseases (Poxes & Plagues – sounds like an ampersand game doesn’t it?) can be cured with the 3rd Level Cleric spell, Cure Disease, refer to the Cook/Marsh Expert Rules page X12. Clerics do not gain access to this spell until 6th Level which means that a diseased Character’s only hope is chance or, a Non-Player Cleric willing to perform this service for a tithe, or a scroll with the spell on it which even then only a Cleric may read. We will provide access to the spell in the form of a scroll as the Player Characters cannot otherwise save themselves.
Treasure
Lets try and round out this so that there is something for every Character Class in the form of magic.
How Much Treasure?
We haven’t really discussed how much treasure should be available for recovery. XP directly translates into character advancement. How much treasure can be collected from an underworld is not necessarily a significant concern if encumbrance rules are in effect. The Characters simply cannot carry it all away and it would be silly to allow it which is why we really should be using this important rule, refer to Moldvay page B20, Mentzer page 61, Labyrinth Lord page 44, OSE Classic Fantasy Rules Tome page 113.
As I point out in my Labyrinth Lord adventure Gloomland (shameless plug, after all it is free to download, located here, and compatible with other OSR clones), a Character such as Burly Barlycorn can carry 160lb maximum, this is 160 x 10 = 1600 coins. The character has 64 lb of equipment which means that they can only carry 96 lbs of treasure away. There are 10 coins to a pound which means the maximum number of coins that can be carried is 96 x 10 = 960 coins, regardless of their type, and it assumes the character picks up nothing else that adds to their encumbrance and reduces what they can carry. Moreover, encumbrance limits movement and the more a character carries the slower they are. Burly Barlycorn’s encumbrance is over 60 lb but under 80 lb which means movement is 60’/20’. However when carrying the maximum this drops to 30’/10’.
There are other brakes on the XP system as well, to quote Moldvay on page B22:
A character should never be given enough XP in a single adventure to advance more than one level of experience. For example, if a beginning (0 XP) 1st level fighter earns 5000 XP (a rare and outstanding achievement), he or she should only be given 3999 XP, enough to place the character 1 XP short of 3rd level.
This means you can pretty much safely put as much treasure where you like but bear in mind a Bag of Holding allows 10,000 coins to be carried and weighs 600 coins when full. Too many of these and you could have a problem, not necessarily in the form of character advancement which is limited by the rule in Moldvay on page B22, but by the Characters having more money than they can spend. I wouldn’t hand out more than one Bag of Holding. Either that or Bags of Holding should come in a variety of lesser sizes, so I say, but that is of course up to you.
Gems represent a real treasure-to-encumbrance bargain as they have great value and weigh the same as a coin, refer to the article Encumbrance-But what has it got in its pocketses eh?
Encumbrance rules force Player Characters to leave what they cannot carry behind. You can relocate it to the hoards of nearby Monsters or make it disappear. Players can try hiding excess treasure but there are no guarantees, insert an evil laugh here.
What do you do if Player Characters are too rich? This is a resource of role-playing. If the Player Characters have too much money the game’s NPCs can soon get wise the characters have money to burn and outrageously charge them more for everything. Of course NPC Clerics and Magic Users expect to be compensated for their services, tithes and fees respectively. Taxes must be paid to local rulers. Excess wealth must be stored somewhere, perhaps buried (no guarantee it will not be found, we should devise a Magic-User spell for concealing buried treasure per the Tolkien quote), or put into a stronghold and then who guards such things? Are they trustworthy? Great wealth will attract adversaries; Bandits, Robbers, and potentially even formidable Monsters!
- +1 Leather Armor
- +1 Chain Armor
- +1 Shield
- +1 Sword, +3 vs. Undead
- 10 +1 Arrows
- +1 Dagger
- +1 Mace
- 2 Healing Potions
- Potion of Diminuation
- Scroll, 3 MU/Elf Spells
- Scroll, 3 Cleric Spells, Cure Disease
- Rope of Climbing
- Ring of Weakness
- Ring of Fire Resistance
- Coins and Gemstones
Map key 15
I want to start out of order as I think it’s important to immediately address the entrances, magic door, stairs, shafts, and chutes, to Level 3. We’ll include warnings regarding the miasma. There is a lot going on with this area.
As you may recall Level 2 Map Key 21 descends 50’ to Level 3 Map Key 15. It is the roost of Stirges and these Monsters are a detriment to early access. At some point a Carrion Crawler ascended from Level 3 and left tracks on the stair. We will assume that the Player Characters have got past the Stirges, if not consult Level 2 Map Key 21.
15. Stair and Intersection. The ceiling drips, water trickles down the stairwell which descends into darkness. There are tracks on the floor here which come from the stairway and the level below. There is a knee high fog at the foot of the stair, which obscures the floor. A human body lays here on the stair above the fog, a dark lantern lays on the step above its head, an Acolyte of Pestilence whose mask and gloves are missing. The withered face and hands of the Acolyte are covered with pox and in one clawed hand is a vellum scroll, in the other is a quill. Nearby a bottle of ink has been spilled.
Secret Ref Info: An INT attribute check roll can be used to follow the tracks, it looks like a large multi-legged creature crawled up the stair. The tracks belong to the Carrion Crawler in Level 2 Map Key 27 but the players won’t know what they are unless they have seen one before. For Level 3 the tracks lead North into Map Key 2, and West to Map Key 14. They are on the floor, walls, and ceiling.
The deceased Acolyte is wearing plate armor under which are mottled and stained brown cowhide garments and gloves. The beaked leather mask of a plague doctor is missing. A mace lays on the step. In a bag tied to the waist are 10 gold coins. In a back pack are quills, a bottle of ink, vellum parchment, and three flasks of oil. The Acolytes’s scroll has a message written on the scroll. An INT attribute check roll must be used to read the faltering hand writing.
Thrax, There are terrible creatures here in this dark place and something terrible in the air, it smells bad. I lost my mask and soon after a sickness from which we are usually divinely protected quickly overcame me. I can go no further. I leave you this message as I meet my end. By this act I earn my place among our departed brethren. We do not need the Patriarch’s creatures after all for the Miasma of the Great Pestilence is here. – Buboe
The knee-high fog at the foot of the stair indicates miasma, indicating this area is filled with the pestilential gas, and it is so thick it obscures any view of the floor thus concealing the open pit. Due to the fog treat this open pit as a trap. Any character who enters the intersection without checking the floor falls into the pit. The fog can be waved aside by hand to temporarily reveal the floor, and open pit, for 1 round before the miasma closes back in again. The pit is 30’ deep but Characters can only fall 20’ before landing on a Gelatinous Cube. This Monster cushions the fall and the Character suffers no damage until the Gelatinous Cube attacks.
There is nothing that tells us how soft the Gelatinous Cube is and whether or not a Character can stand on it. We’ll assume it’s squishy but firm enough to at least stand without sinking more than knee deep. A Gelatinous Cube sweeps over surfaces to consume living or dead organic matter.
Gelatinous Cube, Armor Class 8, 4* Hit Dice, 18 Hit Points, Move 60/20, Damage 2d4 +Paralysation, Saving Throw F2, M12, Alignment Neutral, This monster causes damage and paralyses with a successful attack, attacks against paralyzed characters automatically hit – just roll for damage, the paralysis lasts 2-8 Turns but can be lifted with a Cure Light Wounds spell, monster description Moldvay page B35.
There is a secret door in the wall of the stair. There is a 1-in-6 chance of finding Secret Doors, 2-in-6 for Elves. There is a hidden switch, a round hole 1/2 inch in diameter and 2 inches deep in the step just in front of the door, which only when filled with water then opens the secret door. The hole is easily spotted by Dwarfs as it qualifies as “unusual stonework” whereas other characters will only spot it on a 1-in-6, Elves 2-in-6. There is a peephole in the secret door which allows the stair to be spied on from behind the door; refer to map key 16. The peep hole can be spotted 1-in-6, Elves 2-in-6. If the secret of the switch is not found this secret door may not be forced open.
Map key 16
We will imagine that miners once worked in the caverns before evil came here. It’s a trope but we can’t resist! We’ll propose that Map Keys 16 and 17 are a little secret the miners kept to themselves and one that the Patriarch knew nothing about. We are building a “story” from linking our map keys and it is one about which we had no idea when we started creating the underworld.
We’ll add a little book here the Player Characters can find when they search which will illuminate past events and provide additional warning about the miasma. It will help introduce a later Alignment test. It will introduce the Patriarch Devious Ingrate as the originator of the Chaos now dominating Level 3. Past events suggestively ground the game’s present, giving it the “authenticity” of pseudo-history within the fantasy. This fiction is surprisingly effective as it helps create an immersive experience for the Players and may provide the motivation to confront Chaos/Evil.
The miners are long gone but their tools remain. We won’t put any monsters here so Map Keys 16 and 17 are a refuge the Player Characters can use. We will propose that Map Key 17 is a vault with a special triple lock containing treasure!
16. Mine Bunk Room. This room contains 2 bunk-beds on each of the North and South walls, and a heavy wooden table in the middle with bench seats on either side. The table has 8 place settings and there is dried out mouldy food on the table. A bottom bunk on the North wall has a human body in it. The West wall of this dusty room has racks with 8 shovels and 8 picks. 5 metal buckets contain ruby dust. There is a bench against the east wall and over it on the wall are wooden pegs from which lanterns and sacks hang. From one peg hangs an old green hat and cloak. There is a straw filled crate which once contained flasks of oil, only 3 remain. It appears no one has been here in a very long time. There is a reinforced wood door in the south wall. A large padlock secures the door. It has three keyholes.
Secret Ref Info: The 8 sacks each contain 2 week’s Iron Rations. The picks and shovels, while old, are perfectly usable. The bunk-beds have straw mattresses. The bottom bunk in the North Wall contains a pox ridden corpse covered with a blanket drawn up over the head. The corpse cannot spread the pox. Under the mattress of a top North bunk is a diary.
Day 1 – Mining in the great cavern today. We filled two buckets with rubys. Rumour has it we are to be replaced with Drones by the “Masked Priests” What do they know of mines or mining? Bad idea. They haven’t found our secret rooms yet.
Day 2 – Mining in the great cavern again. We filled three buckets with rubies. Drones were brought in today by the Masked Priests. The Drones are proving hard to control. Everyone is afraid. We keep our distance.
Day 3 – The Drones are made to pick at the stone but they are rubbish and didn’t find anything as expected. What do these Priests know of mining? Nothing. We miners found a great ruby in a pillar of the large cavern today. The Patriarch himself is coming tomorrow to admire it.
Day 4 – The Patriarch removed the great ruby. Buckle said it was the Heart of the Caverns and bad luck to take it, no good will come of this.
Day 5 – Buckle left us today to go to another mine in the north where there are no Masked Priests, and told us we should all go too before it was too late.
Day 6 – The light in the caves is going out since the Patriarch took it. Was Buckle right?
Day 7 – There is a bad smell in the mine today. We couldn’t work. There is a lot of talk about leaving.
Day 8 – Drones attacked Bottle and Rabbit today. Rabbit was killed, Bottle is hurt, we put him into his bunk. Those Priests don’t care about us that much is clear.
Day 9 – Bottle is sick with the pox. Nobody is going into the mine today. There is miasma gathering at the foot of the stair. The Masked Priests went in though. We later heard a cave in where the Drones were mining. It killed some of the Priests but not the Drones! Now the creatures are loose in the mine!
Day10 – Bottle is dead. Buckle was too right. Things have taken a bad turn. We are all agreed on leaving tonight with what we can carry. The trick will be to get away without the Patriarch and the Priests knowing.
The reinforced door can’t be forced open as it is not a “normal” door or “stuck”. There is one key in a pocket of the green cloak. The other two keys are located at Map Key 7. Each part of the triple lock can be picked by a Thief to open the door; we are giving the Player characters one key, so two successful rolls are required , otherwise the three keys are needed.
Map key 17
We’ll make this map key a vault in which the Miner’s kept their valuables.
17. Mine Vault. This room contains 8 locked reinforced wood chests.
Secret Ref Info: The chests have a false bottom spotted 1-in-6, 2-in-6 by Elves. There is no obvious way of gaining access. There is a keyhole on the side hidden under a boss, spotted 1-in-6, 2-in-6 by Elves, which unlocks the bottom so it can be opened.
Secret Rolls – dice rolls you hide from players usually involve some secret that you want to keep hidden if chance does not reveal it. There might be something there, or not. Those rolls are made behind some sort of screen so the players do not see them, but you must allow the dice to fall where they land and not falsify the result. Results, good or bad, should stand. Wait, won’t the players realize you only roll when something is there? Yes, so you should get in the habit of making placebo-rolls when the players search for secret doors for example not with the intent to deceive them but to preserve the mystery.
Public Rolls – it is a good practice that dice rolls which have an obvious result are performed in front of players. Monster attack and damage rolls, and saving throws, are good examples. If you want players to trust you are being fair and not falsifying results, this is the way to go. Players do like it when they have agency, if they can be presented with a way to roll their way out of something by luck take advantage of it. For example, there is a 1-in-4 chance you’ll set off the rusty trap. Let the player make the roll.
Using Chance – as the leader of the game you have options for rolls f chance that aren’t strictly covered by the rules. Instead of x-in-6 you could use x-in-3, x-in-4, or x-in-8. You could also use attribute rolls; for example you could roll less than or equal to a character’s INT to discover the false bottom and hidden key hole. Or, you might choose that these might simply be revealed by the activity of searching and not require a roll of the dice.
Chest 1- contains clean if simple workman’s clothing, a shirt and pants, false bottom 3 rubies worth 10gp, 10gp, and 100gp.
Chest 2 – contains a lantern and oil, false bottom contains 1 ruby worth 500 gp.
Chest 3 – contains 100’ rope, false bottom contains 1 ruby worth 50 gp.
Chest 4 – contains a mirror, false bottom contains rubies worth 10gp, 10gp, and 50gp.
Chest 5 – contains a pair of boots, false bottom contains a magic scroll of Protection from Magic,a protection scroll can be read by any character.
Chest 6 – contains an empty leather sack, false bottom contains 1 ruby worth 500 gp.
Chest 7 – contains 6 torches, false bottom contains 1 ruby worth 50 gp.
Chest 8 – contains 12 iron spikes, false bottom contains 1 ruby worth 500 gp.
Map key 12
This room is the exit of the magic door from Level 2 Map Key 6. It must work in two directions. This map key shouldn’t have miasma, in case players enter it unprotected, and a warning of some kind not to proceed further. We’ll say this room is a little higher and that the east and southern passages slope downward’ we’ll say that at the bottom of the passages the foggy cloud of miasmic gas clings to the floor of map keys 11 and 13.
12. Cave. This cave is elevated above those below by 30’. Steep passages lead south and east. Above each door, is a wooden sign upon which, painted in yellow, are crudely painted crossbones and the words Danger Miasma.
Secret Ref Info: The signs were painted by the miners. At the bottom of the sloped passages can be seen a fog hanging close to the floor, miasma. Should the player characters descend to the adjacent map keys, 11 and 13 without the necessary protective clothing they will expose themselves to the miasma.
Map key 5
This room is the exit of the chute from Level 2 Map Key 2. This map key shouldn’t have miasma, in case players enter it unprotected, and a warning of some kind not to proceed further. We’ll say this room is a little higher and that the western passages slope downward we’ll say that at the bottom of the passage the foggy cloud of miasmic gas clings to the floor of map key 6.
5. Cave. This cave is elevated above those below by 30’. A steep passage leads west. Above the door is a wooden sign upon which, painted in yellow, are crudely painted crossbones and the words Danger Miasma.
Secret Ref Info: The sign was painted by the miners. At the bottom of the sloped passage can be seen a fog hanging close to the floor, miasma. Should the player characters descend to the adjacent map key 6 without the necessary protective clothing they will expose themselves to the miasma.
Map key 7
We want our alignment test here. As the game quantifies all creatures in terms of their alignment we will contrast Chaos, Law (Good and Evil), and Neutrality where the removal of the ruby (the dingus of balance) has brought chaos/evil to the underworld. We want to have a cause and effect in the map key. Because of alignment quantification we do not necessarily have to explain what Patriarch Devious Ingrate gains from the spread of Chaos other than that per the rules in Moldvay on page B11 or Mentzer page 55 the monster’s personal selfishness, in taking the ruby, has had consequences. The spread of Chaos need not necessarily have been the intended result or an objective. That the Patriarch personally benefited at the expense of others is consistent with Chaos. Even upon restoration of the underworld, when the ruby is replaced, will there still be monsters? Yes, after all it is an underworld, but Chaos will not be dominant.
The shaft from Level 1 Map Key 20 exits in this cave’s ceiling. This shaft is the least likely entrance to level 3, yet potentially the most dangerous as the shaft ends in the ceiling, which is 50’ above the cave floor. The entrance to the shaft on Level 1 Map Key 20 is covered with a trap door secured with a chain and padlock. The east wall of the shaft has iron rungs, a ladder which descends all the way to the exit. The shaft smells damp and of fungi. If player characters climb to the bottom of the shaft, their lanterns and the magic spell light are not capable of reaching the floor below. However, they will see the ceiling of the cave is covered with dripping stalactites. If they tie a rope here, and descend, they will eventually see the fog of miasma below. They could also first try lowering a lantern on a rope.
As we definitely want to have miasma in this cave we are presented with the prospect of the player characters visiting this level before they have learned about the miasma and its ill effects. Remember, risk identified is risk managed. Therefore, we should have an explicit and unmistakable warning about the miasma. We shall put a painted wooden sign here at the bottom of the shaft which warns of the miasma. When a player character reaches the bottom of the shaft lantern light reveals the sign. We shall propose that the air at the bottom of the shaft, the ceiling of the cave, is still free from miasma and the players are unaffected until they reach the floor of the cave.
Columns (a), (b), and (c) support the ceiling. We will use these keys to position monsters in the cave.
We shall use our imagination to describe an environment that can survive the deadly miasma; one that is hostile to most living things.
7. Great Cave. The view from the cave floor. The cave is dark, it’s ceiling is not visible as it is beyond the reach of lanterns and torches. The floor of the cave is covered in a heavy knee deep fog and rising from this are waist high stony fungi and foliage. Periodically the stony fungi make a puffing sound and emit a cloud of fog (miasma). Every step crackles and tinkles underfoot as the floor is covered in shards. Water occasionally drips from the dark above you landing with an audible plop.
The view from the shaft from Level 1. The cave is dark, it’s floor is not visible as it is beyond the reach of lantern light. The ceiling of the cave is covered with dripping stalactites. There is a wooden sign upon which, painted in yellow, are crudely painted crossbones and the words Danger Miasma Below. (If the Player Characters lower themselves on a rope below the level of the ceiling a pillar just to the west is revealed – a great pillar descends into the darkness below you.)
Secret Ref Info: At the bottom of the cave can be seen a fog hanging close to the floor, miasma. Should the player characters descend to the floor of this cave, or enter it, without the necessary protective clothing they will expose themselves to the miasma.
The ceiling of this cave is covered with stalactites. The ceiling cannot be illuminated from the floor by a lantern. Water drips from the stalactites, whenever characters enter a square they have a 1-in-8 chance of being struck, it is poison which when consumed causes damage the reverse of a cure light wounds spell, damage 2-7 (1d6+1) hit points; a successful saving throw vs. poison avoids the damage. Shields may be held like umbrellas to shield a player from the water. Wearing the garments of a Plague Doctor also protects characters from the poison.
A swarm of Carnivorous Flies (Robber Flies) fly about in the dark, attracted to light they will attack 1-6 rounds after player characters shine a light in the cavern, they will fly within 30’ and jump to attack from shadow thus surprising on a 4-in-6. 5 Carnivorous Flies (Robber Flies), Armor Class 6, 2 Hit Dice, 6, 6, 8, 3, 10 Hit Points, Move 90/30 Fly 180/60, Damage 1d8, Saving Throw F1, M8, Alignment Neutral, monster description Moldvay page B41, Labyrinth Lord page 75. They can fly into the shaft and climb on the walls. These monsters are patterned similarly to bees and immune to poison.
Pillar (a) Fountain of pain – When the bottom of this pillar is approached the sound of running water can be heard. In a niche on the west side there is a fountain which endlessly and magically fills a small basin and though the water never seems to drain away it never spills over. The water is currently a poison which when consumed causes damage the reverse of a cure light wounds spell, damage 2-7 (1d6+1) hit points; a successful saving throw vs. poison avoids the damage. If the heart of the Cavern is restored to its place this water restores damage and cures paralysis as if it were a cure light wounds spell, 2-7 (1d6+1) lost hit points are restored. This only works once per character once per day. Drinking a second time merely quenches thirst. It would take 3 rounds to fill a flask.
When the player characters approach the base of this pillar (within 30’ in any direction) check for surprise. Tiger Beetles are 4’ long and most of their bodies are concealed by the miasmic fog until they attack, grant an additional +1 to surprise rolls. When these creatures are observed the Player Characters will see the curved striped backs of insects moving through the knee high fog. It billows in their wake. These aggressive creatures attack; they are lairing here and (imagining their behaviour) have laid a cluster of eggs around the foot of the pillar. The mace (which has the name “SMITER” forged in it) lays among the eggs. 4 Tiger Beetles, Armor Class 3, 3+1 Hit Dice, 10, 10, 6, 11 Hit Points, Move 150/50, Bite 2d6, Saving Throw F1, M9, Alignment Neutral, description Moldvay page B31. Treasure: a +1 mace lies on the floor. The eggs are harmless and can be crushed. If left they will be scavanged by other monsters but a few might hatch and later become formidable beetles in their own right.
Pillar (b) This pillar, though stone, is moist and slick with poison which courses and pulsates through veins in the rock as though it were a living thing. Striking the pillar with a weapon causes it to spray poison at the attacker, which causes damage the reverse of a cure light wounds spell, damage 2-7 (1d6+1) hit points; a successful saving throw vs. poison avoids the damage. These veins in the rock, like roots, extend through the ceiling and floor. It is from these that the poison in the ceiling drips. When the ruby the Heart of the Cavern is replaced this pillar becomes inert rock once more.
Pillar (c) This pillar contains a niche which once held the ruby the Heart of the Cavern. The ruby fits exactly in the spot and if replaced here magically: illuminates the caves, changes the water so it is not poison, brings all the fungi back to life, and clears the miasma.
Note – in our previous article I referred to this as pillar 3” (what was I thinking?) so we will have to amend our text for Level 2 Map Key 17.
Carrion Crawlers have made this pillar their lair and they lurk in the darkness above. When the pillar is approached these creatures run down the pillar and attack.
3 Carrion Crawlers, Armor Class 7, 3+1*Hit Dice, 13, 14, 12 Hit Points, Move 120/40, Damage Paralysis, Saving Throw F2, M9, Alignment Neutral, monster description Moldvay page B32, This monster is worm-like, 9′ long with lots of legs. Its mouth is surrounded by 8 paralysing tentacles, all 2′ long. The attack of this creature paralyzes for 2-8 turns on a successful hit unless a saving throw vs. Paralysis is made. The Carrion Crawler will stop and eat its defenceless paralysed prey unless it is attacked. The paralysis can be removed with a cure light wounds spell. These monsters have stuck their treasure into crevices in the rock of the pillar 30’ feet above (the glint of gold and silver coins can be seen at the edge of lantern light) 4000 sp, 2000 gp, 6 gems (rubies) 10 gp, 10 gp, 10 gp, 50 gp, 50 gp, 100 gp. The player characters will have to climb in order to retrieve the treasure and this activity will take a number of turns to complete.
Map key 9
You may recall in an earlier article we wrote there is a candle teleportal from Level 1 Map Key 21 to Level 3 Map Key 9. We will need to amend it for the miasma.
9. The Cave. This small cave has a lit red candle floating in the air of the southern niche illuminating much of this room. There is an iron door in the east which has a small rectangular open grille of iron bars at face height. Above the door, is a wooden sign upon which, painted in yellow, are crudely painted crossbones and the words Danger Miasma. A short steep passage descends 30’ and the end is covered in a heavy knee deep fog.
Secret Ref Info: The lit and glowing candle floating in mid air cannot be touched, it marks an invisible teleportal to Level 1 Map Key 21. The candle burns but is not consumed. The easternmost door is made of iron and locked; there is a keyhole. The iron door cannot be opened without the key except with magic or unless it is picked. If the grille in the door is peered through characters can see more cave beyond the short passage, Map Key 8.
Summary
In our next article we will continue on with populating Level 3.
Previous Article – Next Article