The Old School Dungeon – Populating Level 2, Random Room Fill, Level Completion
Level 2 Random Room Fill
At this point we have placed the treasure for Level 2 that we wanted the players to have and designed many of its rooms. We still have some keyed areas of the dungeon we haven’t really provided for. We’ll use dice to first determine whether or not they are empty or contain a Monster, Treasure, Trick, or Trap. “Empty” rooms are not ever really empty. Our descriptions already include some writing that makes them worth searching, provides atmosphere, etc. We will bring our random content together with what we have already written in the adjacent rooms.
Map Keys 2, 3, 6, 7, 9, 22, and 23 have not been assigned anything yet.
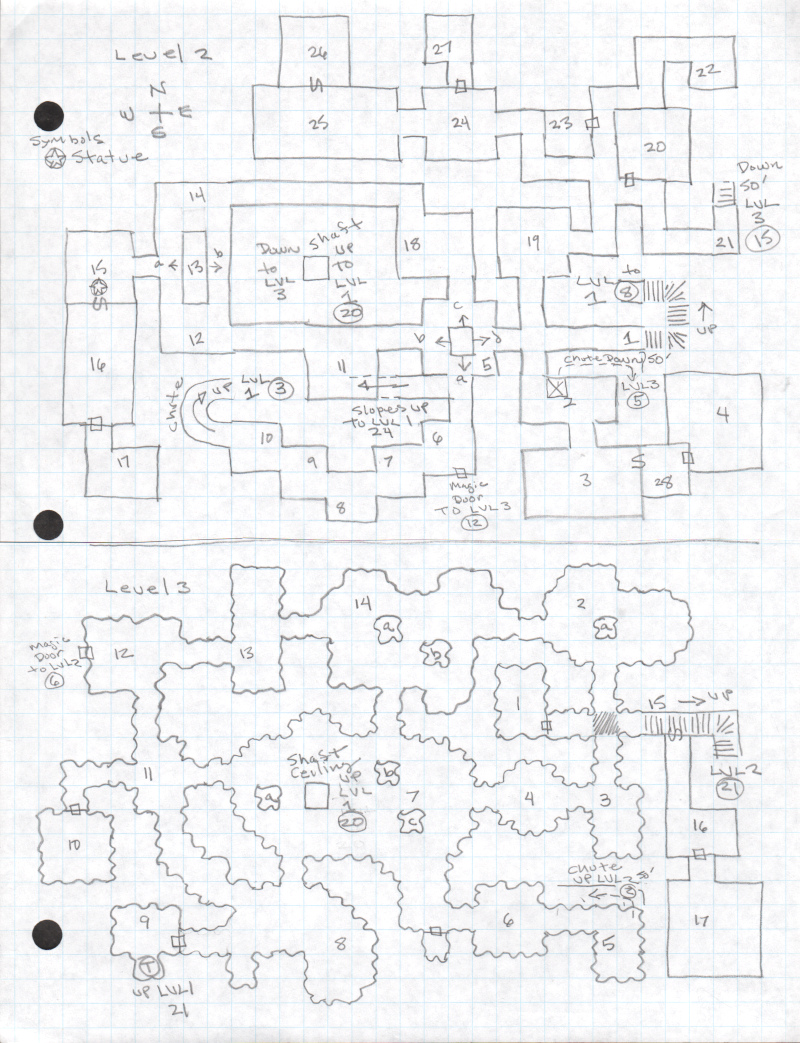
The following maps for Level 2 and Level 3 have been revised per the text in this and the previous article. Note that we have a new symbol for Statues.
Let’s recap the rules:
In the BX rules:
- 2-in-6 of all rooms have a monster with a 4-in-6 chance of a Treasure.
- 2-in-6 of all rooms are empty, 33.33% of the underworld; with a 1-in-6 chance of a hidden Treasure therein.
- 1-in-6 rooms have Traps with a 2-in-6 chance that it protects a treasure.
- 1-in-6 rooms have a Special with no chance that it protects a treasure. There is no column for Special in Unguarded Treasure.
I created the following table for reference in this article but you can use whatever tables are appropriate from your rules:
| Dice Roll | Result |
| 1-2 | Monster, 4-in-6 chance of treasure (dice result 1-4) |
| 2-3 | Empty, 1-in-6 chance of hidden treasure (dice result 1) |
| 4-5 | Trap, 2-in-6 chance it protects treasure (dice result 1-2) |
| 6 | Special, no treasure |
Map key 2
We roll 1d6, the result is a 6, which means there is a Special and no treasure. As I stated previously it is nice when you can tie the special in to treasure in some way. In an earlier article I devised a table of Specials for level 1, and we’ll use it again for Level 2.
| Dice Roll | Special |
| 1 | A sliding block which closes off a passage, it does not open for 1d6 Turns unless it is forced open. These blocks often move randomly roll 1d4, 1. North, 2. South, 3. West, 4. East. |
| 2 | A ghostly lantern floats in the air and leads in the direction of a nearby treasure for 1d12 Turns. It moves 60’ per Turn. The lantern will advance ahead of the player characters if they move in the correct direction and stop when the room containing the treasure is reached; it will vanish when the time limit expires. |
| 3 | Ghastly Fog, when a character enters the ghastly fog they hear whispers and moans; it switches the minds of characters for 1d12 Turns, players make saving throws vs. Spells in pairs of characters, when one of the two players fails their character’s saving throw they temporarily switch player characters. Fogs cannot be seen through meaning characters are effectively blind while in fog. |
| 4 | A magic door appears for 1d6 Turns in a nearby wall which 3-in-6 leads to another room one level below or above the current one. |
| 5 | Ghostly Effect, one of the following; a door opens and closes by itself, a moan is heard, chains rattle, a shriek (check for wandering monsters), an item moves by itself, footsteps are heard nearby, a lantern light is seen in the distance for 1d6 rounds before extinguishing, a ball of light enters the room or corridor passing from one wall to the other, a message is drawn in dripping poisonous ichor on the wall, causing death in 1d10 Turns or 1d6 damage. |
| 6 | Statue, one of the following; the statue speaks revealing information which may be true or false, the statue points towards: the nearest monster, treasure, trap, or the nearest exit to the level above or below, the statue casts a magic spell once per day, the statue emits a gas, the statue sprays a liquid, passing the statue sounds a gong which attracts wandering monsters, when a part of the statue is moved it opens a secret or locked door. |
| 7 | Magic Door, the door is Wizard Locked but can be opened when one of the following conditions is met; it will open for a particular character class, it will open for a particular alignment, it will open only for monsters, it can be opened at a certain time of day for 1d6 Turns, it will open when a password is spoken, it will open when a special key is used or an item is presented. |
| 8 | Chute, there is a 3-in-6 chance the chute will open when its cover is stepped on, the character then falls into the chute, they are not harmed, but involuntarily descend to the level below, chutes cannot be climbed. This table result will cause a map redraw. |
So, we’ll roll 1d8, and see what we get, the result is 8, Chute! A Chute will cause a map redraw but this is such a great idea we will include it. The chute goes down to Level 3. We’ll put a trap door here concealing it.
2. Track Room. There are tracks on the floor.
Secret Ref Info: An INT attribute check roll can be used to follow and identify the tracks which belong to Ghouls. They lead North and East to the stair and south but toward and into Map Key 3 where they lead to the East wall and end. The tracks cannot be followed after they reach the stair as they have been disturbed.
There is a 3-in-6 chance the trap door covering chute will open when its cover is stepped on dropping whoever is in the square down the chute. Curiously all the tracks lead around the square containing the trap door, so that is a hint the Ghouls know all about the chute! The chute descends 50’ to Level 3 Map Key 5 where it is a hole in the wall leading upward. The chute is too slippery to climb back up but not for monsters!
Map key 3
3. Mystery Room. There are tracks on the floor which lead from Map Key 2 into this room and to the east wall, where they mysteriously end.
Secret Ref Info: An INT attribute check roll can be used to follow and identify the tracks which belong to Ghouls. They lead to the secret door, but players will simply see it as ending at a wall. There is a secret door here; there is no peephole. Beside the secret door is a hidden switch, a stone in the wall. When pushed, the switch opens the secret door. There is a 1-in-6 chance of spotting the secret door; 2-in-6 if the character is an Elf. If the switch is not found the door may 2-in-6 be forced open.
Map key 6
We roll 1d6, the result is a 6, which means there is a Special and no treasure. As I stated previously it is nice when you can tie the special in to treasure in some way. In an earlier article I devised a table of Specials for level 1 so we’ll roll 1d8, and see what we get, the result is 4, A magic door appears for 1d6 Turns in a nearby wall which 3-in-6 leads to another room one level below or above the current one.
This is fun, so we’ll have to more map amendments. We need to decide where it goes; which could be anywhere, even on the same level if we wanted. Consulting our maps, lets decide it goes to Level 3 Map Key 12. Well amend both maps. Note, these magic doors don’t even have to be on the same wall, we’ll put the Level 3 door on the West wall. We could make the door only work for certain character classes, appear and disappear, go to different places at different times, make it a one way trip, etc., but as we are just beginning its best if it is a permanent door and no additional tricks.
The underground cavern depicted in the frescoes refers to Level 3.
6. Segmented Chamber. There are tracks on the floor. Frescoes on the walls depict men wearing plague masks hunting large beetle-like insects in an underground cavern.
Secret Ref Info: The tracks on the floor were made by the Oil Beetles in Map Key 8. They can be followed by an INT attribute roll, a character must roll less than or equal to their INT to identify the tracks if a character has seen Oil Beetles before.
There are tracks on the floor made by a Draco Lizard which come from the Magic Door and lead toward Map Key 7. They can be followed by an INT attribute roll, a character must roll less than or equal to their INT to identify the tracks if a character has seen Draco Lizards before.
The Magic Door in the South Wall goes to Level 3 Map Key 12. When the door is opened its interior glows blue with mysterious magical energy (non-reproducible blue?) and the other side cannot be seen. When entered, a character steps into Level 3 Map Key 12.
Map key 7
We roll 1d6, the result is a 2, Monster, there is a 4-in-6 chance of an unguarded treasure, and we roll 4, Unguarded Treasure! We are not substituting this with lair treasure.
We then roll 1d20 on our Wandering Monsters Table, in Moldvay page B54, substitute your rules of choice as appropriate. The result of the dice roll is 9, we look down the Dice Roll column to find 9 and move right in the row to find under the Wandering Monster Column, Draco Lizard! There are 1-4, so we roll 1d4, 1 monster.
This dovetails neatly with the “direction” to decrease the number of 4+1 Hit Die monsters appearing when they appear on Level 3. Per a previous article the text is directing us to modify the number appearing when the Hit Die and Level do not match. Frankly, it’s a bit of a contradiction when we then see 1-4 of these 4+1 Hit Die monsters in the Wandering Monster List for Level 2. It is important to consider how combat is going to work out, such a monster only needs a 6 or better to hit AC 9, which is a 75% chance of a successful hit whereas a 1st to 3rd Level player needs a 10 or better to hit AC9, which is a 55% chance, meaning the difference is this monster has a not insignificant 20% advantage. You can adjust the number appearing if one monster would prove to be an insufficient challenge for your players.
Ok, the adjacent Map Keys have Oil Beetles so we can say these lizards are hunting them. We’ll say there are tracks on the floor coming from the Magic Door in Map Key 6. We’ll have to amend Map Key 6 to include their tracks on the floor.
Unguarded Treasure! We roll on the Unguarded Treasure table using the row for Levels 2-3 on page B52. Silver Pieces – we roll a 1, so there are 1d12 x 100sp, we roll a 3, so 300sp; there is a 50% chance of Gold, we roll two ten sided dice 37, 1d6 x 10, we roll a 5, 50gp; there is a 5% chance of Gems, we roll two ten sided dice 55, nothing; there is a 2% chance of Jewelry, we roll two ten sided dice 38, nothing; there is a 2% chance of Magic Items, we roll two ten sided dice 62, nothing.
The underground cavern depicted in the frescoes refers to Level 3.
7. Segmented Chamber. There are tracks on the floor. Frescoes on the walls depict men wearing plague masks hunting large beetle-like insects in an underground cavern.
Secret Ref Info: The tracks on the floor were made by the Oil Beetles in Map Key 8. They can be followed by an INT attribute roll, a character must roll less than or equal to their INT to identify the tracks if a character has seen Oil Beetles before.
Tracks from the Draco Lizard lead from the magic door in Map Key 6. They can be followed by an INT attribute roll, a character must roll less than or equal to their INT to identify the tracks if a character has seen Draco Lizards before.
There is a loose flagstone in the floor, under it are two leather sacks, one contains 300sp, and the other 50gp.
Draco Lizard, Armor Class 5, 4+1 Hit Dice, 13 Hit Points, Move 120/40 fly 210/70, Bite 1d10, Saving Throw F3, M7, Alignment Neutral, description Moldvay page B38. The Draco Lizard is hunting the Oil Beetles but will attack Player Characters.
Map key 9
We roll 1d6, the result is a 6, which means there is a Special and no treasure. In an earlier article I devised a table of Specials for level 1 so we’ll roll 1d8, and see what we get, the result is 2, A ghostly lantern floats in the air and leads in the direction of a nearby treasure for 1d12 Turns. It moves 60’ per Turn. The lantern will advance ahead of the player characters if they move in the correct direction and stop when the map key containing the treasure is reached; it will vanish when the time limit expires.
The underground cavern depicted in the frescoes refers to Level 3.
9. Segmented Chamber. There are tracks on the floor. Frescoes on the walls depict men wearing plague masks hunting large beetle-like insects.
Secret Ref Info: The tracks on the floor were made by the Oil Beetles in Map Key 8. They can be followedby an INT attribute roll, a character must roll less than or equal to their INT to identify the tracks if a character has seen Oil Beetles before.
With regard to the Magic Lantern, we can be a little flexible with the location of treasure; if a treasure has been taken the lantern will move on to the next available treasure. It can pass through doors and secret doors. So the first treasure is in Map Key 7. The lantern will move to that Map Key at 60’ per turn, the same speed as typical player characters, and hover above the loose flagstone if the unguarded treasure hasn’t been found.
Map key 22
22. We roll 1d6, the result is a 5, which means there is a Trap and a 1-in-2 chance of treasure, we roll 1d6, the result is 2, treasure! For the Trap, lets say a poison gas sprays from cracks in the wall when the room is entered, Save vs. Poison or die.
We roll on the Unguarded Treasure table on page B52. Silver Pieces – we roll a 1, so there are 1d12 x 100sp, we roll a 6, so 600sp; there is a 50% chance of Gold, we roll two ten sided dice 09, 1d6 x 10, we roll a 4, 40gp; there is a 5% chance of Gems, we roll two ten sided dice 09, nothing; there is a 2% chance of Jewelry, we roll two ten sided dice 66, nothing; there is a 2% chance of Magic Items, we roll two ten sided dice 71, nothing.
We’ll say the walls are painted like the rest of this level of the underworld.
22. Chamber of Gnashing. A fresco painted on the walls and ceiling depicts bestial fanged mouths. There is a niche in the South wall which contains a wooden coffer.
Secret Ref Info: The wooden coffer contains 600sp and 40 gp. When the coffer is lifted from the niche a spray of deadly gas fills the room from the mouths, all present in the room must Save vs. Poison or die. A successful Find & Remove Traps roll will disable the Trap.
Map key 23
23. We roll 1d6, the result is a 1, Monster, there is a 4-in-6 chance of an unguarded treasure, and we roll 6, nothing.
We then roll 1d20 on our Wandering Monsters Table, in Moldvay page B54, substitute your rules of choice as appropriate. The result of the dice roll is 9, we look down the Dice Roll column to find 9 and move right in the row to find under the Wandering Monster Column, Draco Lizard! There are 1-4, so we roll 1d4, 1 monster. If this proves to be an insufficient challenge for your players you can increase the number appearing.
Finding this monster here is an odd juxtaposition. I say this because we have tomb/undead interconnections between our various Map Keys. The Draco Lizards, per their description, like to go underground to avoid extremes of temperature, so we can propose that this monster has taken refuge here for that reason.
23. Closet. This room is empty.
Secret Ref Info: Draco Lizard, Armor Class 5, 4+1 Hit Dice, 18 Hit Points, Move 120/40 fly 210/70, Bite 1d10, Saving Throw F3, M7, Alignment Neutral, description Moldvay page B38.
Completing the Level Map Keys
At this point we can put all of our Map Keys together in sequence and insert the missing false statements of Patriarch Devious Ingrate. They will be based on everything we’ve written so far. The Patriarch does not tell the truth but will try to put the Player Characters in harms way. So the Patriarch’s statements appear to be sort of useful but are in reality falsehoods.
We will also make a special wandering monster table for Level 2. We could use the standard wandering monster table if we wanted to but its both fun to devise something in keeping with the content of our level and avoid odd juxtapositions.
Map key 1
1. Bottom of the Stair. The stair from Level 1 Map Key 8 ends here.
Secret Ref Info: There is a trap here, a murder step at the bottom of the stair, which is of a different height and causes characters to trip and fall 3-in-6 of the time if they do not spot it, 1-in-6. Falling causes no damage the character merely falls prone at the bottom of the stair.
Note – It may be implied from the rules of melee that a fallen character forfeits a round of combat in order to stand, would lose any defensive bonus for dexterity or shield and the attacker gains +2 to their attack.
Map key 2
2. Track Room. There are tracks on the floor.
Secret Ref Info: An INT attribute check roll can be used to follow and identify the tracks which belong to Ghouls. They lead North and East to the stair and south but toward and into Map Key 3 where they lead to the East wall and end. The tracks cannot be followed after they reach the stair as they have been disturbed.
There is a 3-in-6 chance the trap door covering chute will open when its cover is stepped on dropping whoever is in the square down the chute. Curiously all the tracks lead around the square containing the trap door, so that is a hint the Ghouls know all about the chute! The chute descends 50’ to Level 3 Map Key 5 where it is a hole in the wall leading upward. The chute is too slippery to climb back up but not for monsters!
Map key 3
3. Mystery Room. There are tracks on the floor which lead from Map Key 2 into this room and to the east wall, where they mysteriously end.
Secret Ref Info: An INT attribute check roll can be used to follow and identify the tracks which belong to Ghouls. They lead to the not-so-secret door, but players will simply see it as ending at a wall. There is a secret door here; there is no peephole. Beside the secret door is a hidden switch, a stone in the wall. When pushed, the switch opens the secret door. There is a 1-in-6 chance of spotting the secret door; 2-in-6 if the character is an Elf. If the switch is not found the door may 2-in-6 be forced open.
Map key 4
4. Ghoul Lair. 3 Ghouls, 4 if Chillyfist is present. The Ghouls are hunched over a corpse of a Giant Shrew which they are in the process of consuming with great relish. They have poor table manners. What table? They are eating off of the floor.
Secret Ref Info: There are 4 Ghouls, Armor Class 6, 2 Hit Dice, Chillyfist, (9 Hit Points) Bonecracker, (4 Hit Points) Nevertaste, (8 Hit Points), and Bilebite (8 Hit Points), Move 90/30, 2 Claws, 1 Bite 1-3, +Paralysis (2-8 Turns), Saving Throw F2, M9, Alignment Chaotic, description Moldvay page B35.
Scattered on the floor amid Ghoul dung, bones, and gristle, are 2000 Silver Pieces, 3000 Gold Pieces, and a +1 Magic Sword named Skullthrasher (it’s written on the blade), +3 against undead which the Ghouls have taken to prevent it from being used against them and they are loathe to touch it. The Ghouls swiped it from the grave of Captain Dumb Fist at Map Key 27, and a leg because they needed a snack.
Map key 5
5. Blocking Stone. There is a grinding sound. A very large stone is moving. It is painted with a mysterious glyph on every side, Ӝ.
Secret Ref Info: An INT attribute roll may be used to discover the meaning of the painted glyph, Ӝ, a player, using d20, must roll equal to or better than their character’s INT; the painted mark on the blocking stone marks the boundary of a tomb. If a character fails the roll they do not understand what the painted glyph represents.
The blocking stone moves 10 feet per melee round and it is triggered by the approach of a character within 60 feet. So when a Fighter is the first closest character to the stone it moves to (a), when a Cleric is the first closest character to the stone it moves to (b), When a Magic-User is the first closest character to the stone it moves to (c), When a Thief is the first closest character to the stone it moves to (d). It then stays put, only returning to its centre home position after characters have departed and are beyond 60’.
If the marching order of the character party is two abreast you can pick one of the two characters as the principle influencer of the stone.
As soon as this stone is in position the characters will want to move it. Don’t allow this. Let them figure out the puzzle.
The blocking stone is not an obstacle to monsters and returns to its home position at the centre of the room when monster’s approach if it is not already there.
Note – just beyond (a) is the sloping path to Level 1 Map Key 24. If the player characters haven’t already met the Skeletons, and (a) is open, these monsters turn about face and attack. We can say that their purpose is to prevent access to Levels 2 and 3.
Map key 6
6. Segmented Chamber. There are tracks on the floor. Frescoes on the walls depict men wearing plague masks hunting large beetle-like insects in an underground cavern.
Secret Ref Info: The tracks on the floor were made by the Oil Beetles in Map Key 8. They can be followed by an INT attribute roll, a character must roll less than or equal to their INT to identify the tracks if a character has seen Oil Beetles before.
There are tracks on the floor made by a Draco Lizard which come from the Magic Door and lead toward Map Key 7. They can be followed by an INT attribute roll, a character must roll less than or equal to their INT to identify the tracks if a character has seen Draco Lizards before.
The Magic Door in the South Wall goes to Level 3 Map Key 12. When the door is opened its interior glows blue with mysterious magical energy (non-reproducible blue?) and the other side cannot be seen. When entered, a character steps into Level 3 Map Key 12.
Map key 7
7. Segmented Chamber. There are tracks on the floor. Frescoes on the walls depict men wearing plague masks hunting large beetle-like insects in an underground cavern.
Secret Ref Info: The tracks on the floor were made by the Oil Beetles at Map Key 8. They can be followed by an INT attribute roll, a character must roll less than or equal to their INT to identify the tracks if a character has seen Oil Beetles before.
Tracks from the Draco Lizard lead from the magic door at Map Key 6. They can be followed by an INT attribute roll, a character must roll less than or equal to their INT to identify the tracks if a character has seen Draco Lizards before.
There is a loose flagstone in the floor, under it are two leather sacks, one contains 300sp, and the other 50gp.
Draco Lizard, Armor Class 5, 4+1 Hit Dice, 13 Hit Points, Move 120/40 fly 210/70, Bite 1d10, Saving Throw F3, M7, Alignment Neutral, description Moldvay page B38. The Draco Lizard is hunting the Oil Beetles but will attack Player Characters.
Map key 8
8. Segmented Chamber. The walls and ceiling of this vault are painted with a colourful fresco depicting men wearing plague masks hunting large beetle-like insects in an underground cavern.
Secret Ref Info: 6 Oil Beetles, Armor Class 4, 2 Hit Dice, 8, 7, 8, 6, 8, 7 Hit Points, Move 120/40, Bite 1-6,Saving Throw F1, M8, Alignment Neutral, monster description Moldvay page B31, Oil beetles are 3′ long giant beetles, they squirt an oily fluid at one attacker range 5’, a “to hit” roll is needed. When hit a victim fights with a penalty of -2 on their “to hit” rolls for 24 hours or until a Cure light wounds spell is used.
Map key 9
9. Segmented Chamber. A ghostly lantern appears, it floats in the air and begins moving.
There are tracks on the floor. Frescoes on the walls depict men wearing plague masks hunting large beetle-like insects.
Secret Ref Info: The tracks on the floor were made by the Oil Beetles at Map Key 8. They can be followed by an INT attribute roll, a character must roll less than or equal to their INT to identify the tracks if a character has seen Oil Beetles before.
A ghostly lantern floats in the air and leads in the direction of a nearby treasure for 1d12 Turns. It moves 60’ per Turn. The lantern will advance ahead of the player characters if they move in the correct direction and stop when the room containing the treasure is reached; it will vanish when the time limit expires.
With regard to the Magic Lantern, we can be a little flexible with the location of treasure; if a treasure has been taken the lantern will move on to the next available treasure. It can pass through doors and secret doors. So the first treasure is in Map Key 7. The lantern will move to that Map Key at 60’ per turn, the same speed as typical player characters, and hover above the loose flagstone if the unguarded treasure hasn’t been found.
Map key 10
10. Segmented Chamber. A chute leads upward to Level 1 Map Key 3. At the bottom of the chute from Level 1 is a pile of debris. There are tracks on the floor.
Secret Ref Info: The tracks on the floor were made by the Oil Beetles at Map Key 8. They can be followed by an INT attribute roll, a character must roll less than or equal to their INT to identify the tracks if a character has seen Oil Beetles before.
The chute is too slippery to climb up to Level 1 Map Key 3. There is a pile of junk here collected from Level 1; an old boot, one glove, bones, a candle, three copper coins, 10’ of rope. We can also put something useful in here from the equipment list; 100’ of Rope, a Sack containing 10 GP, one weeks Iron Rations in a backpack, Boots, Gloves, 6 Torches, Mirror, Holy symbol, a Key to the Zombie coffin padlocks in Map Key 26.
Map key 11
11. Offering Room. This room has an altar in the centre which is about waist high and made of stone, obsidian. The walls bear painted plaster, which is suffering from damp and parts of the scenes painted there have fallen away to the floor. The murals depict offerings being made to a Cleric by humans, humanoids, and monsters. Here it was intended that offerings could be left for the inhabitant of this tomb to be used in the afterlife. On the altar are a bowl and jug.
Secret Ref Info: Bowl contains 50 gold coins. The jug has a stopper and contains a mysterious liquid, a Healing Potion.
The walls of this room sound hollow and if broken open, stones are removed, they will reveal skeletons are hidden in cavities. They remain in place unless the offerings in the following paragraph are removed, see below.
Looting of the tomb always provokes its defense and a hostile reaction by its inhabitants. If the offering is removed Skeletons break out of the walls and attack! 9 Skeletons, Armor Class 7, 1 Hit Dice, 2, 6, 2, 2, 1, 4, 5, 6, 4 Hit Points, Move 60/20, Spear 1-6 damage, Save F:1, M12, Alignment Chaotic, not affected by sleep or charm spells, these undead can be turned by a cleric, they attack until destroyed, monster description Moldvay page B42.
Offerings may be left on the obsidian altar for the Patriarch Devious Ingrate propitiate (gain the goodwill or favour of) Devious Ingrate. They must be of at least 50 sp value. Devious Ingrate has been collecting the offerings and taking them to Map Key 17 thus increasing this monster’s hoard of treasure.
What favour is granted by leaving an offering? This is an opportunity for role-playing this monster. We can imagine that Devious Ingrate won’t want anyone looting the tomb. As long as the player characters are respectful, and take nothing, they may leave unharmed by the tomb’s inhabitants, and with further inducement perhaps some secret about this underworld might be revealed,refer to Map Key 15.
Map key 12
An empty area next to the cage.
12. Arm Area. There is an arm on the floor here, severed at shoulder length, which uses its fingers to crawl across the floor.
Secret Ref Info: The arm on the floor is harmless but it keeps moving around. If anyone tries to attack it the hand makes an offensive gesture and tries to move away. We can propose for the purposes of attack it is AC 9 and has 1/2 Hit Point.
Map key 13
13. Zombie Cage. There is a grilled cage of strange shambling humanoid creatures here, they do not smell good, an unpleasant mouldy rot. They might once have been alive but now they are clearly corpses; dressed in rags. They move silently toward you and without speaking. Fortunately for you they cluster against the grille of the cage, lashing out through the grille with outstretched arms. It is clear they will attack anyone who comes near. It might be a good idea to stay out of reach.
Zombie, Armor Class 8, 2 Hit Dice, 6 Hit Points, Move 120/40, Sword 1-8, Saving Throw F1, M12, Alignment Chaotic, monster description page B44, Undead Human, they are slow fighters, and always strike last (no initiative roll needed), make no noise, not affected by Sleep or Charm spells. May be turned by a Cleric.
Secret Ref Info: The Zombies will roll the cage confining them back and forth, west or east, towards anyone who tries to pass by the cage or enter the passage to Map Key 15. There is a door, which is locked, in the middle of the western side of the cage. One of the Zombies has a key. Devious Ingrate, Map Key 17, can command the Zombie to unlock the door releasing them all to do his bidding.
Zombies can be turned by a Cleric but they cannot retreat further than the limits of the cage.
The players can jam something in the track to keep the wheeled cage from moving at the risk of an attack. They can lure the Zombies back and forth.
Map key 14
14. Slippery Area. There is a slippery pool of what appears to be lantern oil on the floor.
Secret Ref Info: The oil is lantern oil and can be burned. If characters step in it there is a 3-in-6 chance of slipping and falling. Falling causes no damage the character merely falls prone.
Note – It may be implied from the rules of melee that a fallen character forfeits a round of combat in order to stand, would lose any defensive bonus for dexterity or shield and the attacker gains +2 to their attack.
Map key 15
15. Oracle Room. This room is dark, until entered, then braziers in the corners mysteriously alight with heat-less green flame. The room is then illuminated revealing an obsidian statue of Patriarch Devious Ingrate in the middle of the room. The walls are painted with scenes of humanoids bringing offerings to the winged statue in this room. These are depicted as being placed before the statue or in the hollow horned skull the statue is holding. Devious Ingrate is portrayed as a hunched and scowling bat winged human. The body is carved as if it were draped in robes. The Patriarch’s clawed hands hold a horned red crystal skull hollowed to form a basin. This imposing statue practically reaches the ceiling. Its base is a stone block which has Oracle Patriarch Ingrate carved in large block letters.
There is a bronze gong and striker here, green with age and damp.
Secret Ref Info: The bronze gong must be rung to summon the Patriarch. When rung, the gong sounds loudly, check for wandering monsters!The Patriarch will stand behind the secret door 1 Turn after the gong is rung.
When the statue is then approached a reedy voice, barely above a whisper then says, “Place your offering in the skull and I will reveal a secret of this place.”
The voice comes from behind the statue and this can be detected 1-in-6. Devious Ingrate is speaking from behind the secret door to Map Key 16. Beside the secret door is a hidden switch, a stone in the wall. When pushed, the switch opens the secret door. There is a 1-in-6 chance of spotting the secret door; 2-in-6 if the character is an Elf. If the switch is not found the door may 2-in-6 be forced open.
Any offering to Devious Ingrate must be of 50 sp value or he will not reply. Only one of Patriarch Devious Ingrate’s “secrets” is revealed per day. After revealing it the Patriarch will not reply to further offerings, gong ringing, or say anything more. Patriarch Devious Ingrate’s intent is to send player characters into harms way so that this undead monster can collect any treasure they might be carrying. The Ref can pick any Falsehood that suits them:
Falsehoods:
- The bound coffins are locked to keep the dead safe. (False – They are locked to keep the plague Zombies from getting out.)
- The undead can be restrained with the collar-poles found in this tomb. (False – The poles are rotten and unsafe to use.)
- The dead sleep, they care nothing for their grave goods. (False – Taking anything out of a tomb will cause the undead to rise.)
- There is no invisible creature here. (False – One of the Ghouls has an ring of invisibility)
- The magic door leads out. (False – The magic door leads to Level 3.)
- The stair birds can be driven away by loud noise. (False – The Stirges are attracted by noise.)
- Placing the Heart of the Caverns in the pillar will bring calamity. (False – Placing the Heart of the Caverns Ruby in the niche lights Level 3.)
- The wandering dead cannot pass my glyph Ӝ. (False)
- Captain Dumb Fist’s missing sword, Skullthrasher, is cursed. (False)
Map key 16
16. Grave Goods. This room contains the grave goods thought to be needed by Patriarch Devious Ingrate in the afterlife. Everything is in semi ruinous state. Vermin, damp, and mould have ruined the upholstered furniture. Among the bric-a-brac are are three closed chests. Dust covers everything. The walls are painted showing humanoids serving the bat winged Patriarch in the afterlife. There are tracks in the floor which lead southward and to the chests.
They stand so still you might have thought them statues. Silent humanoids stand motionless at the south end of the room. They are armed with swords and clad in rusty mail. Like everything else in this room they are damp, mildewed, and clearly dead. They silently move towards you…
Secret Ref Info: Beside the secret door is a hidden switch, a stone in the wall. When pushed, the switch opens the secret door. There is a 1-in-6 chance of spotting the secret door; 2-in-6 if the character is an Elf. If the switch is not found the door may 2-in-6 be forced open. When anyone searches for the secret door, tries to open it , or succeeds in opening it, Devious Ingrate will commanded the Zombies which are positioned here to defend the room and attack any intruders.
Should the number of Zombies defending Map Key 16 be reduced in battle to three or less Devious Ingrate will retreat to the sarcophagus at Map Key 17, get in, and close the lid. The sarcophagus protects Devious Ingrate and prevents attack. It is a refuge.
6 Zombies, Armor Class 8, 2 Hit Dice, 6, 10, 8, 5, 11, 7 Hit Points, Move 120/40, Sword 1-8, Saving Throw F1, M12, Alignment Chaotic, monster description Moldvay page B44, Undead Human, they are slow fighters, and always strike last (no initiative roll needed), make no noise, not affected by Sleep or Charm spells. May be turned by a Cleric.
An INT roll may be used to reveal what the tracks are, shoe prints.
The chests are locked (Devious Ingrate has the keys), they contain treasure, the offerings given to Devious Ingrate.
Chest 1:
- +1 Dagger
- Bag of Holding
- 100 Gold Coins
- 150 Silver Coins
Chest 2:
- +1 Ring of Protection
- Scroll, 3 MU/Elf Spells
- Hold Portal
- Magic Missile
- Web
- Scroll Protection from Undead
- Elven Boots
- 250 silver coins
- 200 gold coins
Chest 3:
- 3 Healing Potions
- 1 Poison Potion
- 500 silver coins
- 200 gold coins
Map key 17
17. Sarcophagus Room. This room contains a black obsidian sarcophagus. It has a single glyph carved on its top. Ӝ.
Secret Ref Info: Devious Ingrate, Armor Class 7, 2+1* Hit Dice, 13 Hit Points, Move 60/20, Mace 1-6 damage, Save F:2, M12, Alignment Chaotic, not affected by sleep or charm spells, this undead monster can be turned as if it were a ghoul by a cleric, successful attacks paralyze any creature of Ogre-size or smaller. When an opponent is paralyzed the monster will turn and attack another until all the opponents are paralyzed, or slain. Paralysis lasts 2-8 turns unless removed by a Cure Light Wounds spell, this monster can use speech to command skeletons and Zombies to do its bidding.
Our former Patriarch is now an undead skeleton still wearing the ancient ragged yellow clerical robes of its office and slippers with curved toes. Within its skull, luminous eye sockets blaze with green flame. These shine through pupil holes in a carved wood mask painted in a likeness of the Patriarch’s living face. Around the neck of the skeleton is a red jewel (The Heart of the Caverns) suspended on a silver chain. At its waist, suspended from the waist, are three keys to the chests in Map Key 15. On its skull is a yellow leather skull cap.
This monster is untruthful and devious. It collects treasure but seldom if ever tells the truth. Its pronouncements will send player characters into danger.
This monster will defend its tomb from being looted using its Skeleton and Zombie servants. Devious Ingrate created them long ago to defend the tomb. However, now undead, the former Patriarch has lost the ability to cast spells and all other class abilities. Should the number of Zombies defending Map Key 16 be reduced in battle to three or less Devious Ingrate will retreat to the sarcophagus at Map Key 17, get in, and close the lid. The sarcophagus protects Devious Ingrate and prevents attack. It is a refuge.
The sarcophagus, once closed, is not easily opened. The lid must be pushed aside. It can only be opened on a 1-in-8. The chance of opening may be modified by adding the bonus for a character’s strength. A STR of 14 grants a bonus of +1, meaning the sarcophagus can be opened in 2-in-8. The chance, modified by STR, can never be less than 1-in-8.
The ruby necklace is worth 1000gp (we shall propose a mysterious purpose for this jewel – The ruby is the Heart of the Caverns and when it is placed where it was taken from, a niche in Level 3 Map Key 7 pillar 3, it will cause the ceiling of the caves to illuminate.).
The skull cap is magical. On the inside of the cap in its silk lining are embroidered the following poetry “Over the mountains, under the stars, the Bat sings, fly! fly! fly!”. Upon reciting this poem at night, the Bat Cap will allow its wearer to sprout bat wings and fly through the air at a rate of 240′ per turn. The flying character can carry 1 extra person, reducing speed to 180′ per turn. The cap does not work during the day; it only works at nightor in the dark of an underworld.
Map key 18
18. Guard Room. The walls are painted with murals showing soldiers in the service of the Patriarch. Standing here are 8 skeletons armed with spears. They stand silently, waiting.
Secret Ref Info: The skeletons block the passage to the north. No one may pass unless they are accompanied (led) by a Cleric with an alignment of Chaos or Neutral. The skeletons will move aside allowing passage. Lawful Clerics may not pass; the skeletons attack. Once living these skeletal soldiers continue to serve their master in death.
8 Skeletons, Armor Class 7, 1 Hit Dice, 6, 4, 3, 5, 3, 6, 2, 5 Hit Points, Move 60/20, Spear 1-6 damage, Save F:1, M12, Alignment Chaotic, not affected by sleep or charm spells, these undead can be turned by a cleric, they attack until destroyed, monster description Moldvay page B42.
Map key 19
19. Painted Room. A fresco is falling off of the walls due to damp. There are coloured fragments of plaster on the floor. There is enough of it left still on the wall showing a funeral procession. Soldiers bear a bound coffin.
Secret Ref Info: The bound coffin in the fresco is an ominous hint, the coffins contain plague ridden Zombies. The idea is to scare the players, a little, but they have to make the connection there might be something bad ahead.
Map key 20
20. Sepulchre. The door to this room is wood bound with copper straps and studs. They are green with oxidization. Squeaking and hooting can be heard to the south. It sounds like a flock of birds. There are tracks on the wall and the ceiling.
When the door is opened: The tracks on the wall and ceiling belong to a Carrion Crawler but the players won’t know that, the tracks can be followed with a successful INT attribute Check Roll and they lead up from the stair toward Map Key 24 but the players won’t be able to identify the creature unless they have seen one before other than it is quite large and multi-legged.
This room is very damp and wet. The ceiling drips. Water collects in puddles on the floor. The ceiling was once painted blue with white stars but they have mostly fallen off. The west wall has peeling fresco painting showing coffins being placed in this sepulchre. The east wall shows the soldiers receiving rewards in the afterlife, food being presented by servants, servants working farms, etc. Eight wood coffins lay in the middle of the floor, they are covered in wet plaster debris from the ceiling. At the base of the walls are boxes and little clay figures, the servants of the soldiers in the afterlife, in various acts of work, planting reaping, herding cattle, etc., some are broken.
Secret Ref Info: The squeaking and hooting are the Stirges at Map Key 21.
The coffins contain the remains of the soldiers depicted the fresco. They are still dressed. The boxes contain grave goods, common personal household items without much worth. Each of the eight boxes contain the mask of a Plague Doctor, gloves, and a cowhide shift. These will protect a character from the mysterious miasma (gases) in the Caverns of Level 3. The shift can be worn under armor. The little clay statues have a value of 10 sp each. The skeletons remain inert so long as the grave goods and little statues remain in the room, these items can even be handled. However, if anything is taken out of the room,or broken, the skeletons in the coffins rise and attack intruders.
8 Skeletons, Armor Class 7, 1 Hit Dice, 4, 6, 3, 1, 2, 5, 4, 3 Hit Points, Move 60/20, 1-6 damage, Save F:1, M12, Alignment Chaotic, not affected by sleep or charm spells, these undead can be turned by a cleric, they attack until destroyed, monster description Moldvay page B42.
Map key 21
21. Stair – Roost. The ceiling drips, water trickles down the stairwell which descends into darkness. You can hear numerous creatures squeaking and hooting, like a flock of birds. There are tracks on the floor here which come from the stairway and the level below but they don’t stay on the floor, they go up the wall and are on the ceiling.
Secret Ref Info: The tracks on the floor and ceiling belong to a Carrion Crawler but the players won’t know that unless they have seen one before, the tracks can be followed with a successful INT attribute Check Roll and they lead to Map Key 24 but the players won’t be able to identify the creature other than it is quite large and multi-legged.
As soon as the stair is approached and the first lamp light falls upon the first 10’ of the stair the strange bird-like creatures roosting in this stairwell attack. They fly up and out of the dark. They make shrill and eager cries as they attack.
17 Stirges, Armor Class 7, 1 Hit Dice, 1, 5, 6, 5, 6, 5, 3, 1, 2, 1, 2, 1, 3, 1, 6, 1, 2, 4 Hit Points, Move 30/10 Fly 180/60, 1-3 damage, Save F:2, M9, Alignment Neutral, +2 first attack, successful attack means it is attached and automatically sucks blood each round after its first attack, monster description Moldvay page B43.
The Stirges will chase the player characters if they run. They fly much faster than the players. The players can take refuge in Map Key 20 and shut the door to keep the Stirges out (Refer to Map Key 27 Playing the Carrion Crawler below for a brief discussion of door rules). The Stirges will lose interest in 1d12 Turns (1-12 Hours) and return to their roost in the stair. They do not attack again unless their roost is approached.
Map key 22
22. Chamber of Gnashing. A fresco painted on the walls and ceiling depicts bestial fanged mouths. There is a niche in the South wall which contains a wooden coffer with brass straps.
Secret Ref Info: The wooden coffer is locked and contains 600sp and 40 gp. A Thief can pick the lock. The treasure is protected by a trap. A successful Find or Remove Traps roll will disable the Trap. When the coffer is lifted from the niche a spray of deadly gas fills the room from the mouths, all present in the room must Save vs. Poison or die.
An alternative to death is a save-for-half damage situation. The gas causes 1d4 damage per round and a saving throw reduces the damage by 1/2.
Map key 23
23. Closet. This room has a clothes rack upon which are hanging cow hide shifts. On a shelf above the rack are cow hide gloves and Plague Doctor masks.
Secret Ref Info: These 6 sets of cow-hide garments will protect their wearers from the miasma (gases) on Level 3. They can be worn under armor.
Draco Lizard, Armor Class 5, 4+1 Hit Dice, 18 Hit Points, Move 120/40 fly 210/70, Bite 1d10, Saving Throw F3, M7, Alignment Neutral, description Moldvay page B38.
Map key 24
24. Antechamber. The walls of this chamber are painted with frescoes depicting marching soldiers. The faces have all been defaced. This room smells bad. There are tracks all over the room, floor, walls, and ceiling. There is a door in the northern wall but it has been barricaded shut with spikes and boards. The door is wood bound with copper straps and studs. They are green with oxidization.
Secret Ref Info: The smell is from some monster dung in the Southwest Corner. It’s Ghoul dung which can be identified with an INT attribute check roll.
An INT attribute check roll can be used to follow the tracks, it looks like a large multi-legged creature and they came from the eastern entrance and lead to the northern door of this room, as if it were chasing something. The tracks belong to the Carrion Crawler in Map Key 27 but the players won’t know what they are unless they have seen one before.
Map key 25
25. Sepulchre. This tomb is in disarray, coffins here are in a jumble, smashed and opened. Boxes of grave goods have been opened and overturned. Little clay figures are smashed. The walls are painted with frescoes.
Secret Ref Info: The following is a more detailed description of the room which requires the players to look more closely; in many respects it is very similar to Map Key 20. It appears this tomb has been looted.
There are 6 bound coffins here, most have been pried open or their lids smashed revealing skeletonized corpses inside.
There are boxes of grave goods which have been opened, searched, and overturned. There are small clay figures, servants and farmers, all of which have been smashed. The grave goods are common personal household items without any value because they are spoiled. The little clay statues are damaged and have no value.
There are six 10’ poles with rusty iron collars here stacked at the west corner. These, if secured around the neck of a Zombie (by pushing – the collars close around the neck of a Zombie, there is a spring and a latch, a rope pull releases the collar), allow the Zombie to be held at a distance and its movement controlled. This requires a successful to-hit roll. The Zombie no longer moves silently. These collars are rusty, the poles are rotten and unfit for use, and will break 5-in-6 if this is attempted.
The walls are painted with frescoes that are still intact but all the faces of the figures are defaced. (South Wall) The bound coffins are shown being carried to other lands by soldiers commanded by Patriarch Devious Ingrate. (West Wall) The coffins are opened by the soldiers who then hold the Zombies at the end of long poles. (North Wall) The Zombies are used to attack the populace of other lands and spread pestilence. It shows plague spreading and claiming many victims in these other lands. A tentacled bat-like entity (also defaced) is shown rewarding the Patriarch for these these deeds. Right next to Devious Ingrate is a glyph Ӝ.
There is a secret door concealed behind the North Wall fresco. Remember, most rules allow any character a 1-in-6 chance of finding Secret Doors and that means they roll a d6 and on a roll of 1, 2-in-6 for Elves. That doesn’t mean they can open it! There is a hidden switch concealed by the fresco painting, the glyph of Patriarch Devious Ingrate is over it, Ӝ. If pressed it opens the secret door. Per the description above be sure to mention the glyph, its a clue! Otherwise, there is a 1-in-6 chance of spotting the switch; 2-in-6 if the character is an Elf. There is a peephole in the secret door which allows this room to be spied on from behind the door; refer to map key 10. If the switch is not found the secret door may 2-in-6 be forced open.
When the secret door is opened the skeletons in the coffins rise 1d4 rounds later and attack. They are here to protect the secret vault. 10 Skeletons, Armor Class 7, 1+1 Hit Dice, 7, 2, 4, 3, 5, 3 Hit Points, Move 60/20, 1-6 damage, Save F:1, M12, Alignment Chaotic, not affected by sleep or charm spells, these undead can be turned by a cleric in the normal way, they attack until destroyed, monster description Moldvay page B42.
Map key 26
26. Secret Vault. The walls and ceiling of this vault are painted with a colourful fresco. There are places on each wall for two coffins. Five coffins remain and they are bound with metal straps. There are two coffins on the West and East walls. There were two on the Northern wall but one is missing. The floor is clean where it once lay.
Secret Ref Info: This vault is painted with scenes of woe. All of the faces have been defaced, chipped away. On the West Wall cities are falling to flame, sword and plague. In the stormy sky above, painted from the walls to the ceiling, looms a black hole in the clouds, a fanged mouth of enormous size. The Northern Wall depicts the Patriarch Devious Ingrate raising pox ridden Zombies from the dead. The East wall depicts the Zombies being imprisoned in bound coffins.
Each wooden coffin is bound with metal straps and locked with a padlock. When the player characters enter the room the coffins shiver and shake as the Zombies would attack the player characters were they able to escape their confinement. They cannot, unless someone is so foolish as to open the locks which keep the bound coffins shut. (The key which opens the padlocks is at Map Key 10.)
We’ll propose that only one imprisoned Zombie still carries disease, like a rat, refer to page B41, Anyone attacked by the Zombie has a 1 in 20 chance of being infected (this chance should be checked each time the Zombie successfully hits). The victim may still avoid the disease by making a saving throw vs. Poison. If failed, the victim will either die in 1-6 (1d6) days, otherwise the victim will be sick in bed (unable to adventure) for one month. Roll 1d4: the disease is only deadly on a result of 1.
5 Zombies, Armor Class 8, 2Hit Dice, 6, 9, 11 (diseased), 4, 7Hit Points, Move 120/40, Damage 1-8, Saving Throw F1, M12, Alignment Chaotic, monster description page B44, Undead Human, they are slow fighters, and always strike last (no initiative roll needed), make no noise, not affected by Sleep or Charm spells. May be turned by a Cleric.
Map key 27
27. Sepulchre. The door to this room is shut with spikes. There is an obsidian sarcophagus in the centre of this room. It has the name Captain Dumb Fist engraved on the top. There is something on the ceiling, a huge hideous worm-like creature with many legs and a mouth surrounded by tentacles.
Secret Ref Info: An Acolyte of Pestilence is hiding in the sarcophagus from a Carrion Crawler which hangs from the ceiling waiting for him to come out. There are bones in the sarcophagus as well belonging to Captain Dumb Fist of the Guards. One leg is missing, taken by the Ghouls. The Captain is wearing a belt and scabbard, which is empty. It fits the sword Skullthrasher in Map Key 4. The scabbard appears to be armor + 1, and a character can only test an item by using it, until it is worn in deadly combat. The curse then takes effect lowering AC to 9. Once revealed, the cursed scabbard may only be removed by a Remove Curse or Dispel Evil spell. Refer to Moldvay B48 Swords, Weapons,and Armor, and Cook-Marsh X48, Weapons and Armor.
The moment the door is opened to this room the Carrion Crawler will lose all interest in the Acolyte Pimple and attack the player characters. Pimple isn’t too pleased his Chaotic companions abandoned him and will join in on any attack against the Carrion Crawler. After that he may be persuaded to temporarily join the party of player characters, for mutual safety, until they leave the underworld or run back into Thrax, in which case his loyalty changes. Pimple will know the names of all the other Acolytes, Thrax, and that they are getting a pox ridden Zombie to use to spread pestilence but that’s all he knows. As we don’t have a wilderness yet we don’t have to speculate where the Acolytes of Pestilence come from or if there is a larger plot.
There are boxes of grave goods, common household items, and painted clay figures of farm workers and servants. Some of the little figures are broken. Ten are worth 1 GP each.
Carrion Crawler, Armor Class 7, 3+1*Hit Dice, 13 Hit Points, Move 120/40, Damage Paralysis, Saving Throw F2, M9, Alignment Neutral, monster description Moldvay page B32, This monster is worm-like, 9′ long with lots of legs. Its mouth is surrounded by 8 paralysing tentacles, all 2′ long. The attack of this creature paralyzes for 2-8 turns on a successful hit unless a saving throw vs. Paralysis is made. The Carrion Crawler will stop and eat its defenceless paralysed prey unless it is attacked. The paralysis can be removed with a cure light wounds spell.
The Acolytes of Pestilence wear costumes not unlike those of Plague Doctors underneath their armor, mottled and stained brown cowhide garments and the beaked leather mask of a Plague Doctor. Acolyte, name; Pimple, Armor Class 2, 1 Hit Dice, 6 Hit Points, Move 60/20, Mace 1-6, Saving Throw C1, M7, Alignment Chaotic, refer to Moldvay page B30.
Map key 28
28. Entrance. There is a secret door here; there is no peephole. This room is empty. The eastern door has a lock.
Secret Ref Info: Beside the secret door are is a hidden switch. The switch opens the secret door. The door is locked and only Chillyfist has the key.
Level 2 Special Wandering Monster Table
The following Special Wandering Monster Table is in keeping with the other descriptions of the level but you do not have to use it if you do not want to.
Special Level 2 Wandering Monster List
| D10 Die Roll | Monster |
| 1-4 | Skeleton (1+1 Hit Die) |
| 5-6 | Zombie |
| 7 | Oil Beetles |
| 8 | Ghoul |
| 9 | Special: Magic Lantern, refer to Map Key 9 for an example |
| 10 | Trick: All lights, torches and lanterns, suddenly extinguish and must be re-lit. |
Summary
In our next article we will continue on with Level 3.