The Old School Dungeon – Populating Level 1, Mastering Random Room Fill
To be Empty or Not to be Empty?
Level 1 has some rooms to which we have not assigned any bespoke content. That there is fancy talk for we made it up for the other rooms. When making a dungeon we might find ourselves reaching a dry point in terms of inspiration or just don’t know where to begin. Back in the ol’ days when I first started this sort of thing I heavily relied on random content at first and there isn’t anything really wrong with this if you use it for inspiration. As unlikely as odd couplings are they stretch credulity and one of the things we want to achieve is a suspension of disbelief. That is we want the players to kind of forget they are playing a game, just a little, and become immersed in the adventure experience. Odd juxtapositions aren’t always believable so, no matter what you get as the Ref you have the say whether it goes in or not. I suppose the idea really is consistency.
At this point we have placed the treasure for Level 1 that we wanted the players to have and designed a few rooms. We have some keyed areas of the dungeon we haven’t provided for. Per the first article, we’ll use the dice to first determine whether or not they are empty or contain a Monster, Treasure, Trick, or Trap. “Empty” rooms are not ever really empty. Their description should include something that makes them worth searching, provides atmosphere, etc., even if it is only some tracks on the floor, dung, or graffiti on the wall.
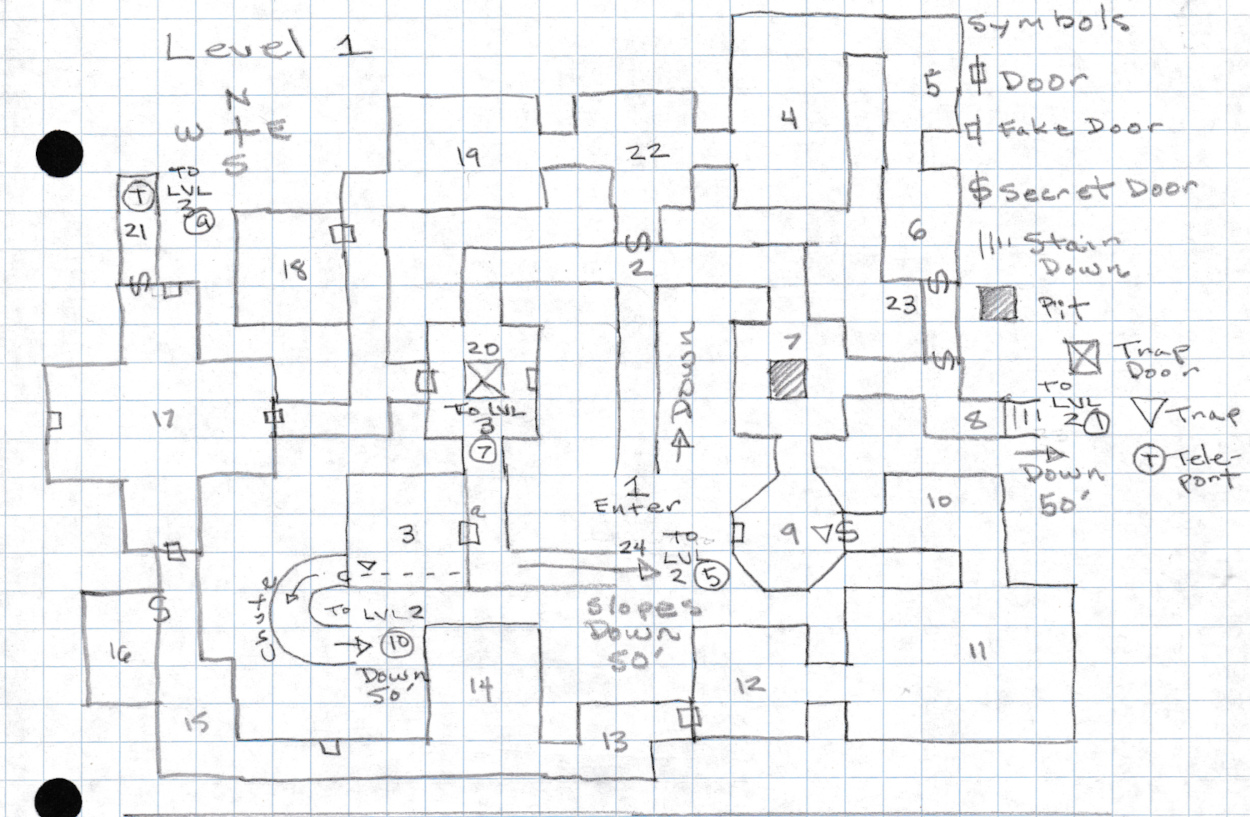
Map Keys 4, 5, 8, 13, 15, 18, 19, 20, and 24 have not been assigned anything.
Let’s recap the rules:
In the BX rules:
- 2-in-6 of all rooms have a monster with a 4-in-6 chance of a Treasure.
- 2-in-6 of all rooms are empty, 33.33% of the underworld; with a 1-in-6 chance of a hidden Treasure therein.
- 1-in-6 rooms have Traps with a 2-in-6 chance that it protects a treasure.
- 1-in-6 rooms have a Special with no chance that it protects a treasure. There is no column for Special in Unguarded Treasure.
I created the following table for reference in this article but you can use whatever tables are appropriate from your rules:
| D6 Die Roll | Result |
| 1-2 | Monster, 4-in-6 chance of treasure (dice result 1-4) |
| 2-3 | Empty, 1-in-6 chance of hidden treasure (dice result 1) |
| 4-5 | Trap, 2-in-6 chance it protects treasure (dice result 1-2) |
| 6 | Special, no treasure |
Map Key 4
We roll 1d6, the result is a 6, which means there is a Special and no treasure. As I stated previously it is nice when you can tie the special in to treasure in some way. In the first article I devised a table of Specials for level 1 so we’ll roll 1d8, and see what we get, the result is 6, we have a magical statue!
| D6 Die Roll | Special |
| 1 | A sliding block which closes off a passage, it does not open for 1d6 Turns unless it is forced open. These blocks often move randomly roll 1d4, 1. North, 2. South, 3. West, 4. East. |
| 2 | A ghostly lantern floats in the air and leads in the direction of a nearby treasure for 1d12 Turns. It moves 60’ per Turn. The lantern will advance ahead of the player characters if they move in the correct direction and stop when the room containing the treasure is reached; it will vanish when the time limit expires. |
| 3 | Ghastly Fog, when a character enters the ghastly fog they hear whispers and moans; it switches the minds of characters for 1d12 Turns, players make saving throws vs. Spells in pairs of characters, when one of the two players fails their character’s saving throw they temporarily switch player characters. Fogs cannot be seen through meaning characters are effectively blind while in fog. |
| 4 | A magic door appears for 1d6 Turns in a nearby wall which 3-in-6 leads to another room one level below or above the current one. |
| 5 | Ghostly Effect, one of the following; a door opens and closes by itself, a moan is heard, chains rattle, a shriek (check for wandering monsters), an item moves by itself, footsteps are heard nearby, a lantern light is seen in the distance for 1d6 rounds before extinguishing, a ball of light enters the room or corridor passing from one wall to the other, a message is drawn in dripping poisonous ichor on the wall, causing death in 1d10 Turns or 1d6 damage. |
| 6 | Statue, one of the following; the statue speaks revealing information which may be true or false, the statue points towards: the nearest monster, treasure, trap, or the nearest exit to the level above or below, the statue casts a magic spell once per day, the statue emits a gas, the statue sprays a liquid, passing the statue sounds a gong which attracts wandering monsters, when a part of the statue is moved it opens a secret or locked door. |
| 7 | Magic Door, the door is Wizard Locked but can be opened when one of the following conditions is met; it will open for a particular character class, it will open for a particular alignment, it will open only for monsters, it can be opened at a certain time of day for 1d6 Turns, it will open when a password is spoken, it will open when a special key is used or an item is presented. |
| 8 | Chute, there is a 3-in-6 chance the chute will open when its cover is stepped on, the character then falls into the chute, they are not harmed, but involuntarily descend to the level below, chutes cannot be climbed. This table result will cause a map redraw. |
Lets say the statue speaks, that’s always a classic! Something True or False, lets refer to the secret door at Map Key 6. We’ll just invent some stuff here, a riddle, describing the secret door without saying there is a secret door.
4. Statue Room. In the northwest corner of this room is a bronze statue of a bear-like creature on a pedestal, only the head is a grinning jack-o-lantern. Its fiery grin flickers illuminating the room with constantly moving light and dark shadows. Whenever the room is entered the head turns to look at you (the players) and growls before saying, “I am half as wide as I am tall, I am not seen yet I am there, where the compass cannot point to me I am to be found, an end is my beginning, where am I?”
Secret Ref Info: A riddle is just a way of describing something without saying what it is, so no obvious “door” words for example. Players tend to be a bit literal and and will likely expect a solution in this room. It may be that the content of this particular Map Key should be moved to Map Key 6. We’ll bear this in mind as we go.
Map Key 5
We roll 1d6, the result is a 3, which means the room is empty, there is a 1-in-6 chance of a hidden treasure, and we roll a 2, nothing!
Empty rooms do not have to be “empty.” We’ll make something up.
5. Stalagmite Room. Water has made ingress here and slowly drips from the ceiling forming stalactites. There is a big odd looking stalagmite partially blocking the southern exit of this room but it is just possible to squeeze past it.
Secret Ref Info: Sometimes a stalagmite is just a stalagmite.
Map Key 6
We roll 1d6, the result is a 2, which means there is a monster, there is a 4-in-6 chance of an “unguarded” treasure, and we roll a 5, nothing. As we have discussed previously this will not be a lair so we would not use lair treasure as a substitute for “unguarded treasure” had their been any. The treasure found would therefore be the sort carried by the monster(s).
We then roll 1d20 on our Wandering Monsters Table, in Moldvay page B53, substitute your rules of choice as appropriate. The result of the dice roll is 13, we look down the Dice Roll column to find 13 and move right in the row to find under the Wandering Monster Column, Giant Shrew! Labyrinth Lord does not put Shrews in the Wandering Monster Table although they are listed as a monster in the descriptions, instead we find Giant Rats. Giant Shrews would therefore never appear as a wandering monster, you would have to pick them. In this example we’ll continue with the “Moldvay Shrews”.
We read the description of the Giant Shrew to see what they are like. When we do so we immediately see that the number appearing in the Wandering Monster table is 1-10, whereas the Monsters Description says 1-4 (1-8). The Wandering Monster table says the Giant Shrews have 2 Hit Dice but the Monster’s Description says 1 Hit Dice. The statistics do not match! Oh no! What are we going to do? We have to make a decision, as part of our mastery of the rules, to give priority to the monster’s description on Page B45, and we make note of this issue for future reference. OSE replicates this discrepancy.
So, we will roll 1d4 to find out how many Giant Shrews there are and the result of the roll is 3. In our description for the room we will need to write down the monster name, number, basic statistical information, the hit points for each, and how they behave. As these monsters have 1 Hit Dice that means you roll 1d6 to find out the number of their hit points. You can also write down the page number where their description is found in your rules!
Bear in mind we can use the previous random results in a suggestive way to modify our entries for 4, 5, and 6 into something somewhat connected. We can shuffle things around a bit, and invent a little more descriptive text, so as a result we have the following entries:
Map Key 4
4. Stalactite Plop. Water has made ingress here and slowly drips from the ceiling forming stalactites and stalagmites, plop, plop, plop. There is a big odd looking stalagmite partially blocking the eastern exit of this room but it is just possible to squeeze past it and into Map Key 5. It looks like some smaller stalactites in the ceiling have dropped to the floor recently.
Secret Ref Info: If players search this room they may 1-in-6 spot that there are large rat-like clawed animal tracks leading eastward and through the eastern exit. Players can mine the 10’ square blocked by the stalagmite with a pickax (in one turn) to enlarge it in order to get by it with normal movement; otherwise it takes characters a full two melee rounds to wiggle through the gap. The sound of mining may 2-in-6 attract wandering monsters each turn. The Giant Shrews at Map Key 5 will attack anyone mining and their movement is not restricted by passing through the hole.
Map Key 5
5. Stalactite Drip. Water drips from the ceiling forming stalactites and stalagmites. Stalagmites partially block the southern exit of this room and one large one in Map Key 4 partially blocks the northern entrance. Hideous mottled three foot creatures crawl here, not rats, but something similar, ugly things with long snouts which are better left undisturbed, Oh my, too late, they squeal and squeak, they wiggle their hungry toothy snouts in your direction, and attack!
Secret Ref Info: Thin stalagmites partially block the southern exit of this room like vertical bars but it is just possible to squeeze through them and into Map Key 6. Players can mine the 10’ square blocked by the stalagmites with a pickax (in one turn) to enlarge it in order to get by it with normal movement; otherwise it takes characters a full two rounds to wiggle through the gap. The sound of mining may 2-in-6 attract wandering monsters each turn.
There are 3 Giant Shrews, Armor Class 4, 1 Hit Dice, 4, 1, 6 Hit Points, Move 180/60, 2 Bites 1-6, Saving Throw F1, M10, Alignment Neutral, Shrews, like bats, use the sound of their squeaks to “see.” Magical silence confuses them, refer to B42. Shrews always have initiative on their first attack; in addition they gain + 1 on their initiative roll for their second attack. As theatre-of-the-mind Giant Shrews attack the head and shoulders. Consequently, when they attack any creature of 3 hit dice or less, the victim must save vs. Death or run away in fear, monster description page B42. As part of our wholistic understanding of the rules we need to understand how they interact to successfully play this creature:
Initiative: The Giant Shrews have initiative by default. Therefore, at step A of the Combat Sequence on page B24 there is no need to roll for initiative, the Shrews proceed to step B.
Saving Throw vs. Death (Fear): The monster doesn’t have to make a successful attack so any attack will do. The attacked character then makes the required saving throw by class, e.g. a Cleric consulting the table on page B26, finds in the Death Ray or Poison column an 11 which means the player must roll 11 or better using 1d20 to completely avoid the effect of fear. Failure means they are forced to run away.
Application of Fear: Fear typically means that a character or monster runs away. In the case of the Cleric spell Remove Fear, in Moldvay page B16, we find out later in the Expert Rules, page 5, that the spell is reversible and Cause Fear can make a character/monster flee for two turns. There are not many examples in Moldvay in which the number of turns of running away is specified. For the Giant Shrew, the number of turns is not cited in the Monster’s description so we can leave it open ended or make a ruling to follow in future as part of our mastery of the game. We can decide, in principle, that at least two turns of running away due to fear is appropriate in this context. I also wouldn’t conflate a Cleric’s turning of undead with fear as it is not fear of the Cleric but the exercise of divine power which really causes them to retreat.
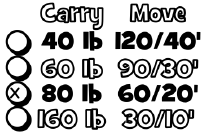
In practice, when a character flees in fear, they turn their back and run at their full movement towards “safety” which is a path we might speculate should be known to the character, and monster free, proceeding towards Map Key 1. We can speculate that an encumbered character carrying up to 80lbs will move 60’ per turn (20’ per round of melee) which means the Giant Shrews are faster than players moving 180’ per turn, (60’ per round of melee). They can easily pursue and attack fleeing characters. Attacks from behind, or against retreating characters gain +2 to the attack roll and the defensive benefit granted by a Shield to AC is lost, refer to the topic RETREAT on page B24. Example a fleeing character with an AC of 4 adjusted to AC 3 by a shield loses the benefit and the attacker gains +2 vs AC 4 when they make their d20 attack dice roll vs. the character’s back. Monsters of up to 1 Hit Dice must roll equal to or greater than 15 vs. AC 4, should the Dungeon Master roll 13 that is still a successful hit because they add +2 to their roll, 13 + 2 = 15.
When we examine encumbrance we can see that there is no outcome in which a player character is actually able to outrun the Giant Shrews.
Map Key 6
6. Statue Room. The ceiling of this room drips forming stalactites and ribbons of calcium line the walls. In the northeast corner of this room is a bronze statue of a bear-like creature on a pedestal, only the head is a grinning jack-o-lantern. The damp has caused the statue to oxidize green. It too is partially covered in calcified drippings from the ceiling. The jack-o-lantern bursts into flame within, its fiery grin and eyes flicker illuminating the room with constantly moving light and dark shadows. The the head turns to look at you (the players) and growls before saying, “I am half as wide as I am tall, I am not seen yet I am there, where the compass cannot point to me I am to be found, an end is my beginning, where am I?”
Secret Ref Info: If players search this room they may 1-in-6 spot that there are large rat-like clawed animal tracks leading north and through the northern exit.
A riddle is just a way of describing something without saying what it is, so no obvious “door” words for example. The statues words refer to the nearby secret door to the south. The clues work out as follows: a door is half as wide as it is tall, secret doors are hidden until found, a compass needle always points north so the door is not north, in the southern end wall where it seems one can go no further.
The walls of this room, including the secret door, are covered in ribbons of calcified drippings from the ceiling. Beside the secret door is a hidden switch, a stone in the wall also covered by drippings. When pushed, the switch opens the secret door. There is a 1-in-6 chance of spotting the secret door; 2-in-6 if the character is an Elf. If the switch is not found the door may 2-in-6 be forced open.
Moving The Random Content
Had we left things as they were initially the result would have been far less interesting. Making an underworld is often an additive process where some editing and shuffling of content provides a better result particularly if there is a bit of interaction between Map Keys. I suppose it is like improv comedy, yes, and… You do not have to come up with everything all at once. I didn’t think about lighting the jack-o-lantern head of the statue until a day later. Let’s move on to the next entry, Map Key 8.
Map Key 8
Map Key 8 is the corner with the secret door and stairs down to level 2. We roll 1d6, the result is a 1, which means there is a monster, there is a 4-in-6 chance of an “unguarded” treasure, and we roll a 5, nothing. As we have discussed previously this will not be a lair so we would not use lair treasure as a substitute for “unguarded treasure” had their been any. The treasure found would therefore be the sort carried by the monster(s).
We then roll 1d20 on our Wandering Monsters Table, in Moldvay page B53, substitute your rules of choice as appropriate. The result of the dice roll is 1, we look down the Dice Roll column to find 1 and move right in the row to find under the Wandering Monster Column, Acolyte. Okey dokey, characters are my least favourite result but lets see what we can make of this.
Referring to page B30, there are 1-8 Acolytes, we roll a 6, this means the six Acolytes will be led by a, rolling 1d10, the result is 3, the description indicates they are led by a 2nd Level Cleric. Inspiration strikes, the Cleric is carrying a torch, leading this procession, and the acolytes a coffin which they have retrieved from a dungeon level below, what’s in the coffin? We’ll put a monster in there suitable from Level 2, a Zombie. In general, the principle is that only one of a higher level monster should be encountered on Level 1. I’ll name the Acolytes just for fun.
8. Stair of Pestilence. The Acolytes of Pestilence wear costumes not unlike those of plague doctors underneath their armor, mottled and stained brown cowhide garments and the beaked leather mask of a plague doctor. A Cleric, carrying a lantern, leads this strange procession up the stair. The glow of this lantern is visible for some distance in the pitch dark. The Acolytes carry a wooden coffin which is bound with metal straps and locked with a padlock. It is common knowledge that the Acolytes of Pestilence are said to appear whenever there is a plague but some say this sect brings the plague with it wherever it travels. (True)
Secret Ref Info: Note – if the Special Wandering Monster table at Map Key 9 indicates Chillyfist the Ghoul then the Acolytes cannot appear on the stair until after the encounter with the Ghoul. When Chillyfist is indicated by the special encounter table the Ghoul will enter Level 1 from the stair Map Key 8 and pass through 7, and 9 in pursuit of otherwise distracted player characters. If Chillyfist doesn’t appear proceed as follows:
The Acolytes have retrieved what they believe is the coffin of an ancient plague victim from Level 2. They intend to use it to spread plague in what they see as fomenting a dominant state of Chaos. The coffin contains a Zombie which will of course attack all present on being released as the 2nd Level Cleric cannot control it. The route they will travel is through 8, 7, 2, and 1 and exit the dungeon carrying their burden.
Thrax, 2nd Level Adept Cleric, Armor Class 2, 2 Hit Dice, 5 Hit Points, Move 60/20, Mace 1-6, Saving Throw C2, M7, Alignment Chaotic, spell Cure Light Wounds – B15, class B9.
Acolytes, names; Pox, Buboe, Pus, Boil, Fester, Putrid, Armor Class 2, 1 Hit Dice, 2, 4, 5, 6, 3, 1 Hit Points, Move 60/20, Mace 1-6, Saving Throw C1, M7, Alignment Chaotic, B30.
Zombie, Armor Class 8, 2 Hit Dice, 6 Hit Points, Move 120/40, Sword 1-8, Saving Throw F1, M12, Alignment Chaotic, monster description page B44, Undead Human, they are slow fighters, and always strike last (no initiative roll needed), make no noise, not affected by Sleep or Charm spells. May be turned by a Cleric.
We’ll propose that this particular Zombie carries disease, like a rat, refer to page B41, Anyone attacked by the Zombie has a 1 in 20 chance of being infected (this chance should be checked each time the Zombie successfully hits). The victim may still avoid the disease by making a saving throw vs. Poison. If failed, the victim will either die in 1-6 (1d6) days, otherwise the victim will be sick in bed (unable to adventure) for one month. Roll 1d4: the disease is only deadly on a result of 1.
Thrax objective is to follow the instructions of a superior and leave this dungeon with the coffin and its contents. The Zombie will be used to spread pestilence. The Adept isn’t particularly looking for a fight but will readily accept one as part of the Divine Universe of Chaos this sect believes in. Thrax carries a key to the lock of the coffin.
Map Key 13
We roll 1d6, the result is a 5, which means the room contains a trap, there is a 2-in-6 chance of a hidden treasure, and we roll a 5, nothing!
13. Soot. There is soot on the floor here from the burned door in Map Key 12.
Secret Ref Info: Stepping into this room launches spring-fired darts: 1-6 darts hit for 1-4 points of damage each. Opening the door resets this trap.
Map Key 15
We roll 1d6, the result is a 3, which means the room contains a trap, there is a 1-in-6 chance of a hidden treasure, and we roll a 1, Unguarded Treasure! We roll on the Unguarded Treasure table on page B52. Silver Pieces – we roll a 1, so there are 1 x 100sp; there is a 50% chance of Gold, we roll two ten sided dice 92, nothing; there is a 5% chance of Gems, we roll two ten sided dice 67, nothing; there is a 2% chance of Jewelry, we roll two ten sided dice 32, nothing; there is a 2% chance of Magic Items, we roll two ten sided dice 17, nothing.
15. Chamber. This room is empty except for some graffiti on the wall which says, “Nothing here”.
Secret Ref Info: Searching this room will reveal a loose flagstone in the Northeast corner of the room. The flagstone will sound hollow if tapped. Under it is a small sack containing 100 silver pieces.
The secret door which permits entry to Map Key 16 can only be opened by a Cleric, it is otherwise Wizard Locked. The switch will only respond to the touch of a Cleric. There is a 1-in-6 chance of spotting the switch that opens this secret door; 2-in-6 if the character is an Elf. There is a peephole in the secret door which allows the corridor, Map Key 15, to be spied on from behind the door. We’ll assign a 1-in-6 chance of spotting the peephole; 2-in-6 if the character is an Elf.
Map Key 18
We roll 1d6, the result is a 3, which means the room is empty, there is a 1-in-6 chance of a hidden treasure, and we roll a 4, nothing!
18. Storage. This room is empty.
Secret Ref Info: Nothing to see here.
Map Key 19
We roll 1d6, the result is a 6, Special, there is no treasure. We roll 1d8 on our Specials table and the result is 8, Ghostly Effect.
19. Storage. This room is empty.
Secret Ref Info: Nothing to see here except that after a Cleric enters the room the message “GET OUT” is drawn in dripping poisonous ichor on the west wall. If touched the ichor causes death in 1d10 Turns or 1d6 damage if a saving throw vs. poison is successful.
Map Key 20
We roll 1d6, the result is a 2, Monster, there is a 4-in-6 chance of an unguarded treasure, and we roll 3, Unguarded Treasure! We are not substituting this with lair treasure.
We then roll 1d20 on our Wandering Monsters Table, in Moldvay page B53, substitute your rules of choice as appropriate. The result of the dice roll is 16, we look down the Dice Roll column to find 16 and move right in the row to find under the Wandering Monster Column, Crab Spider!
Unguarded Treasure! We roll on the Unguarded Treasure table on page B52. Silver Pieces – we roll a 1, so there are 1 x 100sp; there is a 50% chance of Gold, we roll two ten sided dice 71, nothing; there is a 5% chance of Gems, we roll two ten sided dice 80, nothing; there is a 2% chance of Jewelry, we roll two ten sided dice 85, nothing; there is a 2% chance of Magic Items, we roll two ten sided dice 60, nothing.
20. Covered Pit. There is a trap door here with a chain and padlock. There are wood doors west and east. The entrance to the passage south is blocked by spider webs, they are dusty and no longer sticky.
Secret Ref Info: Under the locked trap door is a shaft descending to Level 3. Its walls are damp. Once the shaft is opened a pungent odour of fungi and damp rises from below. There are iron rungs in the east shaft wall which descend into the darkness. 10’ below a leather sack is tied to the rungs and it contains 100 silver pieces.
On the walls of the shaft 4 Crab Spiders cling, concealed by their chameleon like camouflage, they have changed their colour to match the shaft wall. 4 Crab Spiders, Armor Class 7, 2 Hit Dice, 3, 10, 5, 11, Hit Points, Move 120/40, Bite 1-8 damage +poison (+2 Saving Throw, fail and character dies in 1d4 turns), Save F:1, M7, Alignment Neutral, monster description page B43.
Note – Save or Die results from poison are very harsh and can end the game pretty quickly for a player. You can customize the rules! You can house rule to avoid a game-ending-death:
- The poison of the Crab Spider is causes additional damage, Save vs. Poison, 1d8, a successful save causes only 1/2 damage, or nothing.
- The bite of the Crab Spider causes 1-4 turns of paralysation, Save vs. Paralysation;
- The bite of the Crab Spider causes Sleep, like the spell of the same name.
Map Key 24
We roll 1d6, the result is a 2, Monster, there is a 4-in-6 chance of an unguarded treasure, and we roll 5, nothing.
We then roll 1d20 on our Wandering Monsters Table, in Moldvay page B53, substitute your rules of choice as appropriate. The result of the dice roll is 1, we look down the Dice Roll column to find 1 and move right in the row to find under the Wandering Monster Column, Acolyte!
As we already have Acolytes at Map Key 8 we do not like this answer, let’s re-roll, we get a 14, Skeleton, classic!
24. Slope. There is a sloping passage here. A column of ancient soldiers two abreast stand here, skeletons in rags and rusted armor, they point spears in your direction and attack!
Secret Ref Info: 8 Skeletons, Armor Class 7, 1 Hit Dice, 6, 5, 5, 1, 2, 5, 6, 4 Hit Points, Move 60/20, Spear 1-6 damage, Save F:1, M12, Alignment Chaotic, not affected by sleep or charm spells, these undead can be turned by a cleric, they attack until destroyed, monster description page B42.
How Many Skeletons Can Occupy a 10’ Underworld Square?
The answer to this question lies in the origins of the game in miniature battles. We can refer to the progress of the text in the various rules:
In UNDERWORLD & WILDERNESS ADVENTURES it states on page 8 “In the underworld all distances are in feet, so wherever distances are given in inches convert them to tens of feet.” then on page 11 “There can be places where 300 Hobgoblins dwell, but how many can come abreast down a typical passage in the dungeons? Allow perhaps 3 in a ten foot wide passage…”
For reference Hobgoblins are bigger nastier versions of Goblins, which are described in Moldvay on page B36, as “small”. Halflings are also described as “small”, B10, and are 3’ in height, whereas Dwarves are described as 4’ in height. One might therefore choose to interpret Hobgoblins to be similar in stature to Dwarves.
In Holmes Basic Dungeon’s and Dragons on page 20 “Characters can be attacked by more than one opponent at a time; the Dungeon Master should be guided by the actual placement of the figures on a paper sketch or on the table in deciding how many opponents can engage as melee starts, always keeping in mind the dimensions of the dungeon itself. One would not expect to get more than two or three figures fighting side by side in a ten foot corridor, for example.”
In Moldvay on page B19 the number of characters which may occupy a 10’ square is described as two, “Before entering a dungeon, the players should arrange their characters in a ‘marching order’. A ‘marching order’ is the order of position in which the characters in a party explore a dungeon; who’s scouting in front, searching in the middle, and guarding the rear. Different marching orders may be used when opening doors, searching rooms, fighting combat, and so forth. The most common marching order is to explore in a column of two-by-two though this may vary in corridors of different widths.”
So in a single 10’ square both player characters and monsters may move and fight. In Map Key 24 therefore we have arranged our Skeletons in a column of two “figures” per square down the slope. This rule should be applied for most monsters unless they are smaller than human (I would allow three per square) or larger than human (I would allow one per square).
This marching order can also apply to the Kobolds and the Acolytes carrying the coffin.
Summarizing Level 1
At this juncture we can aggregate all of our text for level 1 together into one document. The next step is to review the text for the level, looking for inconsistencies and other problems, before proceeding to Level 2, which we will do.
In the very first days adventures would have been hand or typewritten, which naturally encouraged brevity, often limited to a sentence or two and statistics lest this task become onerous, but times have moved on. The ease of text entry facilitates more content than seen in the earliest years of the game. For those of you new to the game we now understand how to make a dungeon, and the same process is used for subsequent levels. We can see that with a little applied imagination the entries themselves build potential themes between each other.
How much text you write is up to you. In the creation of the Map Keys if I have erred on the side of verbosity it is to show the workings of imagination and to provide a foundation for the adventure to come. The purpose of the Map Keys is to give you, the Ref, something upon which the players will build the story of their adventure.
Remember, nothing is written in stone, we may as we continue to build the dungeon modify what we have written below. To maintain freshness between subsequent adventure sessions if the players revisit the underworld we may alter the map and/or replace Map Key text.
Again, we do not need an overarching theme or a wilderness/world setting. The underworld can be located anywhere.
I have made a few alterations to the summary of the Map Keys.
Level 1 Underworld – Summary of Map Keys
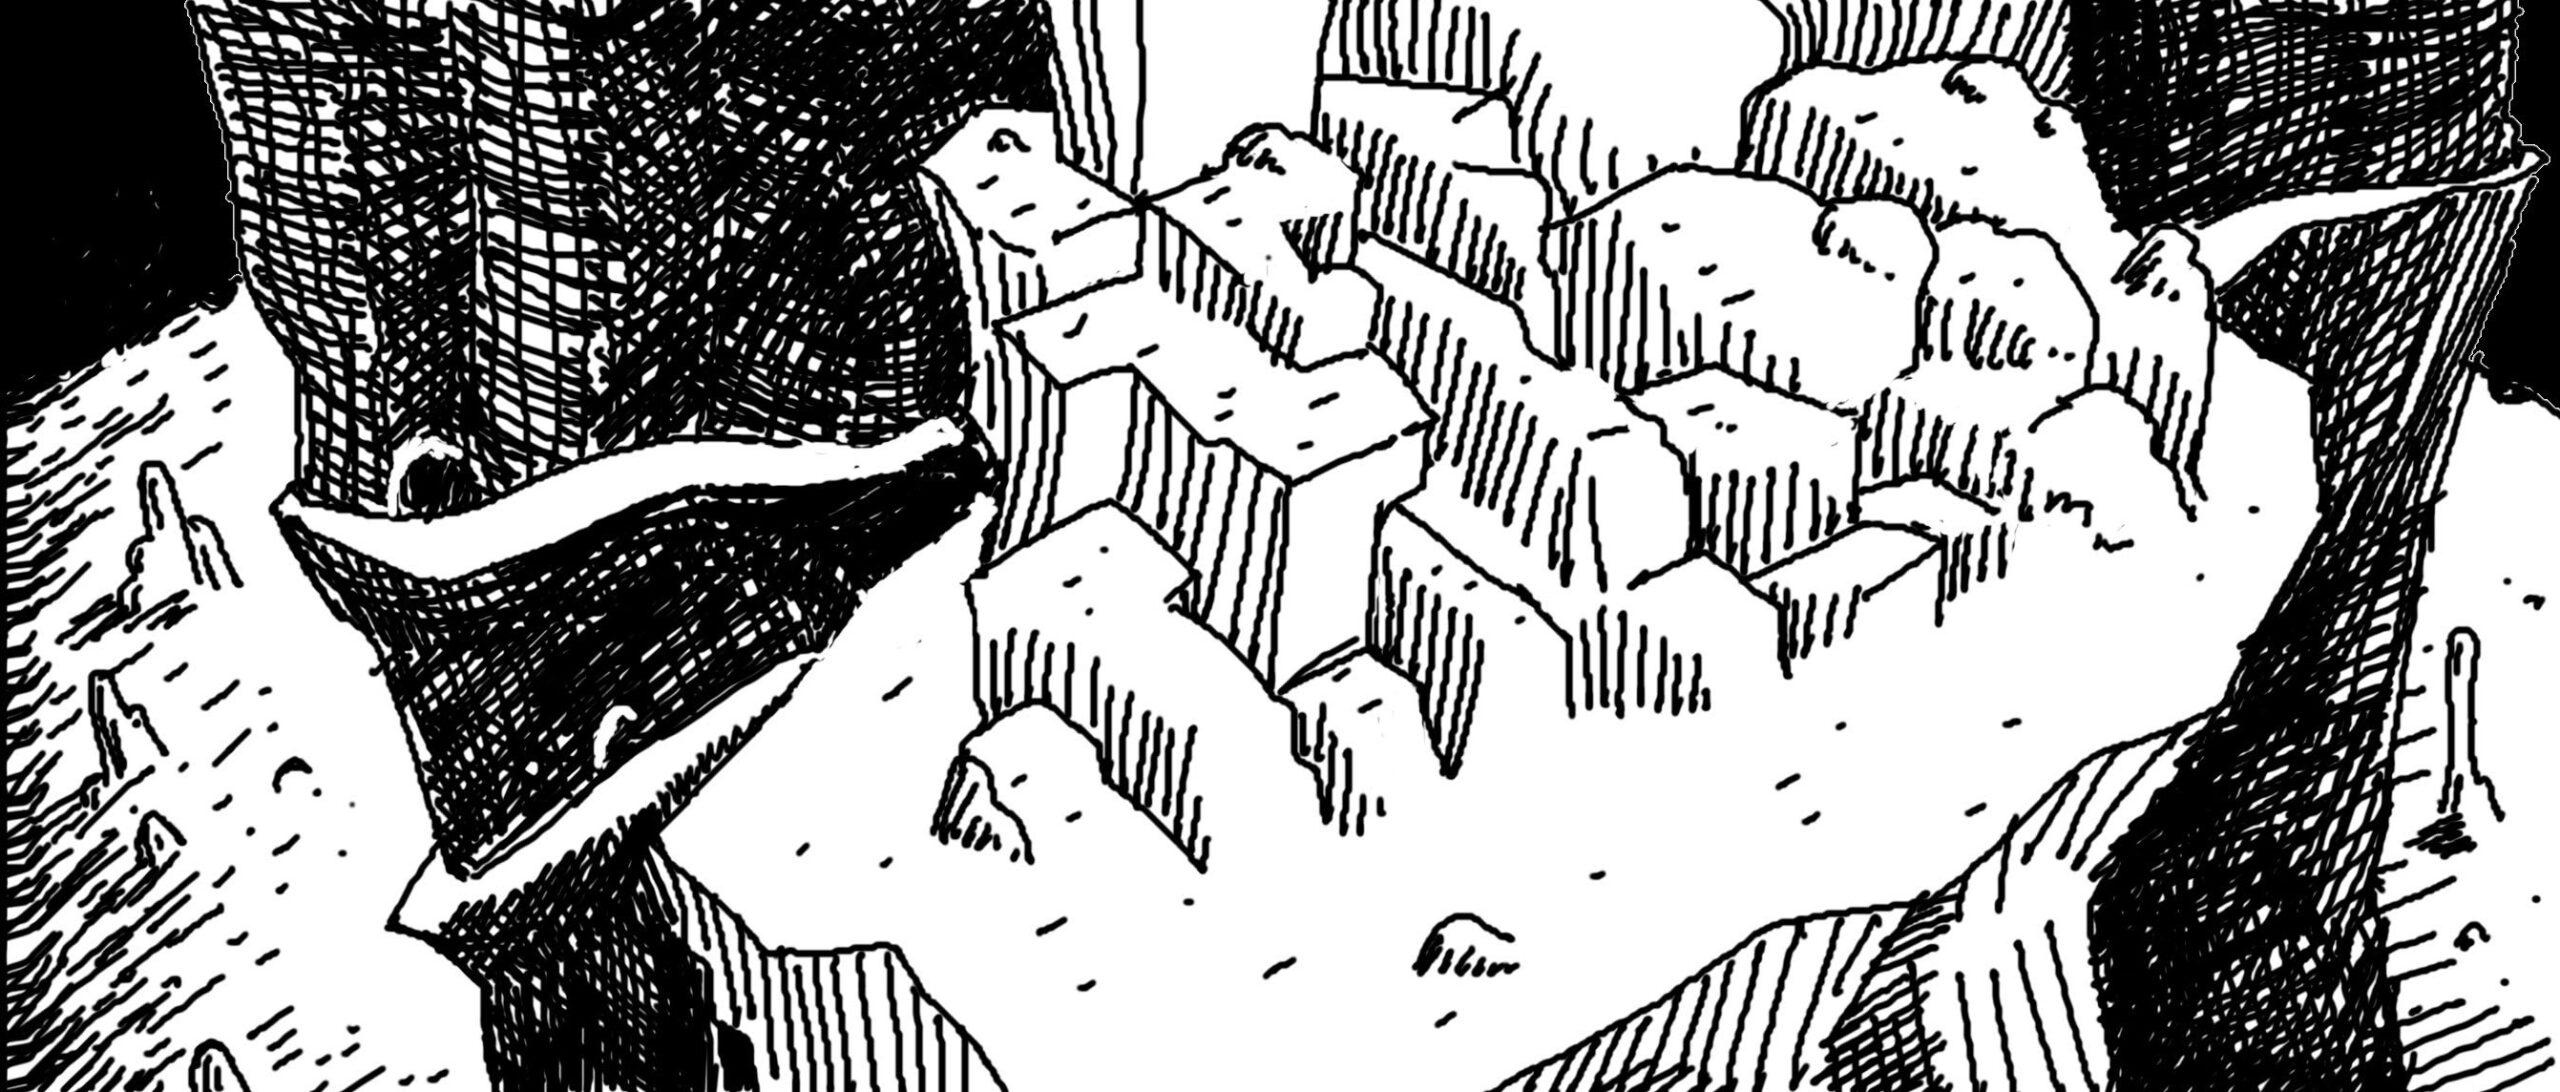
1. Enter. Dawn finds you at the site of an ancient ruin on a high barren hilltop. Large moss covered fallen stones reveal that there once was a building here. All that remains now is an outline where its proud walls once stood. Within the jumbled stones a weather-worn wood trap door, perhaps once an entrance to a cellar, lies broken and open revealing an entry into the ground. When you look closer you can see that a tunnel slopes downward; daylight shines into the first 30’ of the tunnel before shadows and the dark conceal whatever it is that lies beyond. It doesn’t smell very nice, dank, and something else you do not recognise.
A mere few steps from the entrance there is a cairn of stones. Cairns as you know are stones piled over items to protect them from animals.
Secret Ref Info: Inside the cairn is a backpack with 100’ of Elvish rope (thin but strong) tied to it containing:
- A Dwarf made lantern, one flask of oil, a pair of socks (one size fits all), a mirror, a fish-fur hat, a flask of water, 1 weeks Dwarf made iron ration rations (hard biscuits which can be eaten by anyone), a compass, and we’ll see what else comes up. A slice of Shrieker Mushroom wrapped in a bit of linen cloth.
- An initial map, incomplete. This will show the entrance and a hallway or two, and the secret door refer to Map Key (2) just for fun.
- An apothecary prescription on parchment:
Apothecary Glumluck’s Blindness Cure – Ingredients: 1 portion of Shrieker Mushroom approximately the size of a slice of pie. Instructions: When blinded by snakes or other venomous creatures consume 1 portion of the mushroom raw. This mushroom has a somewhat unpleasant taste. Therefore, the Shrieker Mushroom may be lightly toasted, salted, and peppered to taste without affecting the cure. The restorative effect is immediate. The player must make a saving throw vs. Poison to avoid the side effects of eating the mushroom. Side effects lasting one hour may be a deep sleep in some patients.
2. Corridor. A bit of tattered cobweb hangs from the ceiling at the end of the sloping tunnel. The sloping tunnel ends in an east-west intersection.
Secret Ref Info: Beside the door is a hidden switch, a stone which is slightly more worn than the others. There is a 3-in-6 chance of spotting it; 4-in-6 if the character is an Elf. There is a peephole in the door which allows Map Key 2 to be spied on from behind the door; refer to Map Key 22. If the switch is not found the door may 2-in-6 be forced open.
3. Dusty Room. This room appears to be mostly empty, dusty cobwebs hang in the entrance. What purpose it might have served is no longer obvious. It doesn’t look like anyone has entered in a long time. From the vantage point of the door, in one corner a cavity in the wall can be seen that contains a dusty bottle containing a mysterious liquid. There is something else there as well, two leather pouches.
Secret Ref Info: The bottle contains a potion of healing, it is still sealed. The two small leather pouches, tied shut, respectively contain 43 Silver and 50 Gold coins.
There is a concealed switch on the left outside the entrance to this room, a stone, which when pushed in and released, temporarily disables the Special (see below) for 1 Turn. If the stone is held in the Special is disabled as long as it is held. There is a 1-in-6 chance of spotting the switch; 2-in-6 if the character is an Elf.
Description of the Special. A character stepping on the northwest corner of the room, marked with an inverted triangle, triggers the floor Special. The floor splits open along the dashed line dropping all characters within the room into a chute that takes them to Level 2 Map Key 6. While the chute does not injure the characters the danger is that they are now on Level 2. Once triggered the floor closes 1 Turn later and is reset. The chute is too slippery to be climbed back up to Level 1 and even were this possible the floor cannot be opened from below.
4. Stalactite Plop. Water has made ingress here and slowly drips from the ceiling forming stalactites and stalagmites, plop, plop, plop. There is a big odd looking stalagmite partially blocking the eastern exit of this room but it is just possible to squeeze past it and into Map Key 5. It looks like some smaller stalactites in the ceiling have dropped to the floor recently.
Secret Ref Info: If players search this room they may 1-in-6 spot that there are large rat-like clawed animal tracks leading eastward and through the eastern exit. Players can mine the 10’ square blocked by the stalagmite with a pickax (in one turn) to enlarge it in order to get by it with normal movement; otherwise it takes characters a full two melee rounds to wiggle through the gap. The sound of mining may 2-in-6 attract wandering monsters each turn. The Giant Shrews at map Key 5 will attack anyone mining and their movement is not restricted by passing through the hole.
5. Stalactite Drip. Water drips from the ceiling forming stalactites and stalagmites. Stalagmites partially block the southern exit of this room and one large one in Map Key 4 partially blocks the northern entrance. Hideous mottled three foot creatures crawl here, not rats, but something similar, ugly things with long snouts which are better left undisturbed, Oh my, too late, they squeal and squeak, they wiggle their hungry toothy snouts in your direction, and attack!
Secret Ref Info: Thin stalagmites partially block the southern exit of this room like vertical bars but it is just possible to squeeze through them and into Map Key 6. Players can mine the 10’ square blocked by the stalagmites with a pickax (in one turn) to enlarge it in order to get by it with normal movement; otherwise it takes characters a full two rounds to wiggle through the gap. The sound of mining may 2-in-6 attract wandering monsters each turn.
There are 3 Giant Shrews, Armor Class 4, 1 Hit Dice, 4, 1, 6 Hit Points, Move 180/60, 2 Bites 1-6, Saving Throw F1, M10, Alignment Neutral, Shrews, like bats, use the sound of their squeaks to “see.” Magical silence confuses them, refer to B42. Shrews always have initiative on their first attack; in addition they gain + 1 on their initiative roll for their second attack. As theatre-of-the-mind Giant Shrews attack the head and shoulders. Consequently, when they attack any creature of 3 hit dice or less, the victim must save vs. Death or run away in fear, monster description page B42. As part of our wholistic understanding of the rules we need to understand how they interact to successfully play this creature:
Initiative: The Giant Shrews have initiative by default. Therefore, at step A of the Combat Sequence on page B24 there is no need to roll for initiative, the Shrews proceed to step B.
Saving Throw vs. Death (Fear): The monster doesn’t have to make a successful attack so any attack will do. The attacked character then makes the required saving throw by class, e.g. a Cleric consulting the table on page B26, finds in the Death Ray or Poison column an 11 which means the player must roll 11 or better using 1d20 to completely avoid the effect of fear. Failure means they are forced to run away.
Application of Fear: Fear typically means that a character or monster runs away. In the case of the Cleric spell Remove Fear, in Moldvay page B16, we find out later in the Expert Rules, page 5, that the spell is reversible and Cause Fear can make a character/monster flee for two turns. There are not many examples in Moldvay in which the number of turns of running away is specified. For the Giant Shrew, the number of turns is not cited in the Monster’s description so we can leave it open ended or make a ruling to follow in future as part of our mastery of the game. We can decide, in principle, that at least two turns of running away due to fear is appropriate in this context. I also wouldn’t conflate a Cleric’s turning of undead with fear as it is not fear of the Cleric but the exercise of divine power which really causes them to retreat.
In practice, when a character flees in fear, they turn their back and run at their full movement towards “safety” which is a path we might speculate should be known to the character, and monster free, proceeding towards Map Key 1. We can speculate that an encumbered character carrying up to 80lbs will move 60’ per turn (20’ per round of melee) which means the Giant Shrews are faster than players moving 180’ per turn, (60’ per round of melee). They can easily pursue and attack fleeing characters. Attacks from behind, or against retreating characters gain +2 to the attack roll and the defensive benefit granted by a Shield to AC is lost, refer to the topic RETREAT on page B24. Example a fleeing character with an AC of 4 adjusted to AC 3 by a shield loses the benefit and the attacker gains +2 vs AC 4 when they make their d20 attack dice roll vs. the character’s back. Monsters of up to 1 Hit Dice must roll equal to or greater than 15 vs. AC 4, should the Dungeon Master roll 13 that is still a successful hit because they add +2 to their roll, 13 + 2 = 15.
6. Statue Room. The ceiling of this room drips forming stalactites and ribbons of calcium line the walls. In the northeast corner of this room is a bronze statue of a bear-like creature on a pedestal, only the head is a grinning jack-o-lantern. The damp has caused the statue to oxidize green. It too is partially covered in calcified drippings from the ceiling. The jack-o-lantern bursts into flame within, its fiery grin and eyes flicker illuminating the room with constantly moving light and dark shadows. The the head turns to look at you (the players) and growls before saying, “I am half as wide as I am tall, I am not seen yet I am there, where the compass cannot point to me I am to be found, an end is my beginning, where am I?”
Secret Ref Info: If players search this room they may 1-in-6 spot that there are large rat-like clawed animal tracks leading north and through the northern exit.
A riddle is just a way of describing something without saying what it is, so no obvious “door” words for example. The statues words refer to the nearby secret door to the south. The clues work out as follows: a door is half as wide as it is tall, secret doors are hidden until found, a compass needle always points north so the door is not north, in the southern end wall where it seems one can go no further.
The walls of this room, including the secret door, are covered in ribbons of calcified drippings from the ceiling. Beside the secret door is a hidden switch, a stone in the wall also covered by drippings. When pushed, the switch opens the secret door. There is a 1-in-6 chance of spotting the secret door; 2-in-6 if the character is an Elf. If the switch is not found the door may 2-in-6 be forced open.
7. The Chamber. Damp cobwebs hang in the doors of this chamber. Water drips from the ceiling and pools on the floor before trickling into cracks in the centre of the room.
Secret Ref Info: The centre of the chamber contains a hidden pit. There is a 3-in-6 chance the pit will open when its cover is stepped on, there is a 1-in-2 (3-in-6) chance that falling causes 1d6 points of damage. 5 Snakes, Cobras, Armor Class 7, 1 Hit Dice, 1, 3, 6, 2, 5 Hit Points, Move 90/30, Bite or spit 1-3 +poison (spit blinds, poison causes death 1d10 turns), Snake Saving Throw F1, M7, Alignment Neutral, description page B42. These snakes will strike anyone who falls into the pit. They cannot climb out. Any torches thrown down into the pit quickly go out in the following round due to the wet conditions.
At the bottom of the waterlogged pit is a rotting skeleton in rusted chain mail. It lies draped over a wet and rotting wooden chest, coins are spilling out of it into a puddle of wet water. The chest contains a Bag of Holding, a Healing Potion, 250 silver coins, and 150 gold coins. Any attempt to bring up the chest, say by using a hook and rope, will cause the chest to 3-in-6 fall apart spilling out its contents.
The “corpse” has a rusty dagger and sword in rotting leather sheathes. It has rusting chain armor and a helmet which are still good. There are 10 gold coins in a decaying leather bag attached to a rotting leather belt; its buckle a coiled silver dragon is worth 5 silver pieces. The belt, clothes, and boots are unusable.
There is a Shrieker in Map Key 9 which means it will shriek the moment light is brought near; which means as soon as it is within 60’ of illumination. Therefore as soon as light is brought into Map Key 7, (we see from looking at the map, Map Key 7 and 9 are within 60’) it will shriek, refer to Map Key 9 for more information.
8. Stair of Pestilence. The Acolytes of Pestilence wear costumes not unlike those of plague doctors underneath their armor, mottled and stained brown cowhide garments and the beaked leather mask of a plague doctor. A Cleric, carrying a lantern, leads this strange procession up the stair. The glow of this lantern is visible for some distance in the pitch dark. The Acolytes carry a wooden coffin which is bound with metal straps and locked with a padlock. It is common knowledge that the Acolytes of Pestilence are said to appear whenever there is a plague but some say this sect brings the plague with it wherever it travels. (True)
Secret Ref Info: There is a peephole in the northern secret door which allows the corridor, Map Key 8, to be spied on from behind the secret door, refer to Map Key 23. We’ll assign a 1-in-6 chance of spotting the peephole; 2-in-6 if the character is an Elf.
Note – if the Special Wandering Monster table at Map Key 9 indicates Chillyfist the Ghoul then the Acolytes cannot appear on the stair until after the encounter with the Ghoul. When Chillyfist is indicated by the special encounter table the Ghoul will enter Level 1 from the stair Map Key 8 and pass through 7, and 9 in pursuit of otherwise distracted player characters. If Chillyfist doesn’t appear proceed as follows:
The Acolytes have retrieved what they believe is the coffin of an ancient plague victim from Level 2. They intend to use it to spread plague in what they see as fomenting a dominant state of Chaos. The coffin contains a Zombie which will of course attack all present on being released as the 2nd Level Cleric cannot control it. The route they will travel is through 8, 7, 2, and 1 and exit the dungeon carrying their burden.
Thrax, 2nd Level Adept Cleric, Armor Class 2, 2 Hit Dice, 5 Hit Points, Move 60/20, Mace 1-6, Saving Throw C2, M7, Alignment Chaotic, spell Cure Light Wounds – B15, class B9.
Acolytes, names; Pox, Buboe, Pus, Boil, Fester, Putrid, Armor Class 2, 1 Hit Dice, 2, 4, 5, 6, 3, 1 Hit Points, Move 60/20, Mace 1-6, Saving Throw C1, M7, Alignment Chaotic, B30.
Zombie, Armor Class 8, 2 Hit Dice, 6 Hit Points, Move 120/40, Sword 1-8, Saving Throw F1, M12, Alignment Chaotic, monster description page B44, Undead Human, they are slow fighters, and always strike last (no initiative roll needed), make no noise, not affected by Sleep or Charm spells. May be turned by a Cleric.
We’ll propose that this particular Zombie carries disease, like a rat, refer to page B41, Anyone attacked by the Zombie has a 1 in 20 chance of being infected (this chance should be checked each time the Zombie successfully hits). The victim may still avoid the disease by making a saving throw vs. Poison. If failed, the victim will either die in 1-6 (1d6) days, otherwise the victim will be sick in bed (unable to adventure) for one month. Roll 1d4: the disease is only deadly on a result of 1.
Thrax objective is to follow the instructions of a superior and leave this dungeon with the coffin and its contents. The Zombie will be used to spread pestilence. The Adept isn’t particularly looking for a fight but will readily accept one as part of the Divine Universe of Chaos this sect believes in. Thrax carries a key to the lock of the coffin.
9. The Mushrooms. This dark damp room is choked with sickly chartreuse mushrooms with yellow spots. They are nauseating to look at and they don’t smell nice either. In fact this room smells of rot. They range in size from less than a foot in height to nearly eight feet and the largest have a trunk of one foot in diameter. They look to be as hard as wood. To pass under them human and elf characters will have to duck. Underfoot are bones, humanoid and animal bones.
Secret Ref Info: There is a Shrieker here which will shriek the moment light is brought near; which means as soon as it is within 60’ of illumination. Therefore as soon as light is brought into Map Key 7, (we see from looking at the map, Map Key 7 and 9 are within 60’) it will shriek, refer to Map Key 9 for information.
The shriek lasts 3 rounds and there is a 3-in-6 chance of attracting Wandering Monsters each round of the shriek. The Shrieker will then move at normal speed through the mushrooms and out the secret door. However, for player characters movement through this room is halved.
Shrieker: Armor Class 7, 3 Hit Dice, 10 Hit Points, Move 90/30, Saving Throw F1, M12, Alignment Neutral, there is a 50% chance (3-in-6) each round of the shriek that wandering monsters will be attracted; they arrive in 2d6 rounds, description page B42. The Wandering Monsters will come from the Wandering Monster List for level 1 on page B53. You can make your own Wandering Monster list for any level of the underworld, or any area if you so wish. The following is an example of a special Wandering Monster List:
Special Shrieker Wandering Monster List
| D8 Die Roll | Monster |
| 1-4 | Kobolds, refer to Map Keys 22, 17. |
| 5-6 | Fire Beetles, B31 |
| 7 | Cave Locust (1), B33 |
| 8 | Ghoul (1), Chillyfist |
3 Fire Beetles, Armor Class 4, 1+1 Hit Dice, 4, 5, 2 Hit Points, Move 120/40, 1 Bite 2-8, Saving Throw F1, M7, Alignment Neutral
Cave Locust, Armor Class 4, 2 Hit Dice, 10 Hit Points, Move 60/20, Fly 180/60, Jump 60’, Bite 1-2,Bump 1-4, Spit Poison (1 Turn), Saving Throw F2, M5, Alignment Neutral, when frightened or attacked they shriek which 20% per round attracts wandering monsters. Spits attack vs. AC 9 when cornered.
When the Shrieker shrieks and Chillyfist is indicated by the special encounter table the Ghoul will enter Level 1 from the stair Map Key 8 and pass through 7, and 9 in pursuit of otherwise distracted player characters. As Chillyfist is responding to the shriek it makes sense that the Ghoul cannot be surprised.
Chillyfist the Ghoul, Armor Class 2, 1 Hit Dice, 9 Hit Points, Move 90/30, 2 Claws, 1 Bite 1-3, +Paralysis (2-8 Turns), Saving Throw F2, M9, Alignment Chaotic, description page B35. Moves Silently and cannot be heard. Charm and Sleep spells these have no effect on Ghouls. Chillyfist wears a magic Ring of Invisibility which makes the Ghoul invisible granting a 5-in-6 chance of surprising others. Invisible characters cannot be attacked but when Chillyfist attacks the ring can no longer keep the Ghoul invisible for the remainder of the turn in which the Ghoul’s attack occurs. While invisible anything Chillyfist picks up becomes invisible until it is set down. Chillyfist responds to the sound of the disturbed Shrieker at Map Key 10 or is found as a wandering monster on Levels 1 or 2 when Ghouls are indicated. Using the advantage of surprise granted by the Ring of Invisibility, Chillyfist will attack living characters, including monsters, paralyse them and then carry them to the Ghoul’s lair on Level 2, Map Key 4. If Chillyfist fails a morale check the Ghoul will attempt to get away, becoming invisible, and hide in the lair.
The trap is a crushing block. There is a 3-in-6 chance the crushing block will strike when the trap square is stepped on, causing 1d6 points of damage. A character is not pinned by the block but struck. The block prevents movement through the square, blocking the secret door because it does not retract and it is 1d6 turns before the block is withdrawn and the trap reset. The trap switch beside the door, which would ordinarily disable it, is malfunctioning and only works as long as it is held in.
Beside the secret door are two hidden switches, stones in the wall. There is a 1-in-6 chance of spotting them; 2-in-6 if the character is an Elf. There is a peephole in the secret door which allows this room to be spied on from behind the door; refer to Map Key 10. If the switch is not found the door may 2-in-6 be forced open.
There is a half rotten false door in this room which can be removed as if the door was being forced open, 4-in-6. Concealed behind it is a niche in the wall containing a leather case. Inside the leather case is a Spell Scroll upon which are written two first level MU/Elf Spells, Magic Missile, and Shield.
10. Chartreuse Room. The walls and ceiling of this room emit a sickly chartreuse glow and therefore in this dim light no torch is needed. The light is emitted by a strange growth of luminous fungi.
Secret Ref Info: When the chartreuse fungi is touched it wilts temporarily where touched and the dim light is extinguished. Beside the secret door are two hidden switches, stones in the wall covered by fungi. The first switch opens the secret door and the second is meant to disable the crushing block trap in Map Key 10 but it no longer works. Pushing it does nothing. There is a 1-in-6 chance of spotting them; 2-in-6 if the character is an Elf. If the switch is not found the door may 2-in-6 be forced open. There is a peephole in the secret door which allows Map Key 9 to be spied on from behind the door. The glow from the fungi is not bright enough to reveal the peephole to anyone in Map Key 9. We’ll assign a 1-in-6 chance of spotting the peephole; 2-in-6 if the character is an Elf.
11. Mushroom. A narrow path winds through this room from Map Key 10 to 12. The room is also dimly lit by a sickly chartreuse glow similar to Map Key 10. This room is crowded on either side of the path with yellow spotted chartreuse mushrooms that nearly touch the ceiling. They are as hard as wood.
Secret Ref Info: The Shrieker from Map Key 9 will try to hide here among the Fungi. There is a 3-in-6 chance of spotting it but of course it can’t help shrieking if light is brought into this room or it detects movement, refer to Map Key 9 for details, and don’t forget the sound will draw monsters!
Hidden inside one of the mushrooms next to the path is a +1 magic sword. It is concealed in a secret compartment in the bole of the mushroom which can be spotted 1-in-6, 2-in-6 by an Elf. The compartment opens easily when the door in the bole of the mushroom is pushed, there is no switch.
This is the sword which fits in the wall niche in Map Key 17.
12. Burned Room. There were once fungi in this room similar to Map Key 11 but the walls are black and the mushrooms are all charred black from burning. The path from Map Key 11 continues to the wooden door. The wooden door in the west wall is blackened from fire.
Secret Ref Info: Among the wood-like charred remains of the mushrooms is a black iron box which was once concealed in a mushroom. It contains 250 silver coins, and 150 gold coins. This box is hard to spot, 1-in-6 when searching, and it is locked.
13. Soot. There is soot on the floor here from the burned door in Map Key 12.
Secret Ref Info: Stepping into this room launches spring-fired darts: 1-6 darts hit for 1-4 points of damage each. Opening the door resets this trap.
14. Armory. This room is draped with dusty old cobwebs. It was once an armory and there is a wooden rack here on the north wall where seven spears remain, seven shields which are painted with red dragons hang on the west and east walls. There was once armor here as well, as stands for them line the west and east walls. Helmets, also painted red, lay discarded on the floor.
Secret Ref Info: The spears, helmets, and shields, though old, are still perfectly usable. One shield is a +1 Magic Shield but there is nothing visually different about it.
15. Chamber. This room is empty except for some graffiti on the wall which says, “Nothing here”.
Secret Ref Info: Searching this room will reveal a loose flagstone in the Northeast corner of the room. The flagstone will sound hollow if tapped. Under it is a small sack containing 100 silver pieces.
The secret door which permits entry to Map Key 16 can only be opened by a Cleric, it is otherwise Wizard Locked. The switch will only respond to the touch of a Cleric. There is a 1-in-6 chance of spotting the switch that opens this secret door; 2-in-6 if the character is an Elf. There is a peephole in the secret door which allows the corridor, Map Key 15, to be spied on from behind the door. We’ll assign a 1-in-6 chance of spotting the peephole; 2-in-6 if the character is an Elf.
16. Cleric Secret. This room contains shelves of preserves contained in sealed jars and pots which are now spoiled and unfit to eat. It doesn’t look like anyone has been here in a very long time as all the jars and pots are covered in dust. There are three boxes as well which are stacked in the southwest corner. On top of the boxes is a book.
Secret Ref Info: The secret door which permits entry to this room can only be opened by a Cleric, it is otherwise Wizard Locked. The switch will only respond to the touch of a Cleric. There is a 1-in-6 chance of spotting the switch that opens this secret door; 2-in-6 if the character is an Elf. There is a peephole in the secret door which allows the corridor, Map Key 15, to be spied on from behind the door. We’ll assign a 1-in-6 chance of spotting the peephole; 2-in-6 if the character is an Elf.
The book on top of the box is actually a Magic User spell book containing the spells Invisibility, Knock, and Wizard Lock. There is a note tucked into the first page on a bit of parchment which says;
“While lost and running from that invisible thing which hunts us I found this room by chance; a fortunate refuge indeed for it cannot enter. I hear it outside clawing at the door. I will wait for it to lose interest and then I will depart this underworld. I do not know where you are or where you went so I will wait for you at the entrance. I am leaving here what I cannot take with me as it will not do to be slowed from carrying overmuch.”
Of course here by “invisible thing” we are referring to Chillyfist.
The three boxes are filled with straw which protects some glass bottles within. These contain unspoiled root beer and magical potions; two of Healing, one each of Invisibility, and Growth.
17. Cross Room. What purpose this chamber once had is now forgotten and nothing is left which might provide a hint. The Kobold leader, Bark, has posted guards outside the south and east doors to warn of intruders and 8 Kobolds are waiting impatiently for orders.
Secret Ref Info: The Kobold leader, Bark, has planned an ambush and is awaiting news from the guards he\she has posted at Map Key 22.
The plan is that the Kobolds at Map Key 22 move to Map Key 17 and inform Bark (allow one turn for the Kobolds to deliver the message and for Bark to issue instructions) who then divides the pack into two with Bark in the first group, 8 in each group, first group moving through 17 through 20, to 2, and the second group moving from 17 through 19, through 22, to 2. The idea is to ambush the Player Characters from two directions at or near Map Key 2. The Kobolds know all about the secret door at Map Key 2. Remember that Monsters can open any door.
There are two half rotten false doors in this room which can be removed as if the door was being forced open, 4-in-6. Concealed behind the western door is a niche in the wall containing a lever switch that opens the northern secret door. Behind the northern false door is a sword shaped niche which is empty. It once contained a magic sword. There is a secret door in the north wall which has a peephole that may be spotted 1-in-6 if there is light in this room 4-in-6 if the room is dark due to the faint glow from the candle showing in the peephole. There is no visible means of opening the secret door, nor may it be forced open except by magic. There is no x-in-6 chance of opening this door.
There are 10 Kobolds at Map Key 17. One, Growl, stands guard watching outside of room 22 in the eastern corridor at the bend looking North. There is another guard, Wag, posted at the door to the south corridor of Map Key 17. The remaining 8 Kobolds are inside the room, Map Key 17. Just for fun we’ll name them too; Bark (their leader), Yowl, Pant, Drool, Fearbite, Scruf, Limp, and Snort.
Kobolds: Armor Class 7, 1/2 Hit Dice, 4 (Bark), 2, 4, 3, 3, 4, 3, 2 Hit Points, Move 60/20, Saving Throw Normal Man, M6, Alignment Chaotic, Moldvay page B37.
18. Storage. This room is empty.
Secret Ref Info: Nothing to see here, unless you are a Magic-User, in which case you can see in the middle of the room a lit red candle floats in mid air illuminating the room. It cannot be touched, it burns but is not consumed, it marks an invisible teleportal to Level 1 Map Key 11. Entering the square transports a character or monster to the southeast corner of Level 3 Map Key 11 whether they can see the candle or not.
19. Storage. This room is empty.
Secret Ref Info: Nothing to see here except that after a Cleric enters the room the message “GET OUT” is drawn in dripping poisonous ichor on the west wall. If touched the ichor causes death in 1d10 Turns or 1d6 damage if a saving throw vs. poison is successful.
20. Covered Pit. There is a trap door here with a chain and padlock. There are wood doors west and east. The entrance to the passage south is blocked by spider webs, they are dusty and no longer sticky.
Secret Ref Info: Under the locked trap door is a shaft descending to Level 3. Its walls are damp. Once the shaft is opened a pungent odour of fungi and damp rises from below. There are iron rungs in the east shaft wall which descend into the darkness. 10’ below a leather sack is tied to the rungs and it contains 100 silver pieces.
On the walls of the shaft 4 Crab Spiders cling, concealed by their chameleon like camouflage, they have changed their colour to match the shaft wall. 4 Crab Spiders, Armor Class 7, 2 Hit Dice, 3, 10, 5, 11, Hit Points, Move 120/40, Bite 1-8 damage +poison (+2 Saving Throw, fail and character dies in 1d4 turns), Save F:1, M7, Alignment Neutral, monster description page B43.
Note – Save or Die results from poison are very harsh and can end the game pretty quickly for a player. You can customise the rules! You can house rule to avoid a game-ending-death:
- The poison of the Crab Spider is causes additional damage, Save vs. Poison, 1d8, a successful save causes only 1/2 damage, or nothing.
- The bite of the Crab Spider causes 1-4 turns of paralysation, Save vs. Paralysation;
- The bite of the Crab Spider causes Sleep, like the spell of the same name.
21. The Closet. This room might be best described as a closet. It stinks for there is a pile of dung here. At the end of the closet a lit red candle floats in mid air illuminating the closet.
Secret Ref Info: The secret door contains a peephole which is not easily detectable from the other side, Map Key 17. There is a pile of dung here behind the door, it is Ghoul dung. Grant characters a 1-in-6 chance of identifying what it is. The players may infer there is a Ghoul somewhere in this underworld.
At the end of the closet is a lit red candle floating in mid air, it cannot be touched, it burns but is not consumed, it marks an invisible teleportal to Level 3 Map Key 9. Entering the northernmost square transports a character or monster to Level 3 Map Key 9.
Note – It might be interesting to have the candle burn down as it is used a certain number of times. This would limit the number of times the teleportal could be used.
22. Guard Room. This oddly shaped room once served as a guard post but little remains now except for some empty stacked wooden boxes. They are sturdy enough that Halflings and Dwarfs can stand on them but the weight of Elves and Humans cause them to break. Little toadstools have begun to grow on them.
Secret Ref Info: Beside the south secret door is a hidden switch, a stone which is slightly more worn than the others. There is a 3-in-6 chance of spotting it; 4-in-6 if the character is an Elf. There is a peephole in the door which allows Map Key 2 to be spied on from behind the door. If the switch is not found the door may 2-in-6 be forced open.
There are four Kobolds here taking turns as watchmen spying on Map Key 2 so they will not be surprised by Player Characters there. They are as short as Dwarfs and so they have found a box from the guardroom to stand on which allows them to use the peephole. The moment they see light at Map Key 2, or detect movement with their infravision, they will depart and report to their leader at Map Key 17. The route they take is from 22, through 19, taking the corridor south to 17. This trip takes 2 turns because Kobolds move 60’ per turn. Should combat begin the Kobolds move 20’ per melee round. Refer to Map Key 17. for what the Kobolds do after they inform their leader about intruders.
Kobolds: Armor Class 7, 1/2 Hit Dice, 3, 2, 4, 3 Hit Points, Move 60/20, Saving Throw Normal Man, M6, Alignment Chaotic, Moldvay page B37.
The four Kobolds at Map Key 22 will, in view of their self interest, think better of a fight with the player characters until they can re-join their “pack”. Even though their behaviour is Chaotic, their individual survival depends on the the pack which greatly outnumbers the player characters.
Should the Kobolds hear the shrieker at Map Key 9 they will inform Bark at Map Key 17 and then the Kobolds march to Map Key 9, this takes 10 Turns via 17, 20, 2, 7, 9.
23. Closet. Oops! There was no Map Key 23. We can add this key to the map, near Map Key 8. This closet is empty.
Secret Ref Info: Whichever secret door is used this appears to be a closet with a dead end. There is a 1-in-6 chance of spotting the switches that open the secret doors; 2-in-6 if the character is an Elf. There is a peephole in the southern secret door which allows the corridor, Map Key 8, to be spied on from behind the door. We’ll assign a 1-in-6 chance of spotting the peephole; 2-in-6 if the character is an Elf.
24. Slope. There is a sloping passage here. A column of ancient soldiers two abreast stand here, skeletons in rags and rusted armor, they point spears in your direction and attack!
Secret Ref Info: 8 Skeletons, Armor Class 7, 1 Hit Dice, 6, 5, 5, 1, 2, 5, 6, 4 Hit Points, Move 60/20, Spear 1-6 damage, Save F:1, M12, Alignment Chaotic, not affected by sleep or charm spells, these undead can be turned by a cleric, they attack until destroyed, monster description pageB42.
In the Following Articles
In the next articles we’ll take what we have learned from constructing Level 1 and begin Level 2. We have some interesting thematic suggestions building, Chillyfist the Ghoul, the Acolytes of Pestilence, and some Skeletons which have been animated by some Cleric or Magic-user and placed as protectors of Level 2’s secrets. As we continue it may be that Level 2 Map Keys will cause amendments to Level 1. We’ll also give a little thought to a theatre-of-the-mind frontier Inn as a refuge for the players between game sessions and this will be a stepping stone to building a wilderness setting. Until next time!
Previous Article – Next Article